Disclaimer: this blog post is just a port of Adrian’s tutorial at pyimagesearch where he shows how to track a ball using Python and OpenCV. I only changed a few things here and there and rewrote it using Go and GoCV. So all the credit should go to him
I always prefer to start by showing what you’ll get if you stick to the end, so here it goes:
![]()
Hooked? Awesome.
Here are the two main sections of this post:
- Find the range of pixel values of an object in the HSV color space.
- Detect the presence of that object using thresholding techniques and track its movements
Range of values in the HSV color space
The HSV(hue, saturation, value) color space is a different way of representing colors:
- hue: this channel models the color type, this makes it useful for image processing tasks where we need to process objects based on its color.
- saturation: represents the different shades of gray or if it’s fully saturated, meaning there is no white component.
- value: describes the intensity or brightness of the color.
Here is an image showing the HSV cylinder:

Lets write a program that will allow us to determine the range of pixel values of our object, these values will be necessary to track it later. Create a new folder somewhere and add a main.go file there with the following:
package main

import (
	"gocv.io/x/gocv"
)

func main() {
	wi := gocv.NewWindow("normal")
	wt := gocv.NewWindow("threshold")
	wt.ResizeWindow(600, 600)
	wt.MoveWindow(0, 0)
	wi.MoveWindow(600, 0)
	wi.ResizeWindow(600, 600)

	lh := wi.CreateTrackbar("Low H", 360/2)
	hh := wi.CreateTrackbar("High H", 255)
	ls := wi.CreateTrackbar("Low S", 255)
	hs := wi.CreateTrackbar("High S", 255)
	lv := wi.CreateTrackbar("Low V", 255)
	hv := wi.CreateTrackbar("High V", 255)

	video, _ := gocv.OpenVideoCapture(0)
	img := gocv.NewMat()

	for {
		video.Read(&img)
		gocv.CvtColor(img, &img, gocv.ColorBGRToHSV)
		thresholded := gocv.NewMat()
		gocv.InRangeWithScalar(img,
			gocv.Scalar{Val1: getPosFloat(lh), Val2: getPosFloat(ls), Val3: getPosFloat(lv)},
			gocv.Scalar{Val1: getPosFloat(hh), Val2: getPosFloat(hs), Val3: getPosFloat(hv)},
			&thresholded)

		wi.IMShow(img)
		wt.IMShow(thresholded)
		if wi.WaitKey(1) == 27 || wt.WaitKey(1) == 27 {
			break
		}
	}
}

func getPosFloat(t *gocv.Trackbar) float64 {
	return float64(t.GetPos())
}
In the first 6 lines of the main function we create two different windows, one for our normal images and one for our filtered images. We also resize them so that they show up side by side.
After that we create 6 different trackbars. These trackbars will allow you to control the high and low pixel values of each component of the HSV color space. You are going to need to play around with those bars in order to determine the true values of your object.
Now for the important part. Each new frame we read inside the for loop gets converted to HSV using the CvtColor function. Once we have that we want to apply pixel-thresholding to our image using the InRangeWithScalar function. This function will leave us with a binary image where only the pixels that are in the ranges specified by the trackbars will be displayed.
Finally we simply display both images.
To run this program be sure that your camera is in fact identified by the 0 index, if not then change that number to the one appropriate to your setup.
If all went well the following two windows should appear:
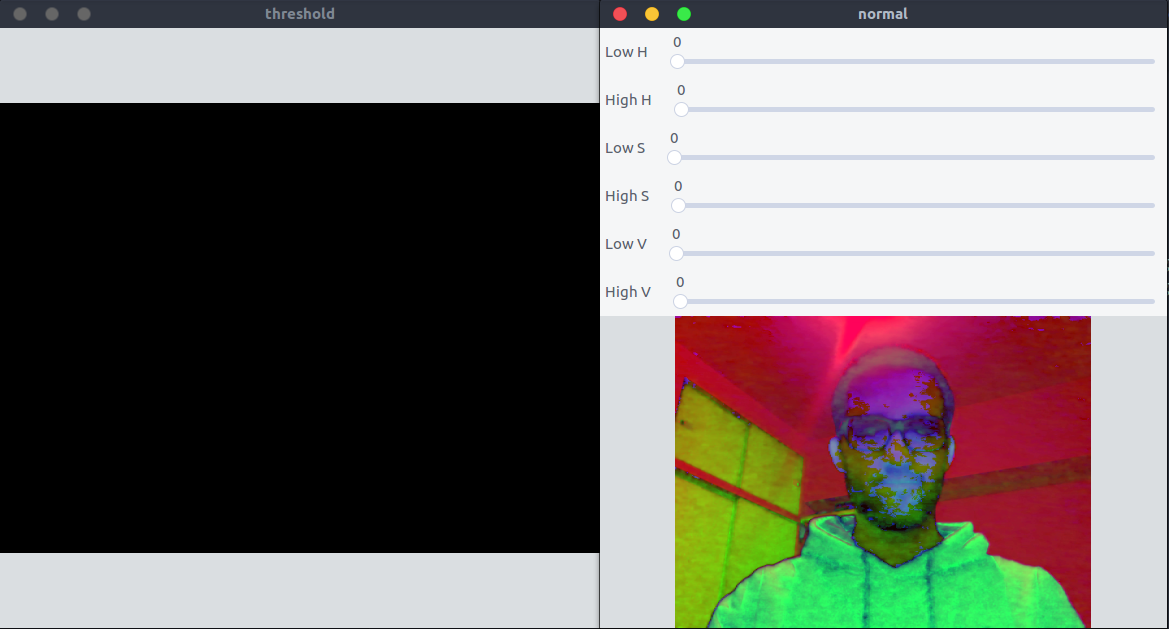
Now it’s time to start playing around with those 6 trackbars you can see there. Each one of them modifies the high and low value of each of the three HSV components. Note that the values required to find the object you want will vary depending on the lighting of the room and the camera you are using.
Lets show an example of the values I needed to set in order to find the hoodie I was wearing:
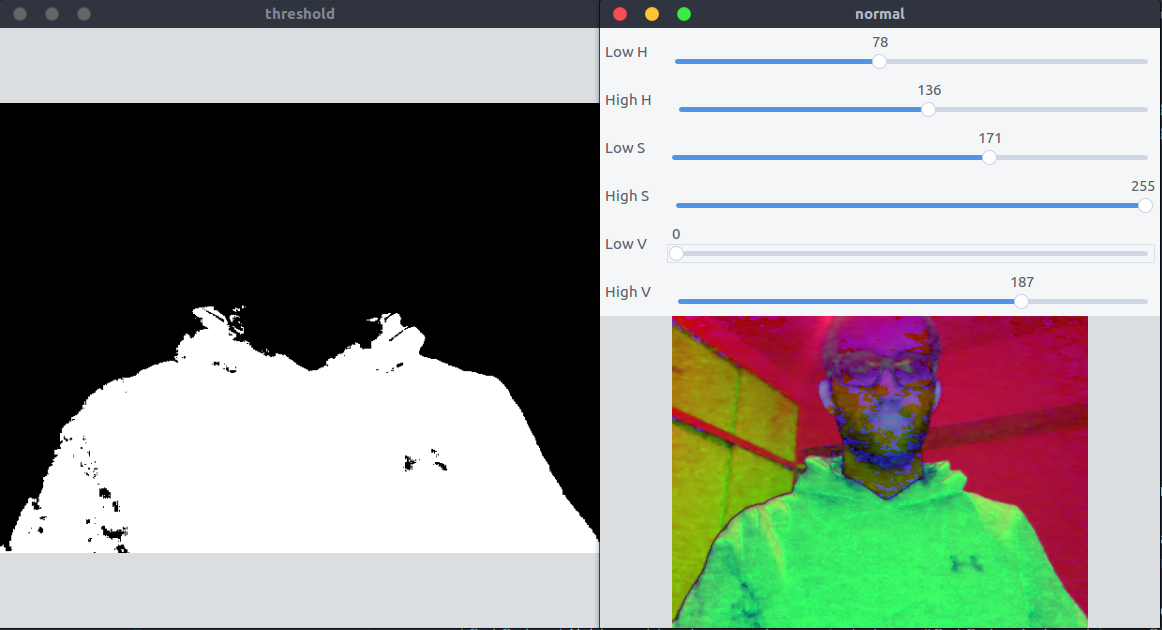
Once you have those values make sure to write them down since you’ll need them for the next part.
Detect and track the object
In order to draw that red line you saw on the video we are going to need to implement a new structure. If you pay close attention you’ll see that the line fades away after a fixed number of points have been drawn. So, in order to only draw the points that we care about we are going to build our own queue that discards old elements when the buffer gets full:
package queue

import "image"

// Queue is a fixed-size queue that discards old
// elements once it reached the maximum size.
type Queue struct {
	data []image.Point
	size int
}

// New creates a new Queue with the specified size.
func New(size uint) *Queue {
	return &Queue{
		data: []image.Point{},
		size: int(size),
	}
}

// Clear clears all elements in the queue.
func (q *Queue) Clear() {
	q.data = []image.Point{}
}

// Push pushes a new element into the queue.
func (q *Queue) Push(p image.Point) {
	if len(q.data) == q.size {
		q.data = q.data[1 : q.size-1]
	}
	q.data = append(q.data, p)
}

// Range iterates over the elements of the queue
// calling f for each element.
func (q *Queue) Range(f func(p image.Point)) {
	for _, p := range q.data {
		f(p)
	}
}

// RangePrevious iterates over the elements of the queue
// calling f for each pair of previous-current elements.
func (q *Queue) RangePrevious(f func(current image.Point, previous image.Point)) {
	for i := 1; i < len(q.data); i++ {
		f(q.data[i], q.data[i-1])
	}
}
The basic idea of this structure is to basically provide a way to push data into the queue discarding old elements once we reach the maximum size we specified. It also provides the RangePrevious function that allows the user of the queue to range over the data using both the current item and the previous item, you’ll see in a bit why we need this. You can find this package here.
Time to actually track the object. Open up a new main.go file and we’ll start by initializing the basic data structures we’ll need:
package main

import (
	"image"
	"image/color"

	"github.com/matipan/computer-vision/queue"
	"gocv.io/x/gocv"
)

var (
	lhsv = gocv.Scalar{Val1: 49, Val2: 89, Val3: 0}
	hhsv = gocv.Scalar{Val1: 109, Val2: 255, Val3: 255}

	size = image.Point{X: 600, Y: 600}

	wt   = gocv.NewWindow("thersholded")
	wi   = gocv.NewWindow("images")
	img  = gocv.NewMat()
	mask = gocv.NewMat()
	frame = gocv.NewMat()
	hsv = gocv.NewMat()
	kernel = gocv.NewMat()
)

func main() {
	defer close()

	wt.ResizeWindow(600, 600)
	wt.MoveWindow(0, 0)
	wi.MoveWindow(600, 0)
	wi.ResizeWindow(600, 600)

	video, _ := gocv.OpenVideoCapture(0)
	defer video.Close()

	queue := queue.New(40)

	for {
		video.Read(&img)
		if imShow() {
			break
		}
	}
}

func imShow() bool {
	wi.IMShow(img)
	wt.IMShow(mask)
	return wi.WaitKey(1) == 27 || wt.WaitKey(1) == 27
}

func close() {
	defer img.Close()
	defer mask.Close()
	defer frame.Close()
	defer hsv.Close()
	defer kernel.Close()
	defer wi.Close()
	defer wt.Close()
}
Lets start from the beginning. First, we are defining the low and high pixel values of our object in the HSV color space:
lhsv = gocv.Scalar{Val1: 49, Val2: 89, Val3: 0}
hhsv = gocv.Scalar{Val1: 109, Val2: 255, Val3: 255}
Modify those values to match the ones you found before. lhsv represents the low values and hhsv represents the high values. Val1, Val2 and Val3 represent each HSV component in order.
Next we initialize all the Mats we are going to need to apply our filters and the windows we’ll use to display the images.
We also initialized our queue with a size of 40. This means that the maximum length of our line will be 40. If you want a bigger line simply increase that number. Finally, we read new frames from our webcam and display them using our convenience imShow function. If you want to quit the program you can hit escape at any time. Note that this program wont compile since we have not used our queue yet.
To each new frame we read we need to apply a few filters before we can find our object:
gocv.Flip(img, &img, 1)
gocv.Resize(img, &img, size, 0, 0, gocv.InterpolationLinear)
gocv.GaussianBlur(img, &frame, image.Point{X: 21, Y: 21}, 0, 0, gocv.BorderReflect101)
gocv.CvtColor(frame, &hsv, gocv.ColorBGRToHSV)
Flip flips the image vertically, this is not necessary but I think it looks better. After that we Resize our image, apply a Gaussian filter to blur the image and convert its color to HSV with CvtColor.
Now that our image is filtered we can look for our object:
gocv.InRangeWithScalar(hsv, lhsv, hhsv, &mask)
gocv.Erode(mask, &mask, kernel)
gocv.Dilate(mask, &mask, kernel)
cnt := bestContour(mask, 2000)
InRangeWithScalar finds all pixels in our image that are between the range of pixel values defined by lhsv and hhsv. After that we perform an Erosion and Dilation to expand the pixels that were in that range. Finally we find the biggest contour in our image. If you read my previous blog post you’ll be familiar with the bestContour function. But in case you didn’t here it is:
// bestContour obtains the biggest contour in the frame(provided is bigger)
// than the minArea.
func bestContour(frame gocv.Mat, minArea float64) []image.Point {
	cnts := gocv.FindContours(frame, gocv.RetrievalExternal, gocv.ChainApproxSimple)
	var (
		bestCnt  []image.Point
		bestArea = minArea
	)
	for _, cnt := range cnts {
		if area := gocv.ContourArea(cnt); area > bestArea {
			bestArea = area
			bestCnt = cnt
		}
	}
	return bestCnt
}
This function will return the biggest contour found in the image as long as the area of that contour is bigger than minArea.
Once we have our contour we can draw the rectangle around it, this can be done easily with BoundingRect and Rectangle:
rect := gocv.BoundingRect(cnt)
gocv.Rectangle(&img, rect, color.RGBA{G: 255}, 2)
To draw the line that follows the movement of the object we first need to get the center of the rectangle:
// middle calculates the middle x and y of a rectangle.
func middle(rect image.Rectangle) (x int, y int) {
	return (rect.Max.X-rect.Min.X)/2 + rect.Min.X, (rect.Max.Y-rect.Min.Y)/2 + rect.Min.Y
}
Finally we are going to use our queue to push the center coordinates of the rectangle, range over all the elements of the queue and display the connection between each of the points using the Line function:
rect := gocv.BoundingRect(cnt)
gocv.Rectangle(&img, rect, color.RGBA{G: 255}, 2)
x, y := middle(rect)
queue.Push(image.Point{X: x, Y: y})
queue.RangePrevious(func(c image.Point, p image.Point) {
	gocv.Line(&img, p, c, color.RGBA{R: 255}, 2)
})
Lets put everything together now:
package main

import (
	"image"
	"image/color"

	"github.com/matipan/computer-vision/queue"
	"gocv.io/x/gocv"
)

var (
	rcolor = color.RGBA{G: 255, A: 255}
	lcolor = color.RGBA{R: 255, A: 255}

	lhsv = gocv.Scalar{Val1: 49, Val2: 89, Val3: 0}
	hhsv = gocv.Scalar{Val1: 109, Val2: 255, Val3: 255}

	size = image.Point{X: 600, Y: 600}
	blur = image.Point{X: 11, Y: 11}

	wt     = gocv.NewWindow("thersholded")
	wi     = gocv.NewWindow("images")
	img    = gocv.NewMat()
	mask   = gocv.NewMat()
	frame  = gocv.NewMat()
	hsv    = gocv.NewMat()
	kernel = gocv.NewMat()
)

func main() {
	defer close()

	wt.ResizeWindow(600, 600)
	wt.MoveWindow(0, 0)
	wi.MoveWindow(600, 0)
	wi.ResizeWindow(600, 600)

	video, _ := gocv.OpenVideoCapture(0)
	defer video.Close()

	queue := queue.New(40)

	for {
		if !video.Read(&img) {
			break
		}

		gocv.Flip(img, &img, 1)
		gocv.Resize(img, &img, size, 0, 0, gocv.InterpolationLinear)
		gocv.GaussianBlur(img, &frame, blur, 0, 0, gocv.BorderReflect101)
		gocv.CvtColor(frame, &hsv, gocv.ColorBGRToHSV)
		gocv.InRangeWithScalar(hsv, lhsv, hhsv, &mask)
		gocv.Erode(mask, &mask, kernel)
		gocv.Dilate(mask, &mask, kernel)
		cnt := bestContour(mask, 2000)
		if len(cnt) == 0 {
			queue.Clear()
			if imShow() {
				break
			}
			continue
		}

		rect := gocv.BoundingRect(cnt)
		gocv.Rectangle(&img, rect, rcolor, 2)
		x, y := middle(rect)
		queue.Push(image.Point{X: x, Y: y})
		queue.RangePrevious(func(c image.Point, p image.Point) {
			gocv.Line(&img, p, c, lcolor, 2)
		})

		if imShow() {
			break
		}
	}
}

func imShow() bool {
	wi.IMShow(img)
	wt.IMShow(mask)
	return wi.WaitKey(1) == 27 || wt.WaitKey(1) == 27
}

// bestContour obtains the biggest contour in the frame(provided is bigger)
// than the minArea.
func bestContour(frame gocv.Mat, minArea float64) []image.Point {
	cnts := gocv.FindContours(frame, gocv.RetrievalExternal, gocv.ChainApproxSimple)
	var (
		bestCnt  []image.Point
		bestArea = minArea
	)
	for _, cnt := range cnts {
		if area := gocv.ContourArea(cnt); area > bestArea {
			bestArea = area
			bestCnt = cnt
		}
	}
	return bestCnt
}

// middle calculates the middle x and y of a rectangle.
func middle(rect image.Rectangle) (x int, y int) {
	return (rect.Max.X-rect.Min.X)/2 + rect.Min.X, (rect.Max.Y-rect.Min.Y)/2 + rect.Min.Y
}

func close() {
	defer wi.Close()
	defer wt.Close()
	defer img.Close()
	defer mask.Close()
	defer frame.Close()
	defer hsv.Close()
	defer kernel.Close()
}
Remember to set your own values for lhsv and hhsv.
If all went well after you run this program and start moving the object you’ll see something similar to this:
![]()
YAS! High five yourself!!

Conclusion
In this blog post we tweaked a bit Adrian’s ball tracking blog post to use the functions that we have available in GoCV. If you follow his blog post you’ll see that he used a function called minEnclosingCircle. This function allows you to get a circle around your contour that you can then draw on the image. The problem is that GoCV has not that implemented that function yet, although they have it on their Roadmap. This is why I decided to simply draw a rectangle but still do the fun part(at least for me) of drawing the line that follows the object.
Hope you enjoyed this and thanks for reading! Until next time!