In this post I will show step by step how to create a Kubernetes cluster on DigitalOcean and then deploy Gogs to the cluster using a set of tools that automate all this.
Creating the Cluster
Choosing the Cloud Provider
I chose DigitalOcean as the cloud provider since it’s the cheapest I could find and it has worked really well for me in the past, plus I was already familiar with a few of their products. You could follow this tutorial using a different provider but there will be a few differences when configuring the persistent volumes for gogs.
Go ahead and create an account there if you don’t already have one. Note that they will request you to register a valid credit or debit card but they won’t charge you anything as long as you destroy the cluster once you are done with this post but if you leave it running it won’t cost more than 30 USD per month.
StackPointCloud
StackPointCloud is a web application that allows us to create a Kubernetes cluster on many different cloud provider with no more than a few clicks. The cluster they deploy also comes with a few nice things already configured such as Helm and the Kubernetes Dashboard.
If you really want to learn what it’s like to setup a cluster on your own you could use Ansible to automate the installation of kubernetes on the machines and then configure helm, the dashboard and coreDNS but it will take much more than just a few clicks. If you feel like it you can follow this tutorial, it took a while for me to get it working since I was not familiar with any of the tools mentioned there but it was really fun.
After you created an account on StackPointCloud click on the Create cluster link and select DigitalOcean as provider. After that a window looking like this will be opened:
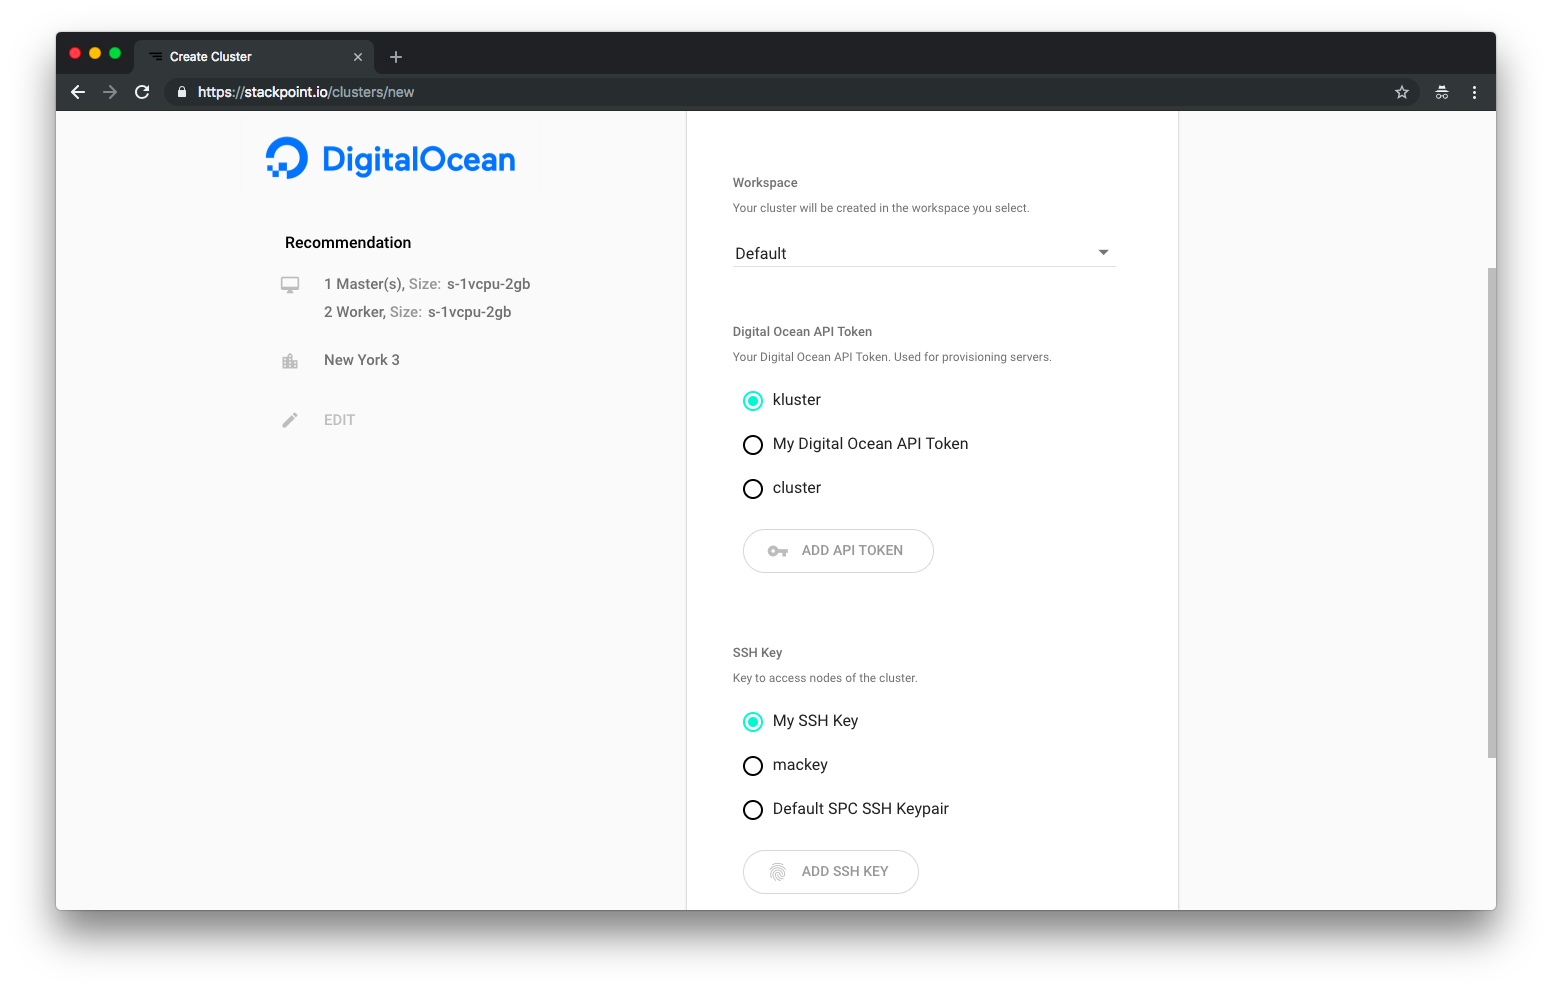
On the left you see all the information of cluster that it’s being created. By default StackPoint recommends 1 master and 2 workers, all using coreOS with 2GB of RAM and 50GB of storage in the NYC3 region. If you want you could edit the cluster details by clicking edit and modifying the fields there:
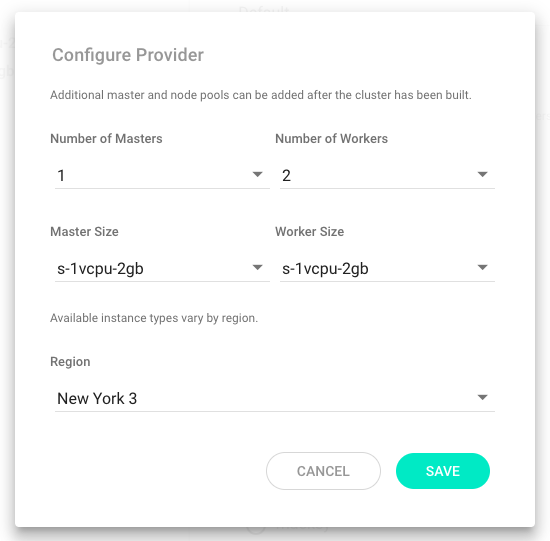
I’m going to leave it as is since it is a good and simple configuration for this use case.
You need to create a DigitalOcean API token and provide it to StackPoint so that they can provision the droplets and configure everything. Head over to DigitalOcean’s cloud console and create a new personal access token by clicking on the Generate New Token link:
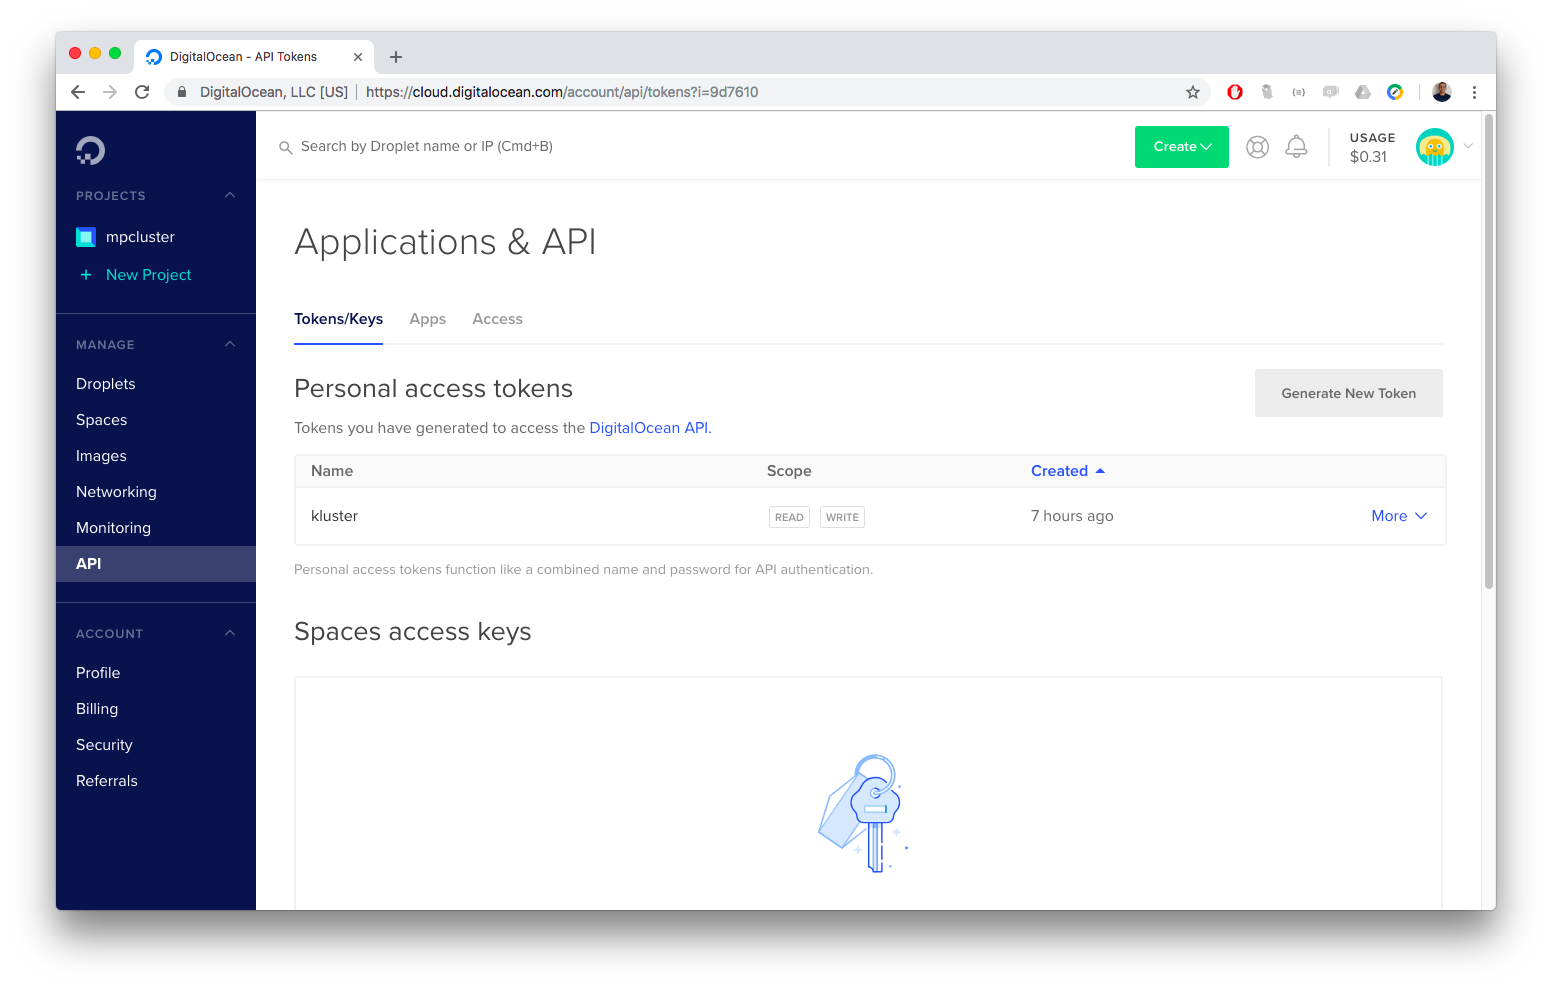
Once you generated your token copy it over to the StackPoint configuration. Next you will generate an SSH key(or use an existing one) on your machine and add it to StackPoint.
Now you are ready to hit create and wait since it takes a while for all droplets to be provisioned and configured. Once you are done you should see the info of the cluster and it should look somewhat like this:
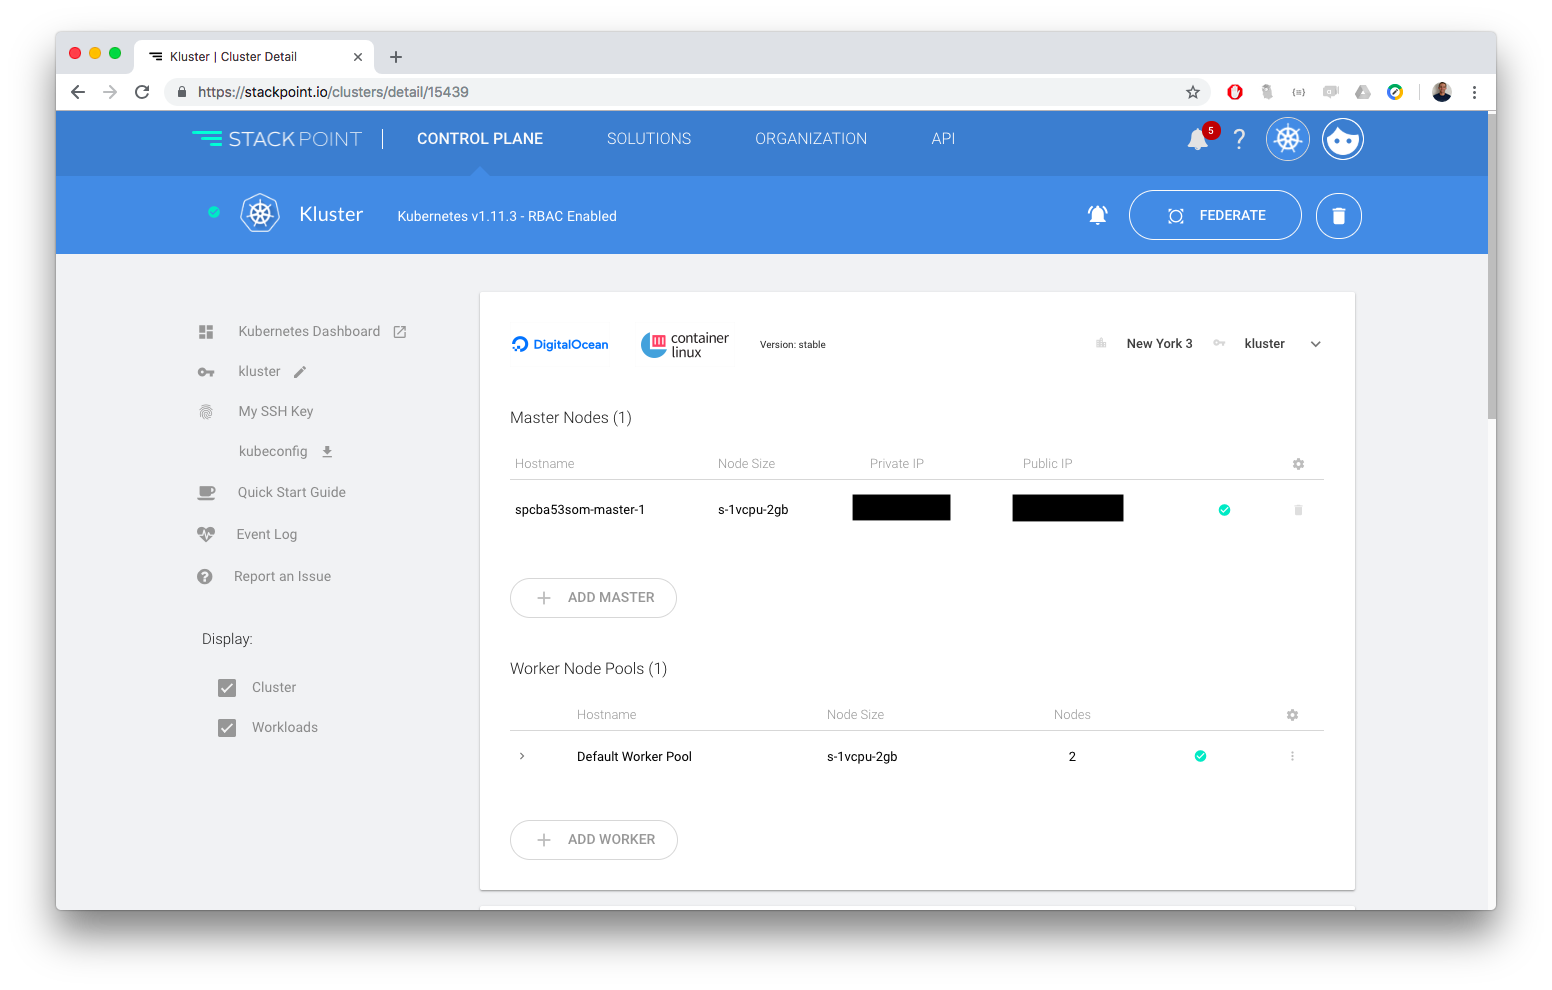
Thats it!! You just created a 3 node kubernetes cluster, it really was no more than a few clicks!
We are almost done with the cluster setup. Now you need to configure your local kubectl installation to point to the recently created cluster(if have not installed kubectl yet follow this tutorial). In the StackPoint cluster page previously showed you’ll see a link on the left that says kubeconf, download that file and copy its contents to ~/.kube/config. To check if it was properly configured run kubectl cluster-info and the output should look similar to this:
Kubernetes master is running at https://<MASTER IP>:<MASTER PORT>
Heapster is running at https://<MASTER IP>:<MASTER PORT>/api/v1/namespaces/kube-system/services/heapster/proxy
KubeDNS is running at https://<MASTER IP>:<MASTER PORT>/api/v1/namespaces/kube-system/services/kube-dns:dns/proxy

To further debug and diagnose cluster problems, use 'kubectl cluster-info dump'.
Installing Gogs
Gogs is a lightweight git server that can deployed very easily since it does not have many dependencies and features like Gitlab CE.
To install Gogs on our cluster we are going to be using Helm so if you don’t already have it installed and configured follow this tutorial. After that you need to add the incubator repo since that is where the gogs chart lives:
helm repo add incubator https://kubernetes-charts-incubator.storage.googleapis.com/
Since we are going to change a lot of the default values that come with the gogs chart you need to clone the charts repository:
git clone https://github.com/helm/charts.git
Inside the charts repo you will have the folder incubator that holds the gogs chart. In there you’ll find the values.yml file that is used when installing gogs, this file would be good for local installations but since we are installing this on a cloud provider we are going to have to change a few things.
This is the resulting values.yml, below I’ll explain what I have changed and which properties you need to configure:
serviceType: LoadBalancer
replicaCount: 2
image:
  repository: gogs/gogs
  tag: 0.11.29
  pullPolicy: IfNotPresent
service:
  httpPort: 80
  sshPort: 22
  sshDomain: CHANGEME
  gogs:
    appName: 'Some name'
    runMode: 'prod'
    forcePrivate: true
    disableHttpGit: false
    repositoryUploadEnabled: true
    repositoryUploadAllowedTypes:
    repositoryUploadMaxFileSize: 50
    repositoryUploadMaxFiles: 5
    serviceEnableCaptcha: false
    serviceRegisterEmailConfirm: false
    serviceDisableRegistration: false
    serviceRequireSignInView: true
    serviceEnableNotifyMail: false
    cacheAdapter: memory
    cacheInterval: 60
    cacheHost:
    serverDomain: CHANGEME
    serverRootUrl: http://CHANGEME
    serverLandingPage: home
    databaseType: postgres
    databaseHost:
    databaseUser:
    databasePassword:
    databaseName:
    webhookQueueLength: 1000
    webhookDeliverTimeout: 5
    webhookSkipTlsVerify: true
    webhookPagingNum: 10
    logMode: console
    logLevel: Trace
    otherShowFooterBranding: false
    otherShowFooterVersion: true
    otherShowFooterTemplateLoadTime: true
    securitySecretKey: "changeme"
    uiExplorePagingNum: 20
    uiIssuePagingNum: 10
    uiFeedMaxCommitNum: 5
  ingress:
    enabled: false
persistence:
  enabled: true
  storageClass: "do-block-storage"
  accessMode: ReadWriteOnce
  size: 20Gi
postgresql:
  install: true
  postgresUser: gogs
  postgresPassword: gogs
  postgresDatabase: gogs
  persistence:
    enabled: true
    storageClass: "do-block-storage"
    size: 5Gi
Ok, that’s a big file and lots of configs. I’m not going to go over each value and explain what it means(I don’t even know), but lucky for you the default values.yml has a lot of comments that explain quite well each config.
This are the fields that were changed and the ones you need to setup:
serviceType: previously it was setup as NodePort which is fine for local setups but since we are running in the cloud we need to specify it as a LoadBalancer.replicaCount: it was changed from 1 to 2 so that I always have two instances running.sshDomain: this will be the domain used whengogsrenders the SSH urls for clones, if you plan to setup a domain name on top of this you can use that, if not then set whatever you’d like since this doesn’t affect the functionality ofgogsit’s just that the UI will be lying to you saying to clone it asgit clone git@localhost:user/repo.gitor something like that.forcePrivate: set to true so that by default the UI checks theprivatecheckmark when creating a new repository.repositoryUploadMaxFileSize: set to 50(in MB) so that the maximum file size that can be uploaded is of 50MB.serverDomain: the domain of gogs, same as with SSH. Use your domain name.serverRotUrl: basicalyhttporhttpsplus theserverDomain.storageClass: this is under the persistence section, you need to specify thestorageClassused for persistent volumes, if you were using DigitalOcean then leave it withdo-block-storage. Otherwise check your storage class withkubectl get storageClassand use that value.storageClass: this is the one found under the postgresql section and you should put the same value as before.
Now that all the configurations are in place we can use helm to install gogs on our cluster. Inside the charts repo you recently cloned execute the following command:
helm install --name gogs -f incubator/gogs/values.yaml incubator/gogs
This magic command will install and configure all the pods, services, deployments and load balancers needed to run 2 replicas of gogs.
It will take a while before gogs is able to be used, you can check the status of the installation with the following command:
helm status gogs
In the output of the helm install command you will find a few commands that will also be useful for checking the status of the installation, this one will allow you to know when the IP of the LoadBalancer is ready:
kubectl get svc --namespace {{ .Release.Namespace }} -w {{ template "gogs.fullname" . }}
After it is ready execute the following three commands to find out where exactly is gogs living:
export NODE_PORT=$(kubectl get --namespace {{ .Release.Namespace }} -o jsonpath="{.spec.ports[0].nodePort}" services {{ template "gogs.fullname" . }})
export NODE_IP=$(kubectl get nodes --namespace {{ .Release.Namespace }} -o jsonpath="{.items[0].status.addresses[0].address}")
echo http://$NODE_IP:$NODE_PORT/
The output of the last command will show you the URL for accessing gogs. Head over to that URL and register a user, this user will be the admin of the application.
Conclusion
Congrats!!! You just created your own scalable git server running on a kubernetes cluster, it’s amazing how the tools we have available have reduced the complexity of things such as automated deployment, scalability and availability.