Exploring Dagger: Building a CI/CD pipeline for IaC
Dagger is a new tool that promises to fix the yaml and custom scripts mess that CI/CD currently is by building pipelines as code with one of the supported SDKs. I’m in the process of learning this tool, understanding where it may fall short and where it shines and I decided that sharing some of the exploration I do and the learnings it leaves me with would be useful. This is the first post in a series of blog posts that look at Dagger from different perspectives. In this post I do a deep dive on how to build a pipeline for an IaC repository. I explore building this using “native” Github actions, the Dagger client and the newer approach of Dagger modules.
NOTE: Dagger is in very active development so by the time you read this blog post some things might have changed.
Background
We have a repository that holds all of our infrastructure in a declarative way using Pulumi’s Go SDK. Every time we want to provision, change or delete some infrastructure we need to:
- Create a pull request with the necessary changes
- Wait for CI to show what changes will be applied by posting a comment to the PR
- Merge it
- Wait for CI on the main branch to apply those changes to the given environment
This process will utilize two operations pulumi provides:
pulumi preview: show a diff of the changes that would be applied.pulumi up: apply the requested changes.
We are going to build this workflow using Github actions first to understand how the current “status quo” works when it comes to building these types of pipelines. Then, we will build this same solution using Dagger. There is currently two ways of building this with Dagger and we will explore both: i) using the “traditional” dagger client; and ii) using the newer concept of Dagger modules.
Using Github actions
Intro
When you build pipelines with Github actions you have to write a YAML file on .github/workflows that contains the definition of your workflow, where each step can:
- Run specific commands such as
curl. - Refer to existing Actions that are a part of Github’s marketplace. These actions usually either install dependencies on the runner or perform specific actions.
- Refer to a custom action defined within the repository (or an external repo if you are paying for Github).
For example, if we want to run go build on a Go project we would re-use the actions/setup-go function that installs Go in the runner where our command executes and simply call go build:
name: Build
on:
  - pull_request
jobs:
  build:
    name: Build
    runs-on: ubuntu-latest
    steps:
      - uses: actions/checkout@v2
      - uses: actions/setup-go@v3
        with:
          go-version: 'stable'
      - name: Go build
        run: go build
In this case we used the already provided setup-go action. If our tool would not have already been supported, we would have had to build the action ourselve. Refer to this blog post to learn how you would build one.
Building our CI
Our CI process has two separate workflows for:
- Previewing changes: used when a PR is created against
mainto executepulumi previewand show the diff as a comment on the pull request. - Applying changes: used when a commit is pushed to
mainto runpulumi upand apply the desired changes.
In both workflows we will to run a specific pulumi command. To do this we could create a workflow that has a step that installs Pulumi’s CLI and another that calls the command. However, if we browse the Github marketplace we will see that the team behind Pulumi has already built a custom action that allows us to do just that. Our Workflow that reuses this action looks like this:
name: Preview infrastructure changes on Pull Requests
on:
  - pull_request
jobs:
  preview:
    name: Preview
    runs-on: ubuntu-latest
    steps:
      - uses: actions/checkout@v2
      - uses: actions/setup-go@v3
        with:
          go-version: 'stable'
      - name: Configure AWS Credentials
        uses: aws-actions/configure-aws-credentials@v1
        with:
          aws-access-key-id: ${{ secrets.AWS_ACCESS_KEY_ID }}
          aws-region: ${{ secrets.AWS_REGION }}
          aws-secret-access-key: ${{ secrets.AWS_SECRET_ACCESS_KEY }}
      - run: go mod download
      - uses: pulumi/actions@v3
        with:
          command: preview
          stack-name: org-name/stack-name
          comment-on-pr: true
          github-token: ${{ secrets.GITHUB_TOKEN }}
        env:
          PULUMI_ACCESS_TOKEN: ${{ secrets.PULUMI_ACCESS_TOKEN }}
In this workflow we are: i) setting up Go since pulumi requires Go to be installed; ii) setting up AWS’s credentials required by Pulumi; iii) use Pulumi’s action to run the command. As you can see, using Pulumi’s action allowed us to solve two problems at once:
- Run the
pulumi previewcommand by settingcommand: previewand - post a PR Comment with the diff the preview generated.
The up workflow would be very similar to this one with the small change of removing comment-on-pr.
Thoughts
Given the simplicity of this workflow I don’t have much to complain about. The two things I personally did not like where:
- Developing it: seems like a shallow complaint, but I personally do not like the “development experience” that YAML gives you. Understanding which parameters the action accepted required me to look at a README on the action’s repo and one trial and error.
- Testing: it is not easy to validate this workflows locally. You could use a custom tool such as act but it does not offer a good DX and it is often quite heavy.
It is true that as the CI process evolves and gets more complicated this two things become more problematic. But for this simple use case it was not too bad.
Using the Dagger client
Intro
To build a CI process using Dagger’s client you first have to choose from one of the available SDKs. We’ll use Go since our Pulumi infra is using it already. The first thing we’ll do is create a folder called ci and write a little main.go file that uses Dagger’s SDK to communicate with the Dagger engine to print a hello world:
package main

import (
	"context"
	"log"

	"dagger.io/dagger"
)

func main() {
	ctx := context.Background()
	client, err := dagger.Connect(ctx)
	if err != nil {
		log.Fatal(err)
	}

	client.Container().
		From("alpine:latest").
		WithExec([]string{"echo", "hello world"}).
		Stdout(ctx)
}
We can run this with go run or with Dagger’s CLI that shows us a detailed output of what is happening:
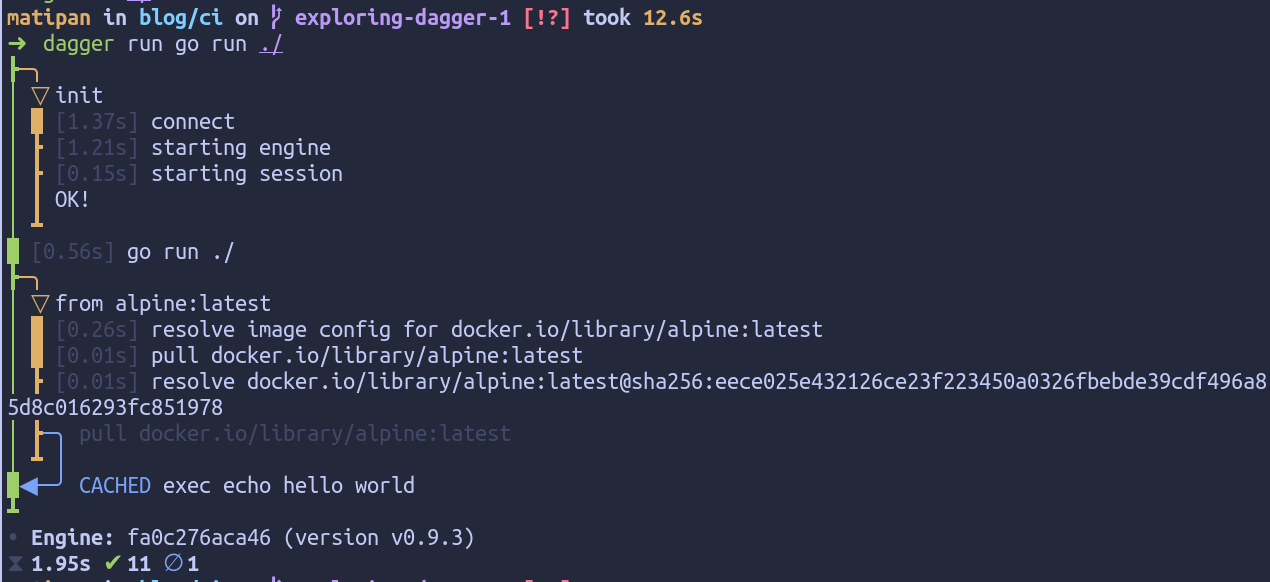
Internally the Dagger engine is leveraging BuildKit to perform all the operations we ask for. This means that this code we wrote will on any machine and produce the same result. You could use this SDK to replace Dockerfiles entirely but for now we’ll focus on our IaC pipeline.
Building our CI
Let’s start by writing the Dagger program. Now, given that we need to support two operations (and both need the same flag) we need this program to manage arguments and execute different code based on those. Let’s rewrite our main.go to support that:
// ...
var stack = flag.Parse("stack", "prod", "pulumi stack to use")

func main() {
	flag.Parse()

	// ...

	if len(os.Args) == 0 {
		log.Fatal("specify an operation. Possible values: preview,up")
	}

	switch os.Args[1] {
	case "preview":
		// Run `pulumi preview --stack <stack>`
	case "up":
		// Run `pulumi up --stack <stack>`
	}
}
As we saw previously, all we need to do is execute pulumi preview and post the result of it to Github. Since Dagger is containers all the way we can re-use existing images that have the dependencies we need. In this case all we need is pulumi, so we’ll use the official image to build a Container that has the necessary go dependencies, code and secrets to run commands:
func baseContainer(client *dagger.Client) *dagger.Container {
	pulumiToken := client.SetSecret("pulumi_token", os.Getenv("PULUMI_ACCESS_TOKEN"))
	awsAccessKey := client.SetSecret("aws_access_key", os.Getenv("AWS_ACCESS_KEY_ID"))
	awsSecretKey := client.SetSecret("aws_secret_key", os.Getenv("AWS_SECRET_ACCESS_KEY"))

	return client.
		Container().
		From("pulumi/pulumi:latest").
		WithSecretVariable("PULUMI_ACCESS_TOKEN", pulumiToken).
		WithSecretVariable("AWS_ACCESS_KEY_ID", awsAccessKey).
		WithSecretVariable("AWS_SECRET_ACCESS_KEY", awsSecretKey).
		WithMountedDirectory("/infra", client.Host().Directory(".")).
		WithWorkdir("/infra").
		WithEntrypoint([]string{"/bin/bash"}).
		WithExec([]string{"-c", "go mod tidy"})
}
In this baseContainer function we are building and returning a container that:
- Starts from pulumi’s oficial image pulumi/pulumi:latest
- Has the credentials necessary to communicate with Pulumi and AWS obtained from the environment but stored in a secure way using Dagger secrets.
- Has the infrastructure code mounted in the working directory
/infraand - has all the go dependencies that our pulumi code requires.
This container can now be used to execute pulumi commands:
// ...
func main() {
	// ...
	switch os.Args[1] {
	case "preview":
		out, err := baseContainer(client).
			WithExec([]string{"-c", fmt.Sprintf("pulumi preview --stack %s --non-interactive --diff", *stack)}).
			Stdout(ctx)
		if err != nil {
			log.Fatal(err)
		}

		fmt.Println(out)

	case "up":
		// Run `pulumi up`
	}
}
Running this locally using Dagger’s CLI shows a lot of output, so I’ll show here only the relevant pulumi bits:
┃ @ Previewing update.....
┃ @ Previewing update.....
┃   pulumi:pulumi:Stack: (same)
┃     [urn=urn:pulumi:prod::networking::pulumi:pulumi:Stack::networking-prod]
┃         ~ aws:ecs/service:Service: (update)
┃             [id=arn:aws:ecs:us-west-2:831445021348:service/services-0187c44/ninjas]
┃             [urn=urn:pulumi:prod::networking::awsx:ecs:FargateService$aws:ecs/service:Service::ninjas]
┃             [provider=urn:pulumi:prod::networking::pulumi:providers:aws::default_5_35_0::321a9293-c7af-42be-a9fd-061afc82e317]
┃           ~ networkConfiguration: {
┃               ~ securityGroups: [
┃                   ~ [0]: "sg-0b2ee5e5403c1ca86" => "sg-0cf0cbf24b1e39535"
┃                 ]
┃             }
┃     - aws:ec2/securityGroup:SecurityGroup: (delete)
┃         [id=sg-0b2ee5e5403c1ca86]
┃         [urn=urn:pulumi:prod::networking::aws:ec2/securityGroup:SecurityGroup::svc-sg]
┃         description        : "Allow TCP traffic on port 8080 from the VPC"
┃         egress             : [
┃             [0]: {
┃                 cidrBlocks: [
┃                     [0]: "0.0.0.0/0"
┃                 ]
┃                 fromPort  : 0
┃                 protocol  : "-1"
┃                 self      : false
┃                 toPort    : 0
┃             }
┃         ]
┃         ingress            : [
┃             [0]: {
┃                 cidrBlocks : [
┃                     [0]: "10.1.0.0/16"
┃                 ]
┃                 description: "allow TCP traffic on 8080 from the VPC"
┃                 fromPort   : 8080
┃                 protocol   : "tcp"
┃                 self       : false
┃                 toPort     : 8080
┃             }
┃         ]
┃         name               : "svc-sg-6648e89"
┃         revokeRulesOnDelete: false
┃         vpcId              : "vpc-0ec0d8d2118fc95c5"
┃ Resources:
┃     ~ 1 to update
┃     - 1 to delete
┃     2 changes. 59 unchanged
You probably already saw a big difference in how CI gets built with Dagger. We first developed the code that performs the operations we want and tested it locally instead of writing a YAML and pushing it to the repo to test it. To run this in Github’s CI environment we, unfortunately, have to write some YAML (maybe Dagger cloud will fix that some day? 👀):
name: preview

on:
  pull_request:
    branches:
      - main

jobs:
  dagger:
    runs-on: ubuntu-latest
    permissions: write-all
    steps:
      - name: Checkout
        uses: actions/checkout@v3
      - name: Setup Go
        uses: actions/setup-go@v4
        with:
          go-version: '>=1.21'
      - name: Install Dagger CLI
        run: cd /usr/local && { curl -L https://dl.dagger.io/dagger/install.sh | sh; cd -; }
      - name: Preview infrastructure changes
        env:
          PULUMI_ACCESS_TOKEN: ${{ secrets.PULUMI_ACCESS_TOKEN }}
          AWS_ACCESS_KEY_ID: ${{ secrets.AWS_ACCESS_KEY }}
          AWS_SECRET_ACCESS_KEY: ${{ secrets.AWS_SECRET_ACCESS_KEY }}
          AWS_REGION: "us-west-2"
        run: dagger run go run ./ci preview -stack=<your stack>
In this pipeline you can see that we first have to setup the tools we need (Go and Dagger, although Dagger is not strictly necessary) and then we call to our go program using Dagger’s CLI and specifying that we want to perform the preview operation on a specific stack.
This pipeline is missing the capability of posting a comment with the diff that preview generated. Since we are writing Go code for our CI, we can extend our program to use Github’s Go SDK and post the comment with the output of the command:
	// ...
	switch os.Args[1] {
	case "preview":
		out, err := baseContainer(client).
			WithExec([]string{"-c", fmt.Sprintf("pulumi preview --stack %s --non-interactive --diff", *stack)}).
			Stdout(ctx)
		if err != nil {
			log.Fatal(err)
		}

		// if the token is not specified we won't post anything
		token := os.Getenv("GITHUB_TOKEN")
		if token == "" {
			return
		}

		// GITHUB_REPOSITORY is in the format: `:owner/:repo`
		repo := strings.Split(os.Getenv("GITHUB_REPOSITORY"), "/")
		// On pull requests GITHUB_REF has the format: `refs/pull/:prNumber/merge`
		ref, err := strconv.Atoi(strings.Split(os.Getenv("GITHUB_REF"), "/")[2])
		if err != nil {
			log.Fatal(err)
		}

		return postComment(ctx, out, token, repo[0], repo[1], ref)
}

func postComment(ctx context.Context, content, githubToken, owner, repo string, pr int) error {
	body := fmt.Sprintf("```\n%s\n```", content)
	client := github.NewClient(nil).WithAuthToken(githubToken)
	_, _, err := client.Issues.CreateComment(ctx, owner, repo, pr, &github.IssueComment{
		Body: &body,
	})
	return err
}
This can still be tested locally. All we have to do is specify the GITHUB_TOKEN environment variable so that our program can communicate with Github’s API.
Here is a sample of this working at my repository:
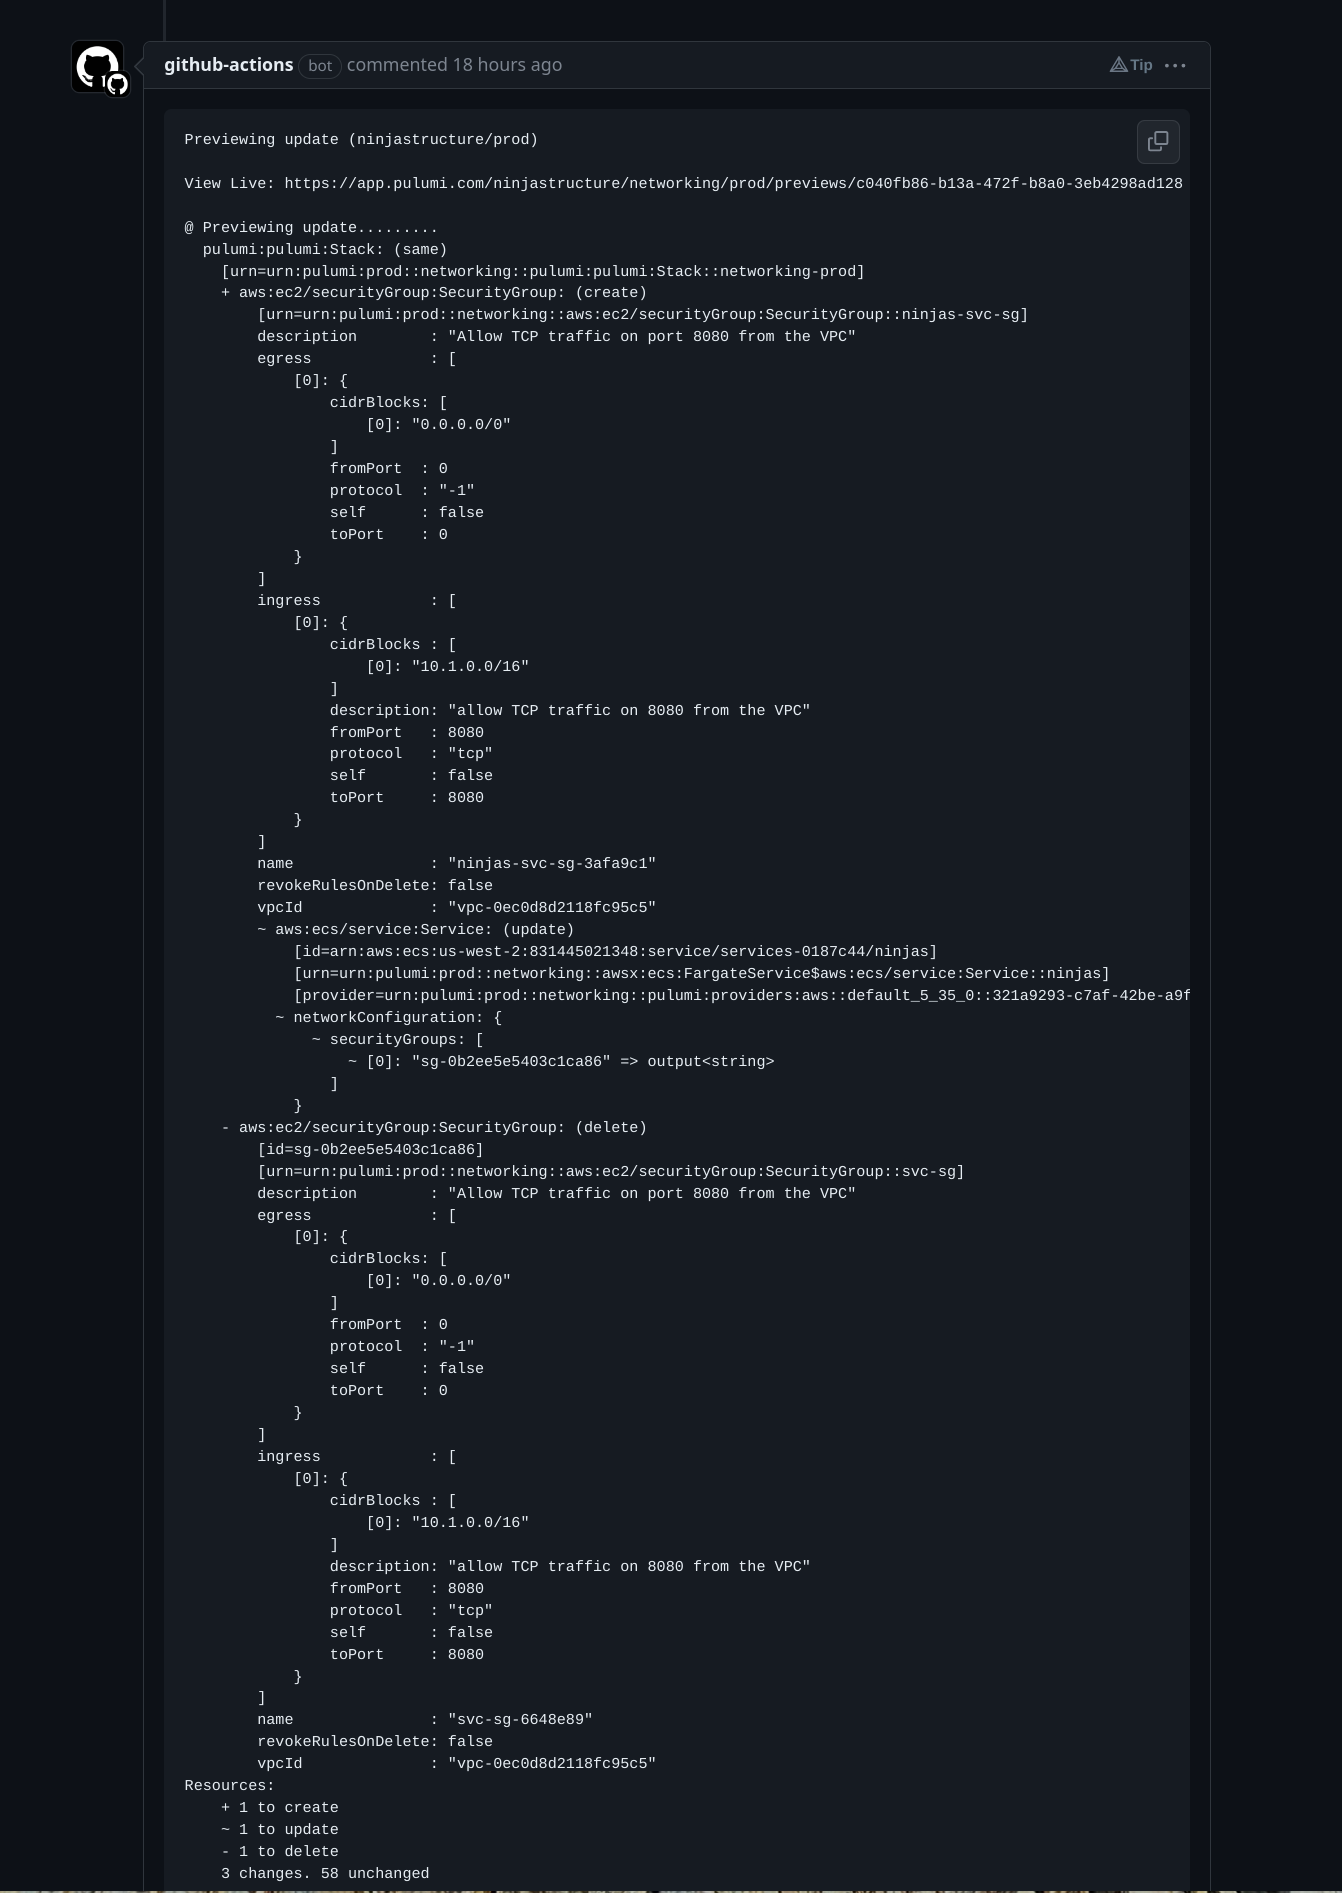
Implementing the up command would be very similar to the preview but without calling the postComment function.
Thoughts
You can probably see how much code we had to write in order to implement the same functionality that a few lines of YAML gave us. In the case of Github actions, all we had to do was reuse Pulumi’s action and specify an option of comment-on-pr to get everything we wanted. With the Dagger SDK we had to first build the container that had the dependencies we needed and then use Github’s SDK to post the comment we wanted. If Pulumi’s action was not already provided and we had to build it ourselves then I do believe that the approach of using Dagger, where we can run it locally and “tap” into the ecosystem of the language we are using, would have been much more superior.
While this example in particular is rather simple, imagine how this process get more complicated when you want to run integration tests that require multiple containers running. I’m doing some exploration on this part that I hope to post soon, but in the meantime you can refer to this YouTube video to see an example of a more complicated CI process being implemented with Dagger.
Using Dagger modules
Intro
Dagger modules is, at the time of this writing, a brand new concept the Dagger team implemented to address some of the problems we mentioned previously. The two that we will focus on here are:
- Re-usability: with the Dagger SDK we built a program that can run pulumi commands, but it is not re-usable by myself or any other person that might need to do this same thing.
- Declarative Interface: our Go program is very “raw” when it comes to declaring its API. If you want to understand what is the “API” of this CLI, you have to look at the code, see the
switchstatement and notice that we supportupandpreviewas valid values.
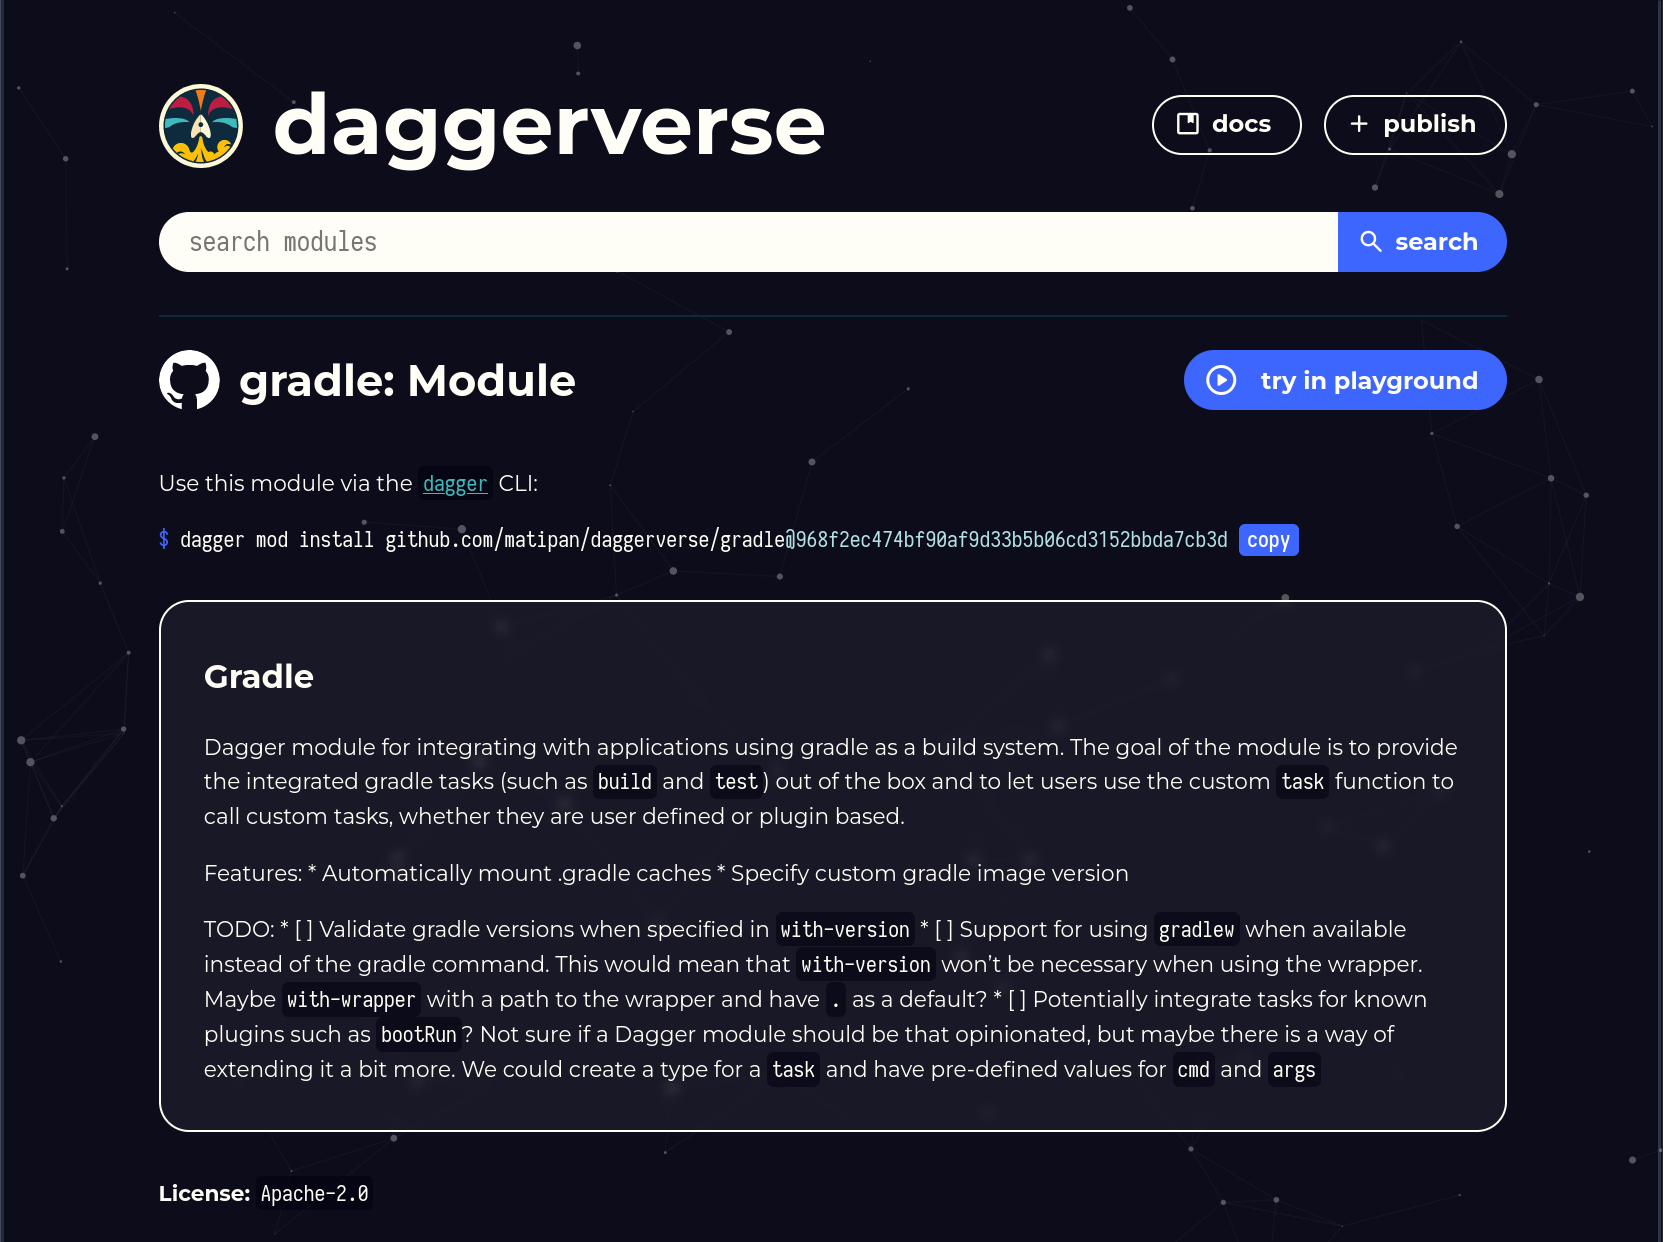
When it comes to re-usability the first thing we need to understand is: how can we make what we built available to the world? Similar to how the Github marketplace allows us to browse all available actions, the Daggerverse (still in very early stages) allows us to browse all modules that were developed and published by someone. For example, here is a module that someone (👀) built to run gradle tasks:
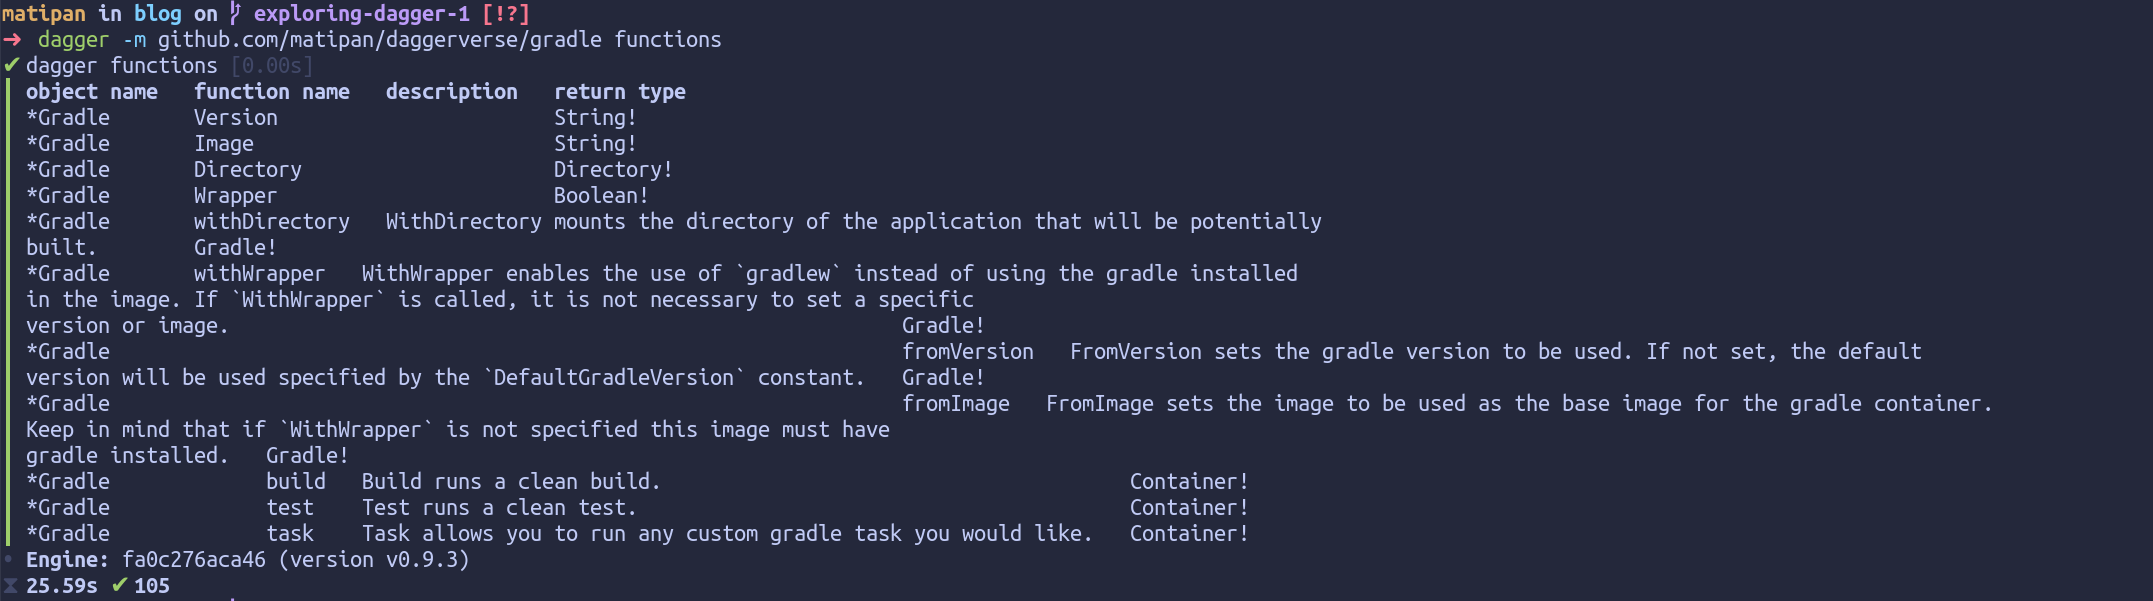
To understand the API that this module has we can use Dagger’s CLI and run dagger -m github.com/matipan/daggerverse/gradle functions:
The most interesting bit for me is that you can call other Dagger modules from your own no matter the programming language they are using. For example, the gradle module was built using Go but we can call the gradle.Build function from another Dagger module built with Python:
import dagger
from dagger.mod import function

@function
def build() -> dagger.Container:
    return dagger.gradle().build()
When we call this function on our module and we can see that it indeeds uses the Gradle module to perform a build (it failed because, fortunately, we are not writing Java):
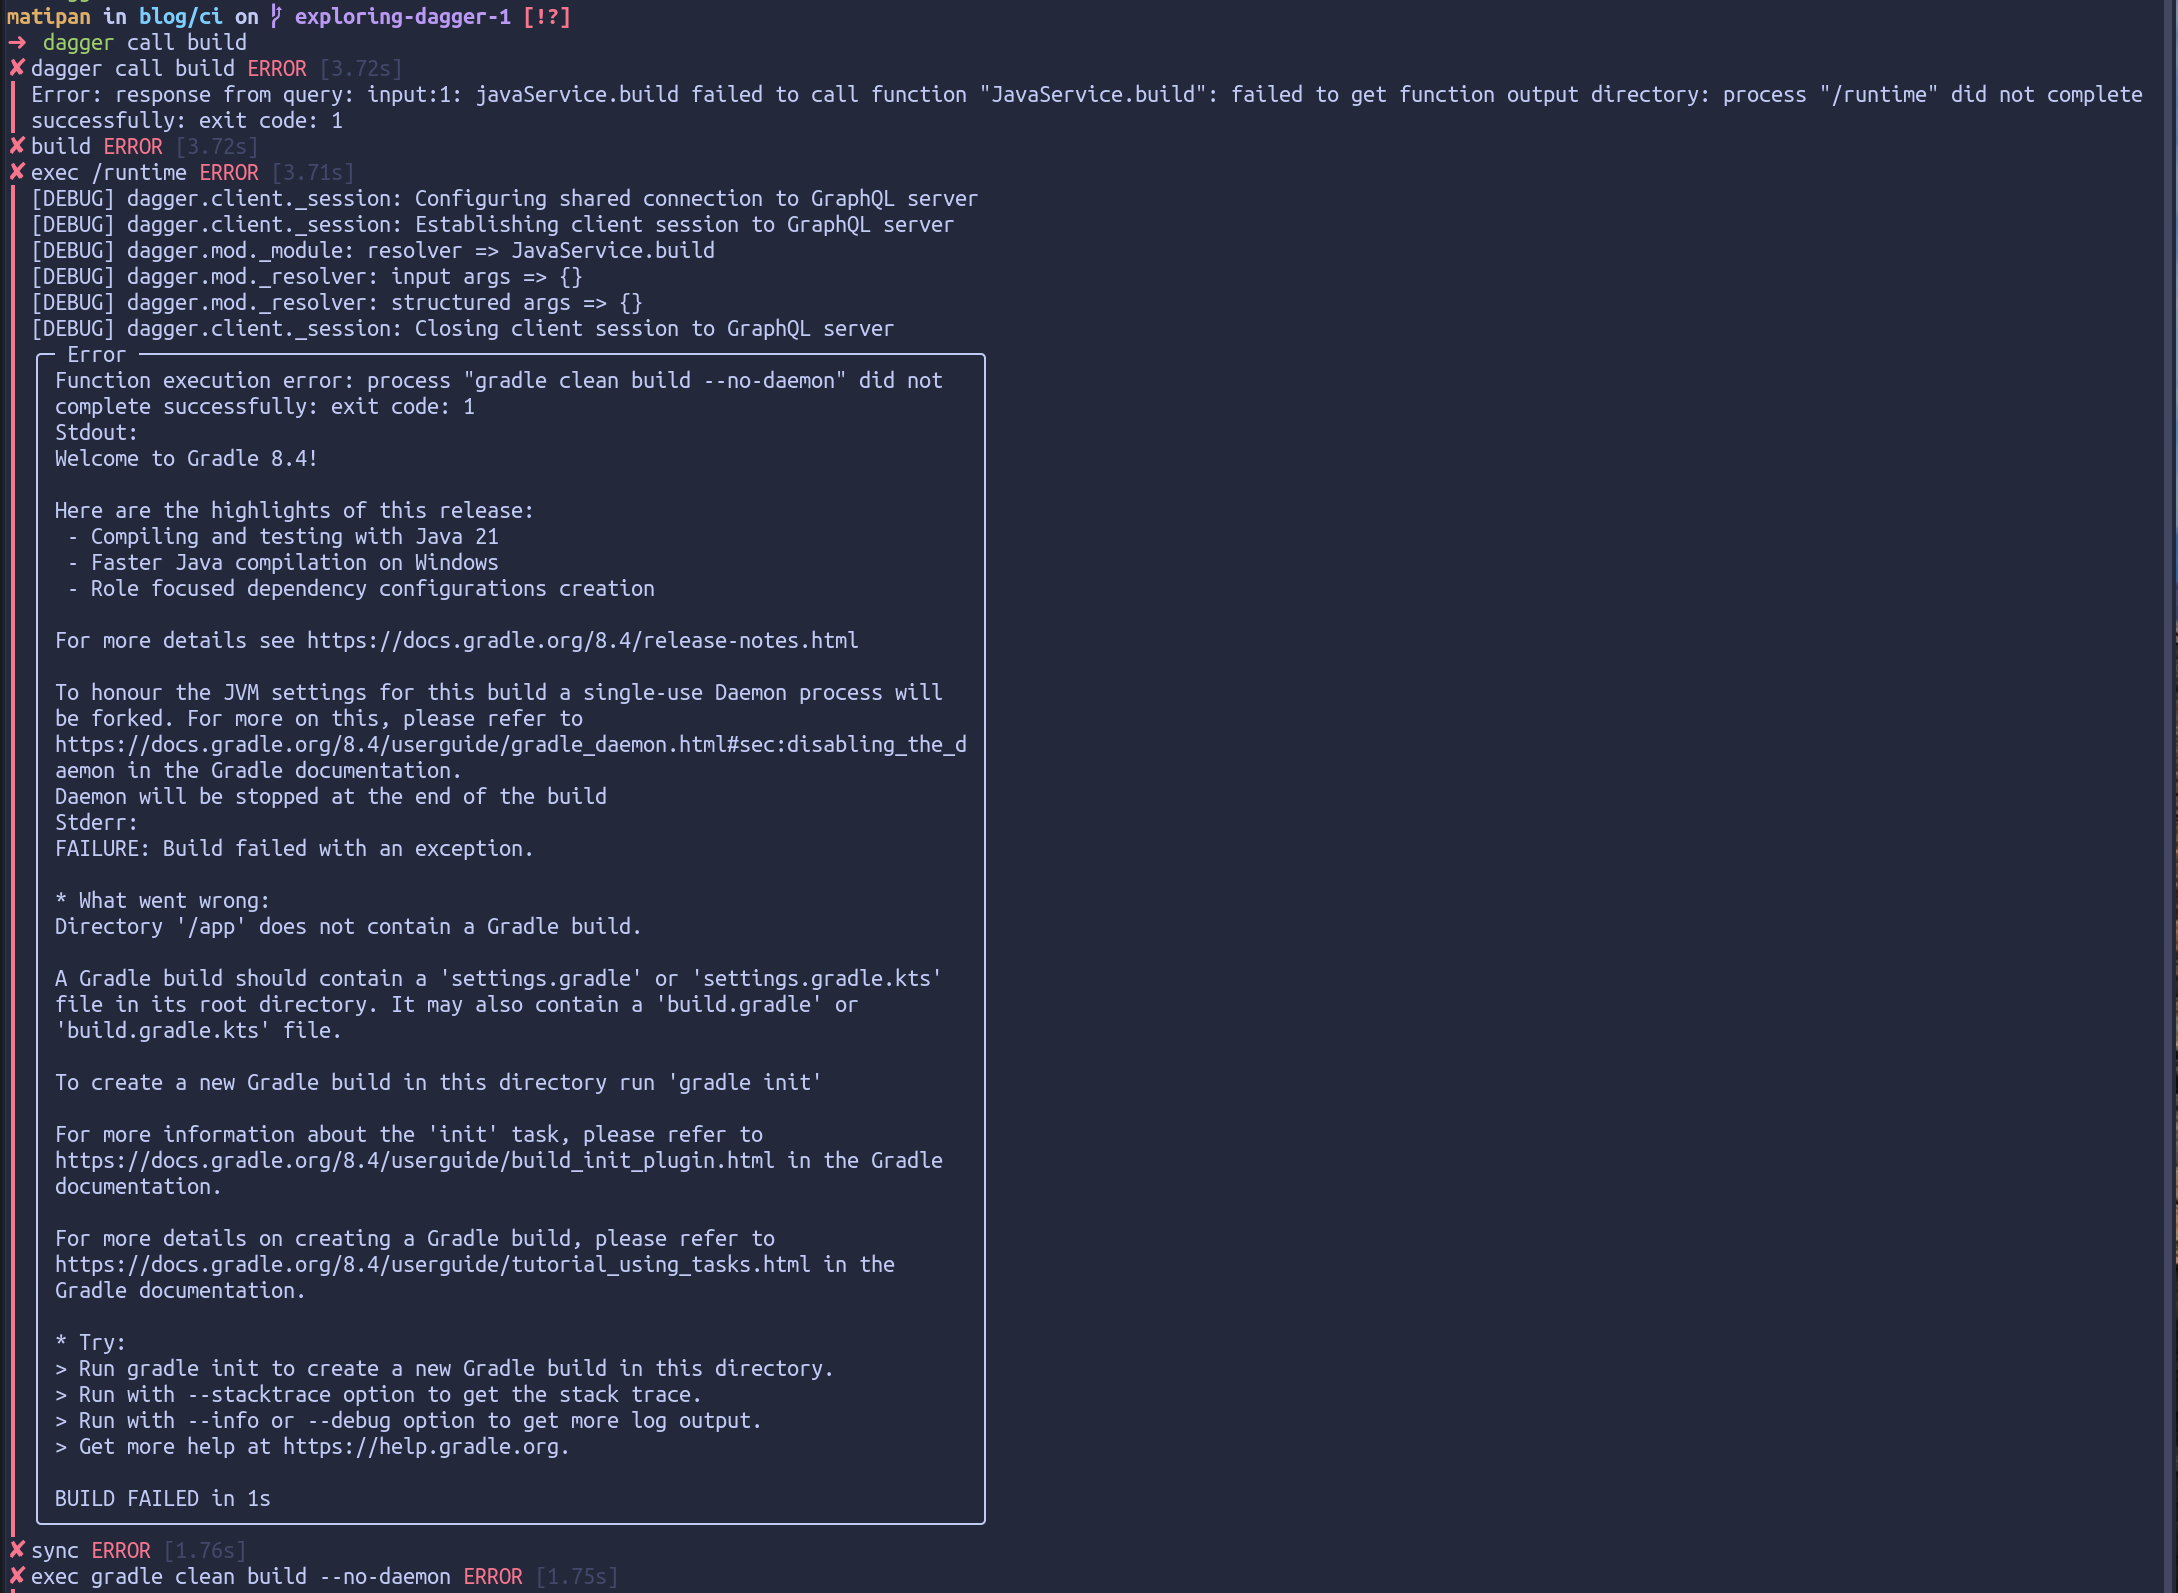
Building our CI
Since Dagger modules can be reused and we can find all modules in the Daggerverse lets see if someone already built a Pulumi module:
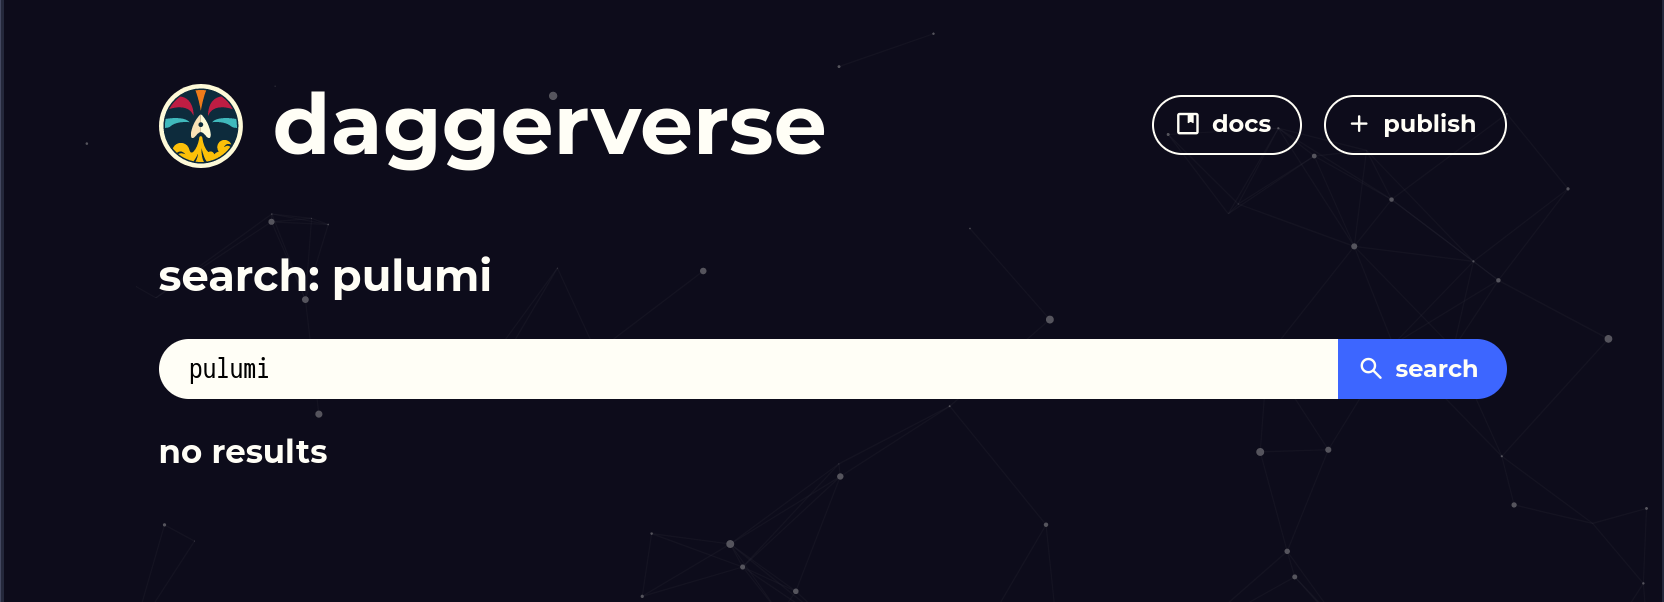
No luck 😕. Well, at the time of this writing the Daggerverse was announced less than a week ago so it makes sense that it is not as “crowded” as the Github marketplace. But this is great for us. We get to build a pulumi module ourselves, publish it and contribute to this brand new environment that has a lot of promise. Then we’ll build our CI process using it.
Building the Pulumi module
We want to build a module that has an interface similar to Pulumi’s Github action where we can run any of the supported pulumi commands. But since we are going to be building it with code we can make it a bit more expressive. We start by initializing our module and specifying that we want to use Go:
dagger mod init --name pulumi --sdk go
This command will generate Go code that we will use to interface with Dagger’s SDK as well as a dagger.json file that contains the definition of our module and its dependencies (in this case we won’t have any). The sample main.go file that it generated gives us some idea on how to start writing our module:
package main

import (
	"context"
)

type Pulumi struct {}

// example usage: "dagger call container-echo --string-arg yo"
func (m *Pulumi) ContainerEcho(stringArg string) *Container {
	return dag.Container().From("alpine:latest").WithExec([]string{"echo", stringArg})
}

// example usage: "dagger call grep-dir --directory-arg . --pattern GrepDir"
func (m *Pulumi) GrepDir(ctx context.Context, directoryArg *Directory, pattern string) (string, error) {
	return dag.Container().
		From("alpine:latest").
		WithMountedDirectory("/mnt", directoryArg).
		WithWorkdir("/mnt").
		WithExec([]string{"grep", "-R", pattern, "."}).
		Stdout(ctx)
}
We want to start by implementing the 4 operations that the Pulumi CLI github action supports: up, refresh, destroy and preview. We want each of these operations to be its own function so that when we call dagger functions we can see each operation and users can refer to any one of them separately. Pulumi’s main role is to perform operations against our cloud provider so we need to solve the problem of specifying credentials. When we built the Github workflow we had to run the configure-aws-credentials step that left the environment ready for pulumi to communicate with AWS. We can do something similar here but “natively” within the module. For each cloud provider we want to support we will add a function called With<Provider>Credentials that sets the credentials in a secure way for that specific cloud provider using Dagger’s native support for Secrets. We’ll do the same thing for specifying pulumi’s access token. I’ll show here a portion of the code that implements the Up operation to keep it brief, you can see the entire code base of the module on Github:
type Pulumi struct {
	AwsAccessKey *Secret
	AwsSecretKey *Secret
	PulumiToken  *Secret
	Version      string
}

// FromVersion is an optional function that users can use to specify
// the version of pulumi's docker image to use as base.
func (m *Pulumi) FromVersion(version string) *Pulumi {
	m.Version = version
	return m
}

// WithAwsCredentials sets the AWS credentials to be used by Pulumi.
// Call this function if you want pulumi to point your changes to AWS.
func (m *Pulumi) WithAwsCredentials(awsAccessKey, awsSecretKey *Secret) *Pulumi {
	m.AwsAccessKey = awsAccessKey
	m.AwsSecretKey = awsSecretKey
	return m
}

// WithPulumiToken sets the Pulumi token to be used by Pulumi.
func (m *Pulumi) WithPulumiToken(pulumiToken *Secret) *Pulumi {
	m.PulumiToken = pulumiToken
	return m
}

// Up runs the `pulumi up` command for the given stack and directory.
// NOTE: This command will perform changes in your cloud.
func (m *Pulumi) Up(ctx context.Context, src *Directory, stack string) (string, error) {
	return m.commandOutput(ctx, src, fmt.Sprintf("pulumi up --stack %s --yes --non-interactive", stack))
}

// ...

// commandOutput runs the given command in the pulumi container and returns its output.
func (m *Pulumi) commandOutput(ctx context.Context, src *Directory, command string) (string, error) {
	ct, err := m.authenticatedContainer(src)
	if err != nil {
		return "", err
	}

	return ct.
		WithExec([]string{"-c", command}).
		Stdout(ctx)
}

// authenticatedContainer returns a pulumi container with the required credentials.
// Users have to set credentials for their cloud provider by using the `With<Provider>Credentials`
// function.
func (m *Pulumi) authenticatedContainer(src *Directory) (*Container, error) {
	if m.PulumiToken == nil {
		return nil, errors.New("pulumi token is required. Use `with-pulumi-token` to set it")
	}

	ct := container(src, m.PulumiToken, m.Version)
	switch {
	case m.AwsAccessKey != nil && m.AwsSecretKey != nil:
		ct = ct.WithSecretVariable("AWS_ACCESS_KEY_ID", m.AwsAccessKey).
			WithSecretVariable("AWS_SECRET_ACCESS_KEY", m.AwsSecretKey)
	default:
		return nil, errors.New("no cloud provider credentails was provided")
	}

	return ct, nil
}

// container obtains a base container with pulumi's CLI installed.
func container(src *Directory, pulumiToken *Secret, version string) *Container {
	if version == "" {
		version = "latest"
	}
	return dag.
		Container().
		From(fmt.Sprintf("pulumi/pulumi:%s", version)).
		WithSecretVariable("PULUMI_ACCESS_TOKEN", pulumiToken).
		WithMountedDirectory("/infra", src).
		WithWorkdir("/infra").
		WithEntrypoint([]string{"/bin/bash"}).
		WithExec([]string{"-c", "go mod tidy"})
}
Since we are writing Go, any variable or function that starts with an Uppercase letter will be part of the interface of this module and developers will see it when calling dagger functions. A few things worth pointing out of this code:
- There are 2 public functions (
WithAwsCredentialsandWithPulumiToken) that set the credentials for what we want to do and need to be called before our operation. See how they return a reference to the module itself, in Dagger-lang this means that in order for something to happen they require a subcommand (likeup). If you want support for your cloud provider you are welcome to make a PR 🚀. - The
Upfunction returns a string and an error, indicating the output of the pulumi command and an error if there was any. - The
authenticatedContainerfunction is where the magic happens. This function is private and is used to create a container that has the required credentials and dependencies. - Users of the module can point to a specific version of pulumi using
FromVersionand if they don’t we default tolatest.
We can test this module locally with my IaC repository. For example the Preview operation:
dagger -m github.com/matipan/daggerverse/pulumi call with-aws-credentials --aws-access-key "<AWS_ACCESS_KEY_ID>" --aws-secret-key "<AWS_SECRET_ACCESS_KEY>" with-pulumi-token --pulumi-token "<PULUMI_ACCESS_TOKEN>" preview --src "." --stack "<PULUMI_STACK>"
And the output:
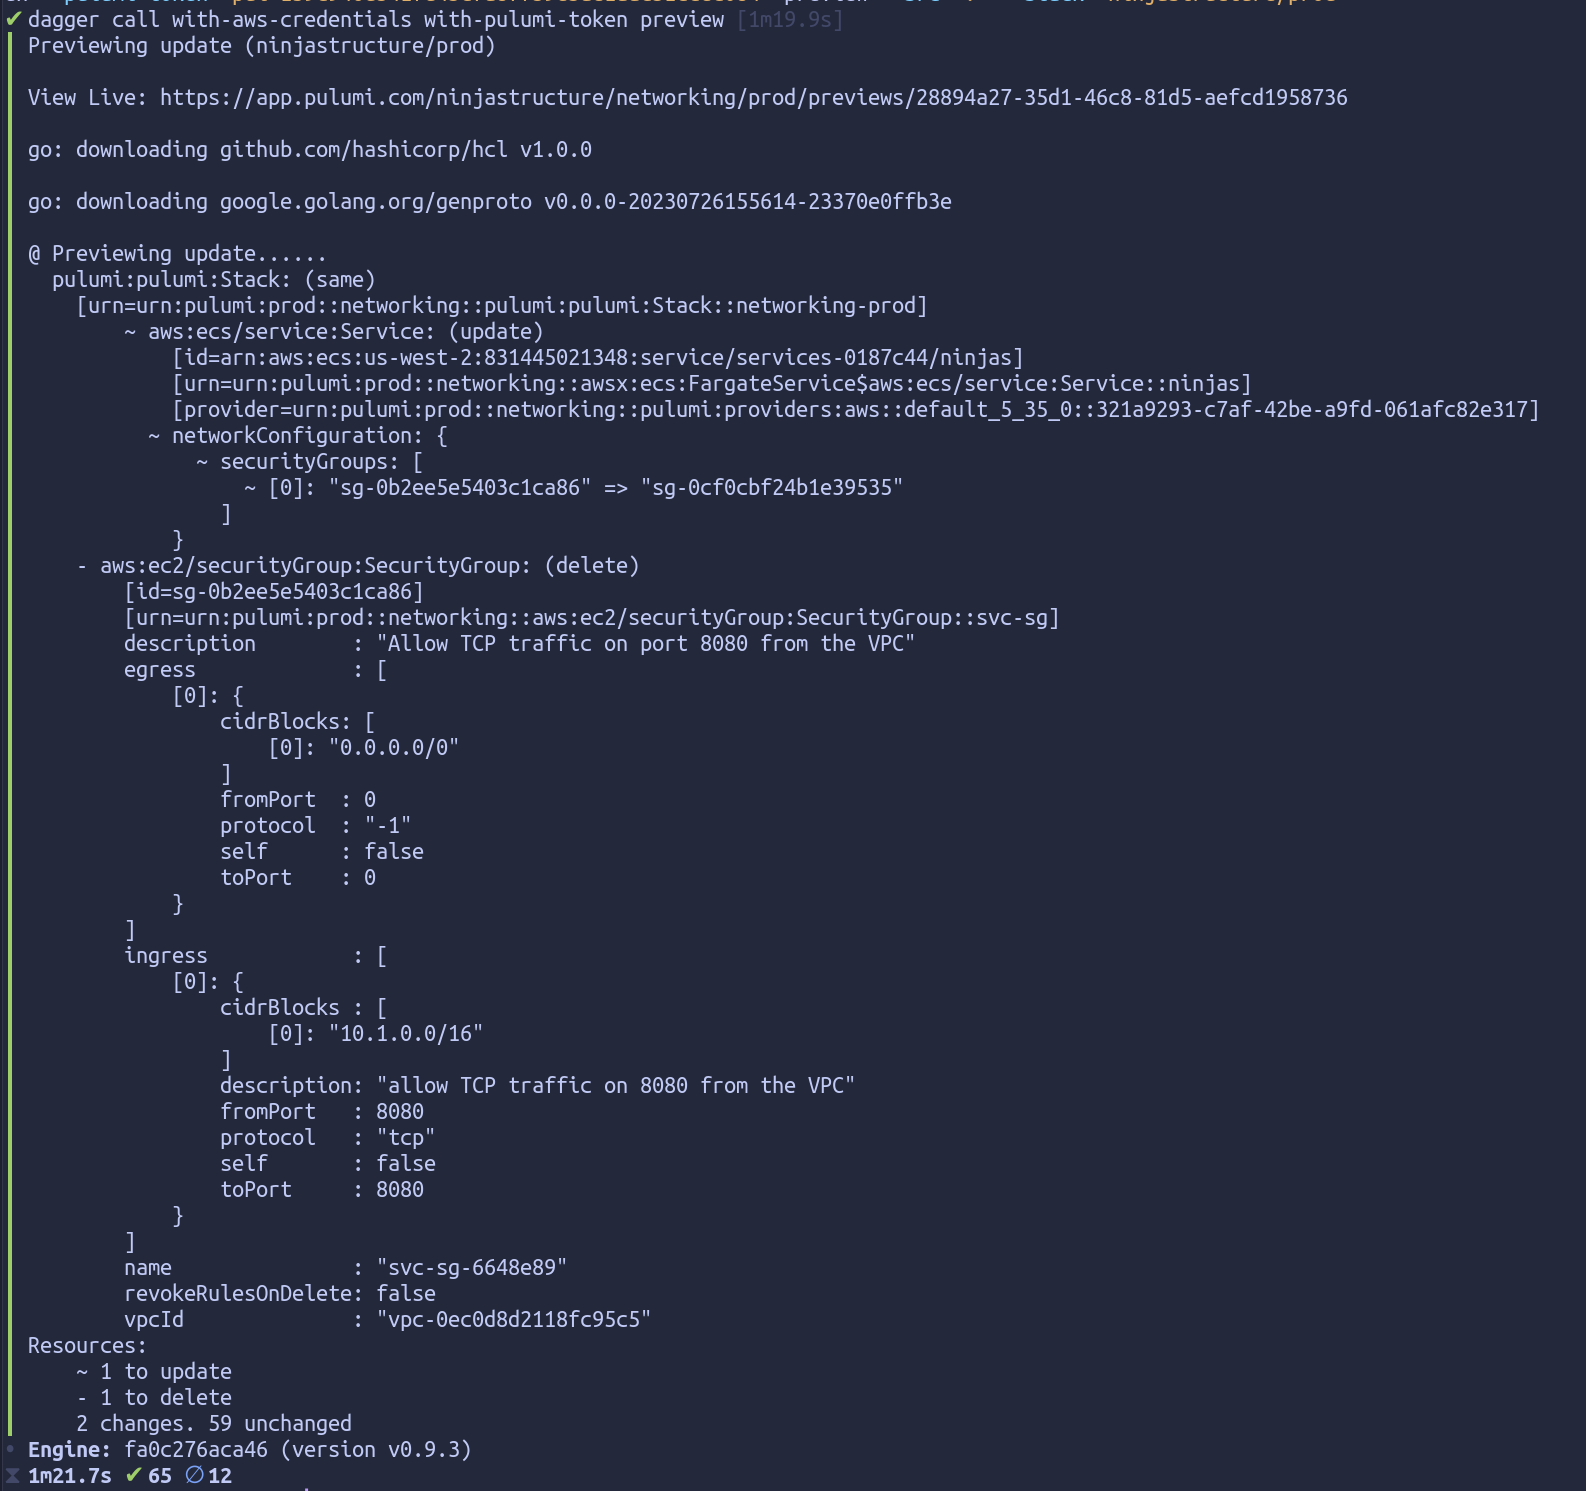
You can see all the operations this module supports by running dagger -m github.com/matipan/daggerverse/pulumi functions or browsing the homepage of the module in the Daggerverse.
Building our CI re-using modules
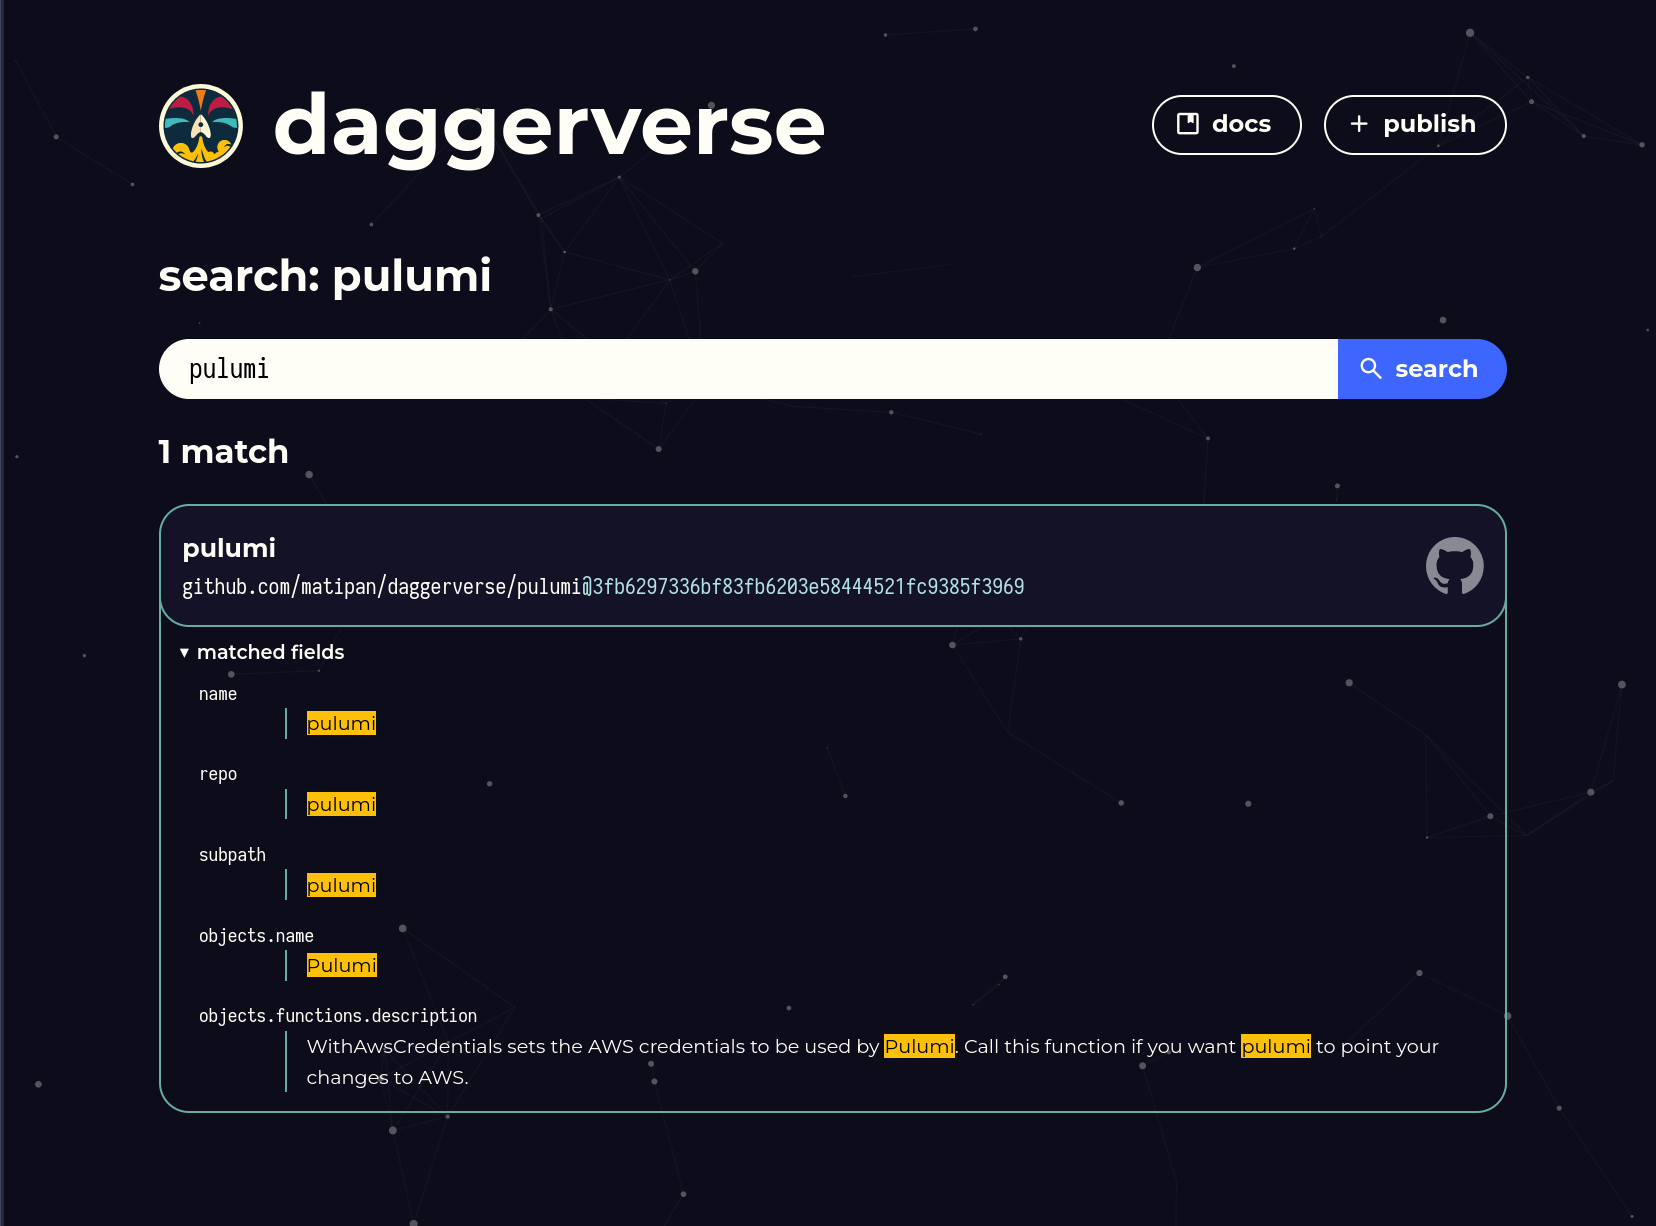
When now can see in the Daggerverse that there is a pulumi module we can leverage:
This module takes care of the IaC part but for the case of pull requests we wanted to post a comment showing the diff that was generated. Luckily, someone (thanks @aweris) already built a Dagger module that allows developers to run any command of the gh CLI. This means we could run gh pr comment <PR> --body '<contents>' from our Dagger code and pass the output that the Pulumi module gave us.
To get started writing our CI we will create a new “module” that has the operations our workflow requires. For simplicity we will call them preview and up as well. We’ll use Go since we kind of love it here (but remember that with Dagger it does not matter in what language a given module was built):
dagger mod init --name iac --sdk go
Now we can add the dependencies for the two modules we’ll use:
dagger mod use github.com/matipan/daggerverse/pulumi
dagger mod use github.com/aweris/daggerverse/gh
And quickly build our module with the Preview function that uses these dependencies:
type Iac struct {
	AwsAccessKey *Secret
	AwsSecretKey *Secret
	PulumiToken  *Secret
}

func (m *Iac) WithCredentials(pulumiToken, awsAccessKey, awsSecretKey *Secret) {
	m.PulumiToken = pulumiToken
	m.AwsAccessKey = awsAccessKey
	m.AwsSecretKey = awsSecretKey
}

func (m *Iac) Preview(ctx context.Context, src *Directory, stack string, githubToken *Secret, githubRef string) error {
	diff, err := dag.Pulumi().
		WithAwsCredentials(m.AwsAccessKey, m.AwsSecretKey).
		WithPulumiToken(m.PulumiToken).
		Preview(ctx, src, stack)
	if err != nil {
		return err
	}

	// On pull requests GITHUB_REF has the format: `refs/pull/:prNumber/merge`
	pr, err := strconv.Atoi(strings.Split(githubRef, "/")[2])
	if err != nil {
		return fmt.Errorf("githubRef did not have the correct format, expected: refs/pull/:prNumber/merge. Got: %s", githubRef)
	}

	_, err = dag.Gh().Run(ctx, githubToken, fmt.Sprintf("pr comment %d --body '%s'", pr, diff))
	return err
}
You can see that we are calling the Pulumi module Preview operation and then sending the output of it to the gh module so that it posts the comment on Github. Our Github workflow will now call our module instead:
name: 'preview'

on:
  pull_request:
    branches:
      - main

jobs:
  dagger:
    runs-on: ubuntu-latest
    permissions: write-all
    steps:
      - name: Checkout
        uses: actions/checkout@v3
      - name: Setup Go
        uses: actions/setup-go@v4
        with:
          go-version: '>=1.21'
      - name: Install Dagger CLI
        run: cd /usr/local && { curl -L https://dl.dagger.io/dagger/install.sh | sh; cd -; }
      - name: Preview infrastructure changes
        env:
          PULUMI_ACCESS_TOKEN: ${{ secrets.PULUMI_ACCESS_TOKEN }}
          AWS_ACCESS_KEY_ID: ${{ secrets.AWS_ACCESS_KEY }}
          AWS_SECRET_ACCESS_KEY: ${{ secrets.AWS_SECRET_ACCESS_KEY }}
          AWS_REGION: "us-west-2"
          GITHUB_TOKEN: ${{ secrets.GITHUB_TOKEN }}
        run: dagger -m ./ci call with-credentials --pulumi-token $PULUMI_ACCESS_TOKEN --aws-access-key $AWS_ACCESS_KEY_ID --aws-secret-key $AWS_SECRET_ACCESS_KEY preview --src "." --stack "ninjastructure/prod" --github-token $GITHUB_TOKEN --github-ref $GITHUB_REF
The dagger command that was specified in the last step can be run locally which allows us to test things before pushing them.
Thoughts
As you can see at the time of this writing the Daggerverse is quite new and does not have many modules already provided. This required us to build the module to interact with Pulumi. However, we were able to find a module that provided us with the capacity to post a comment on the PR that was open. Once we had these dependencies ready to go it was just a matter of referencing them and piping things together, all with code using the programming language I preferred. With the wiring of those modules taken care of it was just a matter of using Dagger’s CLI to call our module and perform the operations we wanted. The same command we run locally to test that everything worked correctly was then added to the CI process to finish the entire workflow. If we ever were to migrate from Github actions to say, CircleCI, then it would be a matter of referencing this same command from our CircleCI workflow and that’s it.
The main problem I see with this approach today has to do with caching. Every single operation can potentially be cached and save us from having to recreate the entire environment every time. To achieve this with Dagger we would have to either: i) use the paid offering that provides this caching called Dagger cloud; ii) deploying a dagger engine with caching in your own infrastructure and point your CI runners to use that version of the engine. That approach is not too bad for simpler use cases, but as soon as you need to scale you’ll require multiple instances running.
As a side note, when we wanted to create our pipeline we had to create a new “module” that was the entrypoint for our CI. This is because the only way to use other modules today is from within another module. I found this a bit confusing. In programming languages such as Go you can create either libraries or executables. When I hear the word “module” I think of a library that requires an executable to call it and do something. Maybe it’s just a naming thing or maybe I get easily confused.
Comparison
When comparing the approach of Github actions and Dagger modules I find two main differences. First of all, Github actions does not give us a process that can be easily testable and extensible. When it comes to extending we would either have to build custom actions or do some setup magic and run custom scripts on top of this yaml. Again, this is a simple process, but CI/CD often gets more complicated as time goes on. And while right now this may not seem like an obvious problem, it always ends up becoming that critical yaml file that nobody wants to touch. The second difference is more “conceptual”, but it’s important to point it out because it requires a mindset shift when it comes to building CI. In the traditional pipeline we can see a “stateful” approach where each of the steps that are being executed are doing explicit things on the host (i.e the runner) that the subsequent action then reuses:
- Checkout the code of the repository
- Install the latest stable version of Go
- Configure AWS’s credentials (technically not needed, we could use env variables directly…)
- Download go dependencies that pulumi’s code uses.
- Run pulumi preview
Every single one of those actions changed the underlying host in some way and left a state that the subsequent action would then use. This means that when you build a workflow you always operate directly on the host instead of “chaining” inputs/outputs like you do when building a dag, for example an Airflow dag. I don’t particularly like this approach, it is one of the main things that makes this processed hard to test and more importantly very hard to understand.
With dagger modules we saw a different approach. When we were calling a module we had to explicitly provide all the required resources to perform the specific operation. This is because dagger functions run in a sandboxed environment that can potentially be executed on a different host. This, in my opinion, opens up interesting possibilities for building CI pipelines using reusable APIs that are deployed once and used everywhere. There might be occasions where this stateless approach falls short but I still need to do a deep dive in those special cases. If I compare Dagger’s approach with the way the data world works I find a lot of similarities. When you build data pipelines using tools like Airflow, the worker where the operator code gets executed usually only performs HTTP calls. For example, if you build a data pipeline that performs some data transformation using spark on EMR and then ingests that data on a datasource like clickhouse, your Airflow DAG will probably look something like this:
- Use EMR Operator to execute some spark code. Airflow’s worker will call AWS’s API, ask for a given script to be executed and then wait for completion.
- Use an ECS task or similar to run code that reads the data from S3 and ingest it into clickhouse.
Conclusion
I believe Dagger offers a compelling alternative to yaml and custom scripts in CI/CD pipelines. By leveraging code, we gain expressiveness, reusability, and the ability to integrate with a wide range of tools and services. As Dagger matures, I’m excited to see how it will continue to evolve and improve CI/CD practices. However, the current state of the art of Dagger requires a big mindset shift and, while it does offer important benefits, for simpler use cases like the one explored in this blog post the learning curve seems to be a bit steep. I think that in this post we found very interesting primitives that will probably allow us to develop a better experience for all use cases.

