Exploring Dagger: Streamlining CI/CD Pipelines with Code – A Developer's Guide

This is the second post in a series of blog posts that look at Dagger from different perspectives. In this post we do a deep dive on how to leverage Dagger as a developer that is tasked with implementing the CI process of a Java-Gradle service. In this CI process we need to: build, run end to end tests with external dependencies and package the service. We will leave the CD part for a future blog post that looks at Dagger from the perspective of a Platform Engineer/SRE. We are going to build this with traditional tools like docker-compose and with Dagger modules and then compare the two approaches.
NOTE: Dagger is in very active development so by the time you read this blog post some things might have changed.
Background
We suddenly land on a team that is the owner of a Spring-Boot service that uses gradle as its build tool and we are tasked to build the CI process for this service. The first we think about when we look at this codebase is that we should rewrite it in Go. But we are going to decide to push that thought aside for a bit and be productive 🤵. This service is part of an E-Commerce system and is used primarily for filtering orders that are stored inside a MySQL database. It exposes one important endpoint that accepts a list of filters and returns the orders that match those filters. For example:
GET /orders?page=1&status=open&shipping_method=43123
{
    "orders": [
        {
            "id": 1234,
            "status": "open",
            "shipping_method": 43123,
            "payment_status": "pending",
            "fulfillment_status": "unfulfilled"
        },
        {
            "id": 1235,
            "status": "open",
            "shipping_method": 43123,
            "payment_status": "paid",
            "fulfillment_status": "fulfilled"
        }
    ]
}
The service has not yet reached production but we know this endpoint will be very critical. It has to be consistent, meaning that if I specify status=open as a filter, it should only return orders that match that status. If we break this constraint we are going to be in big trouble. To guarantee that we never merge or deploy code that breaks this constraint we decide is best to build a few black-box end to end tests that validate the behavior of the entire system. We are going to start our service and its dependencies and execute a program that makes HTTP requests with different filters and validates that the responses match what we expect. We want developers to be able to run this tests locally but we also want to make them a hard constraint on our CI, so we need to run them there as well. For the sake of keeping this blog post focused on the CI part, I’ll share just a snippet of what this end to end tests look like. In our repository we created a tests folder and wrote a main.go file that does what we just mentioned. Here is a snippet of what this program looks like:
var endpoint = flag.String("endpoint", "localhost:8080", "service endpoint")

func main() {
	flag.Parse()

	if err := OrdersList(*endpoint); err != nil {
		log.Fatalf("tests failed: %s", err)
	}
}

func OrdersList(endpoint string) error {
	tests := []struct {
		name    string
		filters Filters
	}{
		{
			name: "open",
			filters: Filters{
				Status: OrderStatusOpen,
			},
		},
		{
			name: "open paid",
			filters: Filters{
				Status:        OrderStatusOpen,
				PaymentStatus: PaymentStatusPaid,
			},
		},
		// more test cases
	}

	errs := []error{}
	for _, test := range tests {
		name := test.name
		filters := test.filters

		// create HTTP request and send it using Go's standard library

		// validate the response
		if err = validateResponse(filters, response.Orders); err != nil {
			errs = append(errs, testErr(name, fmt.Errorf("response for filters is invalid: %v.\n\tResponse: %+v\n\tFilters: %+v", err, response.Orders, filters)))
			continue
		}
	}

	if len(errs) == 0 {
		return nil
	}

	rerr := errors.New("tests have failed")
	for _, err := range errs {
		rerr = fmt.Errorf("%s\n\t%s", rerr, err.Error())
	}
	return rerr
}

func testErr(name string, err error) error {
	return fmt.Errorf("❌ test %s failed. Error: %w", name, err)
}

func validateResponse(filters Filters, orders []*Order) error {
	for _, order := range orders {
		// validate that the orders respect the filters that were specified
        // if it is not the case then we return an error
	}

	return nil
}
With this program developers can start their local environment and run go run ./tests/main.go -endpoint=localhost:<PORT>.
In summary, we want to build a reproducible way to:
- build and package our service
- run unit tests
- run end to end tests that require the service and its dependencies to be running
So that we can then build a CI process that integrates all of it.
Using docker and docker-compose
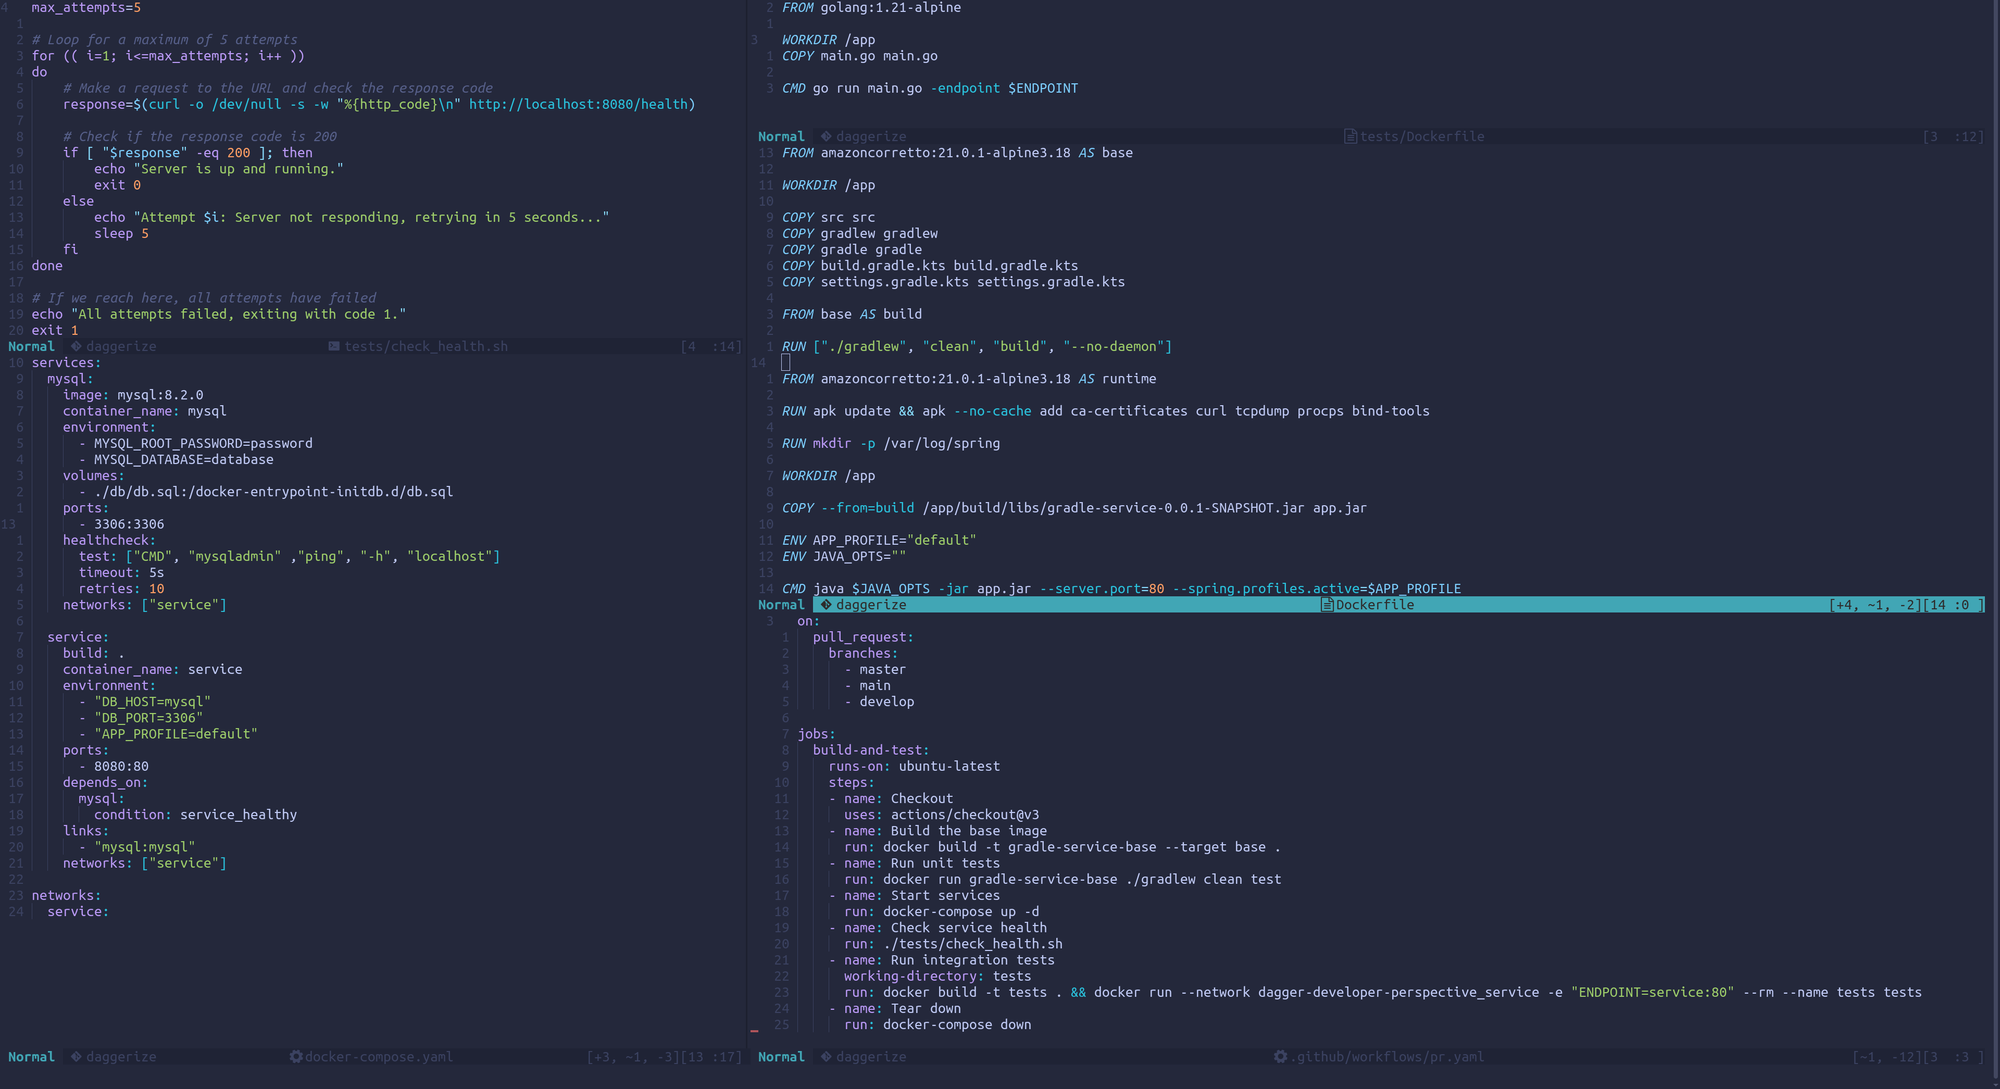
Let’s start building this using the tools you are probably already familiar with: docker and docker-compose. To build and package our service we first write a Dockerfile that:
- Starts from an image with the Java version we require already installed.
- Copies all of our required files and folders.
- Performs a gradle build using the gradle wrapper.
- Starts a new stage from an image with Java installed.
- Installs critical dependencies that are often used to troubleshoot.
- Copies over the .jar generated in the previous stage.
- Defines a command for running the service.
FROM amazoncorretto:21.0.1-alpine3.18 AS base

WORKDIR /app

COPY src src
COPY gradlew gradlew
COPY gradle gradle
COPY build.gradle.kts build.gradle.kts
COPY settings.gradle.kts settings.gradle.kts

FROM base AS build

RUN ["./gradlew", "clean", "build", "--no-daemon"]

FROM amazoncorretto:21.0.1-alpine3.18 AS runtime

RUN apk update && apk --no-cache add ca-certificates curl tcpdump procps bind-tools

RUN mkdir -p /var/log/spring

WORKDIR /app

COPY --from=build /app/build/libs/gradle-service-0.0.1-SNAPSHOT.jar app.jar

ENV APP_PROFILE="default"
ENV JAVA_OPTS=""

CMD java $JAVA_OPTS -jar app.jar --server.port=80 --spring.profiles.active=$APP_PROFILE
In this Dockerfile we are leveraging Docker’s multi stage capabilities to reduce the final size of our image and only ship the things that we need.
With this defined developers can now build and run the service locally without having to install java, gradle and such:
docker build -t gradle-service .
docker run -p 8080:8080 -e APP_PROFILE=local gradle-service
How about running unit tests? Well, in our Dockerfile you probably saw that we first defined a stage called base were we mounted the code of our application. This was done to re-use the Dockerfile for running our unit tests. We can do this by leveraging BuildKit’s ability to target specific stages like so:
docker build -t gradle-service-base --target base .
docker run -e APP_PROFILE=test gradle-service-base ./gradlew clean test
With this approach we were able to containerize our build and test so that these processes run in the exact same way on all machines. Something I’ve seen quite frequently, specially in the Java ecosystem, is that developers usually run build and test commands in their CI workflows by re-using whatever abstraction the CI runtime provides. For example, in the case of GitHub workflows I’ve seen people often use the gradle action to run gradle commands directly in their CI. What usually ends up happening is that the action sets things up in a different way and then tests end up failing in the CI but not in the local environment of the developer. Leaving people confused and forced to ignore the tests in that PR because who has time to debug the CI?
Now for the interesting part: end to end tests. We mentioned previously that our service uses MySQL to store and retrieve the orders it is requested. To be able to run these tests we need to have MySQL running and the service connected to it. Since we want this to be reproducible and run in our CI as well we will leverage docker-compose:
version: '3.9'

services:
  mysql:
    image: mysql:8.2.0
    container_name: mysql
    environment:
      - MYSQL_ROOT_PASSWORD=password
      - MYSQL_DATABASE=database
    volumes:
      - ./db/db.sql:/docker-entrypoint-initdb.d/db.sql
    ports:
      - 3306:3306
    healthcheck:
        test: ["CMD", "mysqladmin" ,"ping", "-h", "localhost"]
        timeout: 5s
        retries: 10
    networks: ["service"]

  service:
    build: .
    container_name: service
    environment:
      - "DB_HOST=mysql"
      - "DB_PORT=3306"
      - "APP_PROFILE=default"
    ports:
      - 8080:80
    depends_on:
      mysql:
        condition: service_healthy
    links:
      - "mysql:mysql"
    networks: ["service"]

networks:
  service:
Let’s quickly go over what this docker-compose file has:
- service: the definition of our service that will trigger a
buildwhen we run it (this is because we specified thebuild: .to docker-compose). We added adepends_onto MySQL with aservice_healthycondition so that the service is only started once MySQL is up and accepting connections. - mysql: a service that runs a MySQL 8 server with an SQL file mounted to seed some data for our tests. We specified a
healthcheckthat usesmysqladminso that the service connects to it only once MySQL is ready for connections.
We can now start our services locally and in any other environment by running docker-compose up.
Time to add our tests. We also want these tests to be able to run in any host without requiring that host to have dependencies installed (other than the ability to run containers of course). For this reason we start writing a Dockerfile inside our tests folder:
FROM golang:1.21-alpine

WORKDIR /app
COPY main.go main.go

CMD go run main.go -endpoint $ENDPOINT
Quite simple: we want Go and we want to execute our tests. We don’t care about publishing this image so no need to optimize it with multi-stage builds.
With this new dockerfile and our docker-compose we can now execute our tests. However, since everything is dockerized we need to run the container for our tests in the same network as the service is running so that it can access its endpoint. We also need to wait a bit until the service is running before triggering our tests:
$ docker-compose up -d
# You should wait for the service to be up and running
$ cd tests && docker build -t tests .
$ docker run --network dagger-developer-perspective_service -e "ENDPOINT=service:80" --rm --name tests tests
2023/11/19 14:22:37 running validation for: open
2023/11/19 14:22:37 running validation for: open paid
2023/11/19 14:22:37 running validation for: open pending
2023/11/19 14:22:37 running validation for: open paid unpacked
2023/11/19 14:22:37 running validation for: open paid unpacked shippingMethod:table
2023/11/19 14:22:37 running validation for: open paid unpacked completedAtFrom completedAtTo
2023/11/19 14:22:37 running validation for: open paid and pending
We are now ready to build our GitHub workflow that re-uses what we built here.
Building our CI workflow
I won’t go over too much detail here on the syntax for GitHub workflows. We want our workflow to run only on pull requests that are made against our main branch and we want it to:
- Run unit tests
- Build the service
- Run end to end tests
As we saw previously, building the sevice already happens when we do a docker-compose up so we only need to take care of the other two:
name: 'pull request'

on:
  pull_request:
    branches:
      - main

jobs:
  build-and-test:
    runs-on: ubuntu-latest
    steps:
    - name: Checkout
      uses: actions/checkout@v3
    - name: Build the base image
      run: docker build -t gradle-service-base --target base .
    - name: Run unit tests
      run: docker run gradle-service-base ./gradlew clean test
    - name: Start services
      run: docker-compose up -d
    - name: Check service health
      run: ./tests/check_health.sh
    - name: Run end to end tests
      working-directory: tests
      run: docker build -t tests . && docker run --network dagger-developer-perspective_service -e "ENDPOINT=service:80" --rm --name tests tests
    - name: Tear down
      run: docker-compose down
In this CI workflow we are:
- Building the
baseimage that we can then use to run our tests - Using the
baseimage to run our tests - Starting the service and database with docker-compose
- Running a script that checks the health of the service so that we run our end to end tests once the service is up
- Building the container image for our tests and running them in the same network as the service
- Tearing down our service and database
You can see that we added a new step that previously was done manually: service healthcheck. This is so that the tests only run once the service is ready:
#!/bin/bash

max_attempts=5
for (( i=1; i<=max_attempts; i++ ))
do
    response=$(curl -o /dev/null -s -w "%{http_code}\n" http://localhost:8080/health)
    if [ "$response" -eq 200 ]; then
        echo "Server is up and running."
        exit 0
    else
        echo "Attempt $i: Server not responding, retrying in 5 seconds..."
        sleep 5
    fi
done
echo "All attempts failed, exiting with code 1."
exit 1
Now we can push our branch, create a pull request and see that our CI workflow is running successfully:

Thoughts
There were quite a few things we had to build in order to make this happen, and they were all a bit scattered:
- A
Dockerfilefor the service - A
Dockerfilefor the end to end tests - A
docker-compose.yamlto run the services in a reproducible way - A
check_health.shto check the health of the service before running our tests - The
.github/workflows/pr.yamlthat glues everything together.
Developing this wasn’t as “smooth” as I wrote it here. There were many mistakes I made in the middle that forced me to iterate a bit on how things would run locally and how they would run in the CI, for example the check_health.sh was only necessary in the CI. Having to define 3 stages in order to be able to run the tests in a dockerized way is also something that I haven’t seen people often do, they just rely on their CI runtime to also install dependencies and pray it does not break. I also had to play around with how to connect containers together so that our integraion tests can actually access the service. My developer experience here, in my opinion, wasn’t great. Probably no developer in the team will do a docker build && docker run locally to run their tests, it requires more effort and steps than simply using their tool of choice (in this case gradle). If the CI ever breaks, it will probably go ignored until someone decides to be unhappy for a bit and fix it.
Using Dagger modules
Can Dagger provide a better experience for building this? Let’s give it a try!
Quick intro: Dagger allows you to define the entire lifecycle of your application (building, testing, packaging, etc) using code with one of the supported languages. Instead of having to write Dockerfiles and docker-compose files, you write everything in a Dagger module with your programming language of choice. Internally, Dagger leverages BuildKit and containers to make sure that the code you are writing runs anywhere in the exact the same way.
So, what do we do first? We initialize a Dagger module in our repository that will hold all the code required to build what we built before. Lets start by creating a ci folder and create a new Dagger module that will use Go:
mkdir ci && cd ci
dagger module init --name gradle-service --sdk go
Quickly inspecting the contents of the program that dagger generated we can see that it is using an object called dag to create containers and perform actions on them:
package main

import (
	"context"
)

type GradleService struct {}

// example usage: "dagger call container-echo --string-arg yo"
func (m *GradleService) ContainerEcho(stringArg string) *Container {
	return dag.Container().From("alpine:latest").WithExec([]string{"echo", stringArg})
}

// example usage: "dagger call grep-dir --directory-arg . --pattern GrepDir"
func (m *GradleService) GrepDir(ctx context.Context, directoryArg *Directory, pattern string) (string, error) {
	return dag.Container().
		From("alpine:latest").
		WithMountedDirectory("/mnt", directoryArg).
		WithWorkdir("/mnt").
		WithExec([]string{"grep", "-R", pattern, "."}).
		Stdout(ctx)
}
We can leverage dagger’s CLI to explore what the module can actually do, from the root of the repository we can run dagger -m ./ci functions and then try some of the already provided examples:
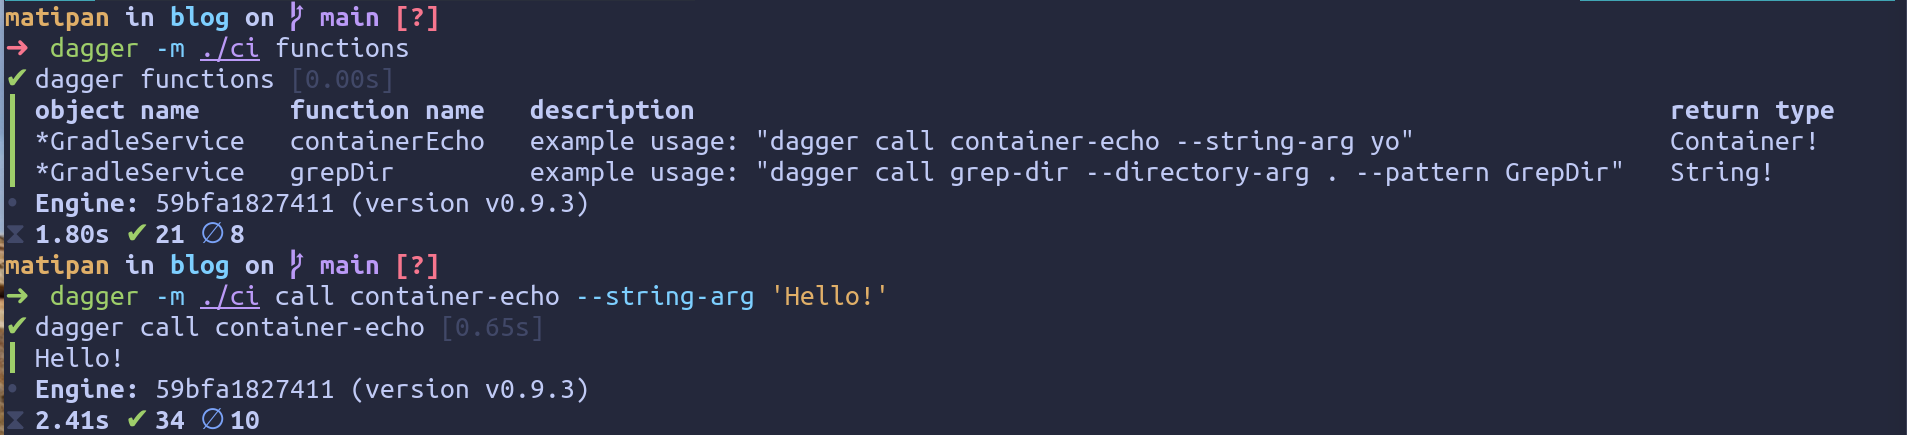
Let’s start re-writing our module to build and test our service.Now, the interesting thing about Dagger is that modules can be published and re-used by others no matter what programming language was used to write the module, this means you can use a Go module from within a Python one. At the time of this writing modules are published at the daggerverse. If we look in the Daggerverse we can see that someone already developed a module to running gradle commands:
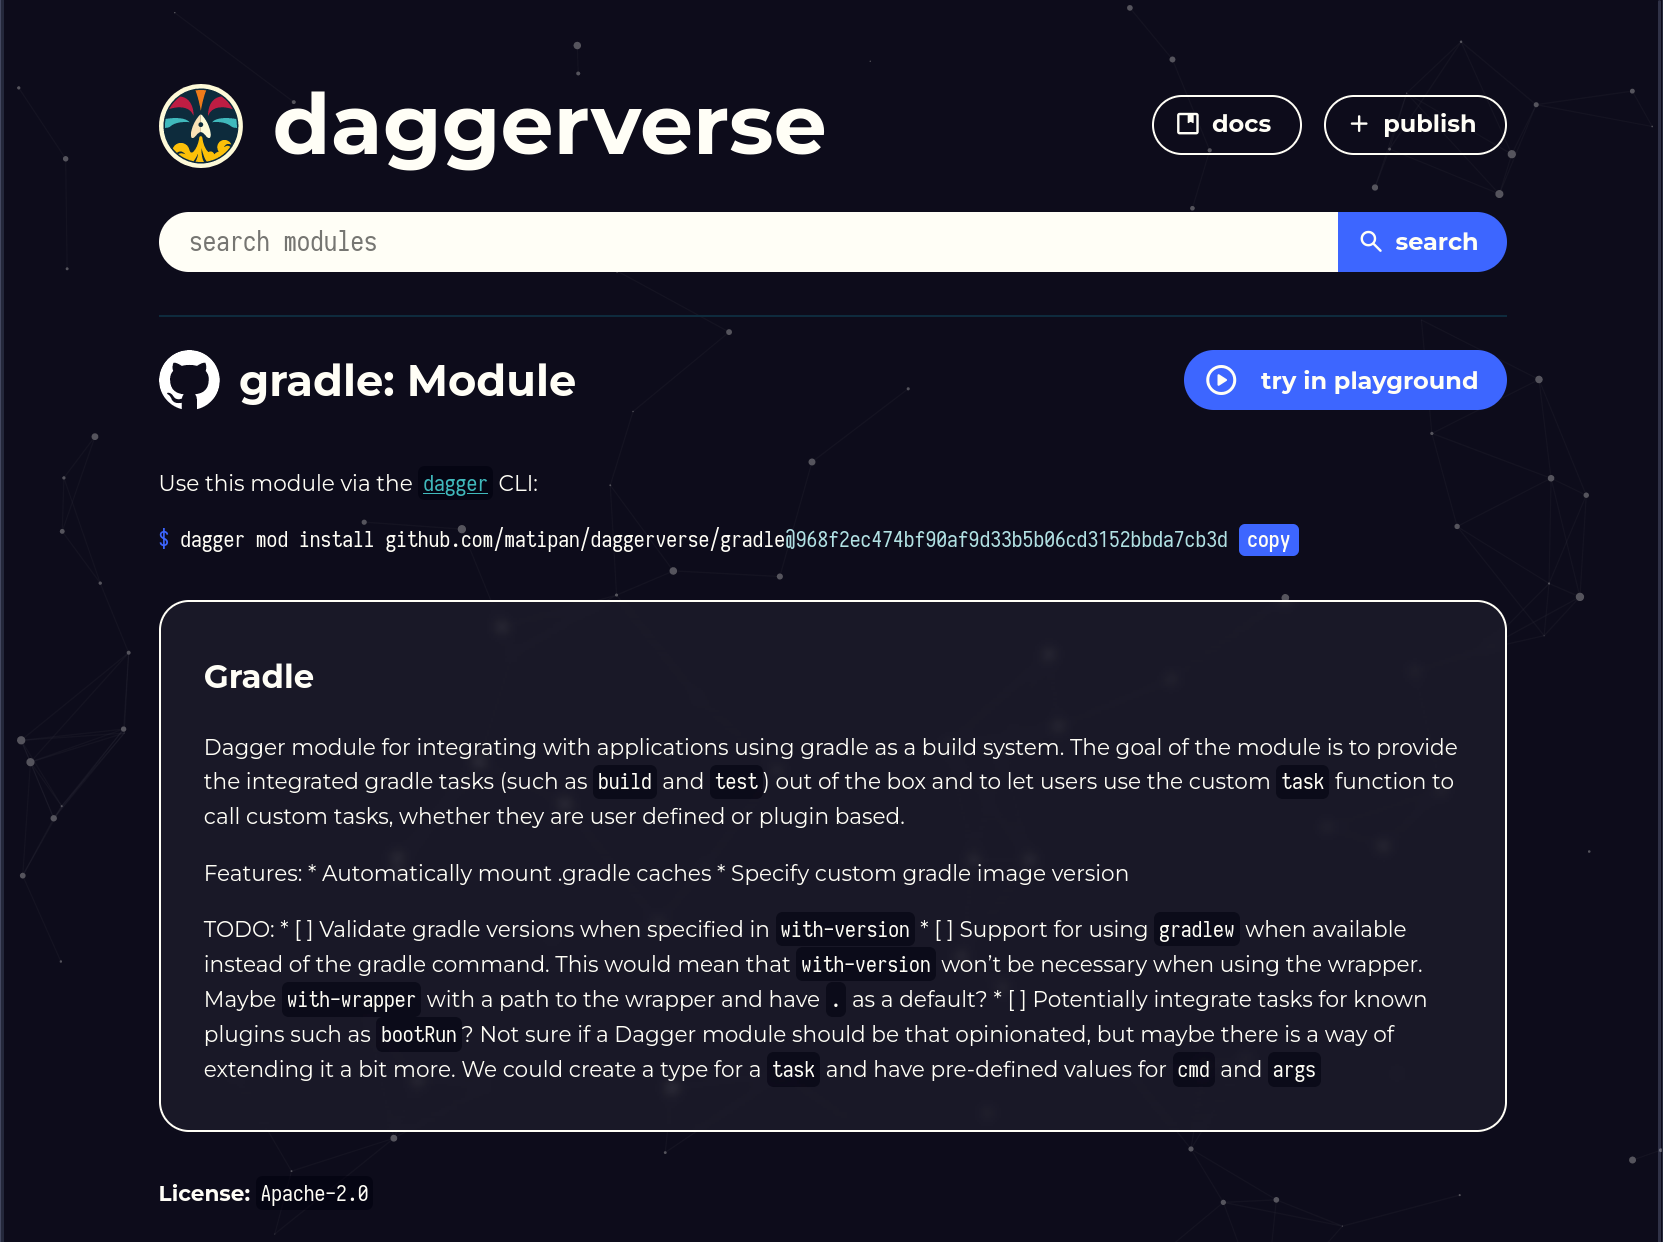
We can leverage this module to execute the build and test commands. To use it we simply have to import it by running dagger mod use github.com/matipan/daggerverse/gradle. If you inspect the module with dagger -m github.com/matipan/daggerverse/gradle functions you’ll see, among other things, that we can define what version of the gradle image to start from. In our case we are using the JDK 21. Let’s write our Build and Test functions with this in mind:
package main

import (
	"context"
	"fmt"
	"log"
)

var GradleVersion = "jdk21-alpine"

type GradleService struct {
	Source *Directory

	gradle *Gradle
}

func (m *GradleService) WithSource(src *Directory) *GradleService {
	m.Source = src
	return m
}

func (m *GradleService) Build(ctx context.Context) *Container {
	return m.getGradle(m.Source).Build()
}

func (m *GradleService) Test(ctx context.Context) *Container {
	return m.getGradle(m.Source).Test()
}

func (m *GradleService) getGradle(src *Directory) *Gradle {
	if m.gradle != nil {
		return m.gradle
	}

	m.gradle = dag.Gradle().
		FromVersion(GradleVersion).
		WithDirectory(src).
		WithWrapper()
	return m.gradle
}
Let’s go over what we did here:
WithSource: all Dagger calls run inside a sandboxed environment, so we need to explicitly provide things such as folders and env variables to the commands.getGradle: this function creates a reference to theGradlemodule, specifying the version and configuring it to use the gradle wrapper.BuildandTest: in this functions we simply obtain a reference to the Gradle module with our src directory mounted and run the specific operation there.
We can now try our build function by running dagger -m ./ci call with-source --src "." build:
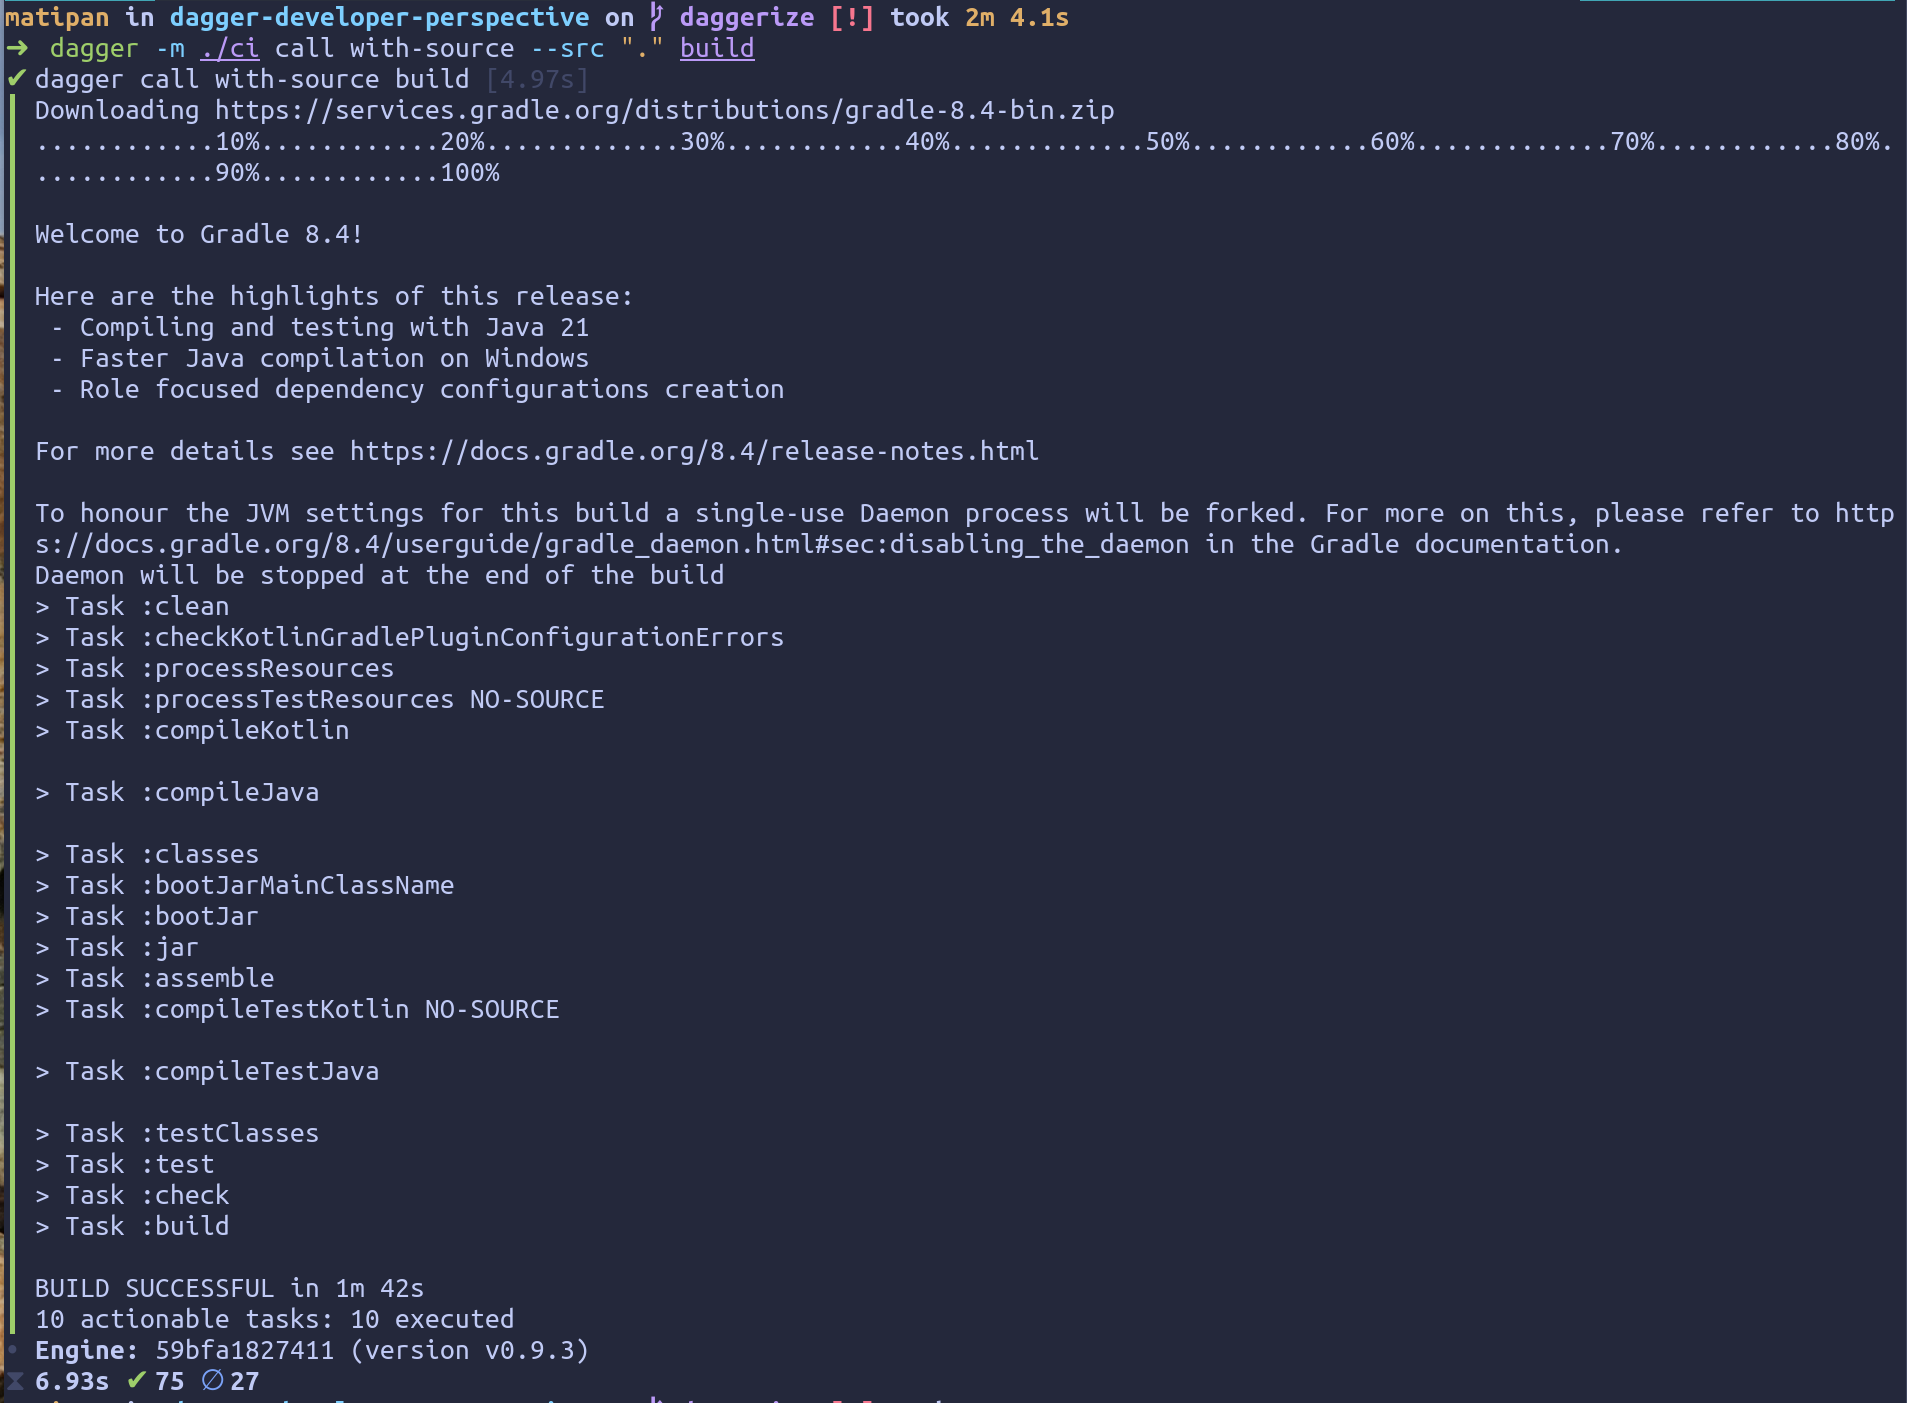
In the Build function we are only executing a ./gradlew clean build, we can’t really build a final image from the output of this command. With Dockerfiles we created a multi-stage build to separate our runtime from our build. With Dagger we can do the same thing:
func (m *GradleService) BuildRuntime(ctx context.Context) *Container {
	ctr, err := m.Build(ctx).Sync(ctx)
	if err != nil {
		log.Fatalf("build failed: %s", err)
	}

	return dag.Container().
		From("amazoncorretto:21.0.1-alpine3.18").
		WithExec([]string{"apk", "update", "&&", "apk", "--no-cache", "add", "ca-certificates", "curl", "tcpdump", "procps", "bind-tools"}).
		WithWorkdir("/app").
		WithFile("app.jar", ctr.File("build/libs/gradle-service-0.0.1-SNAPSHOT.jar")).
		WithEntrypoint([]string{"sh", "-c", "java $JAVA_OPTS -jar app.jar --server.port=80 --spring.profiles.active=default"})
}
You can see that from BuildRuntime we are calling the Build function defined previously. We then generate a new container that starts from amazoncorretto:21.0.1-alpine3.18 and mounts the application jar found in the container returned by build.
So far we’ve only done Build, BuildRuntime and Test. But we also want to run end to end tests and have everything integrated into Dagger. To do this we need a way to run the service and a MySQL server. Well, we are in luck. Dagger has native support for Services. With Dagger, we can define a container as a service and then use the dagger up command to start the service and its dependencies. All we have to do is write functions that return the *Service type:
func (m *GradleService) Service(ctx context.Context, sqlInitDB *File) *Service {
	runtime := m.BuildRuntime(ctx)

	return runtime.
		WithEnvVariable("DB_HOST", "mysql").
		WithEnvVariable("DB_PORT", "3306").
		WithServiceBinding("mysql", m.Mysql(ctx, sqlInitDB)).
		WithExposedPort(80).
		WithExec([]string{"sh", "-c", "java $JAVA_OPTS -jar app.jar --server.port=80 --spring.profiles.active=default"}).
		AsService()
}

func (m *GradleService) Mysql(ctx context.Context, sqlInitDB *File) *Service {
	return dag.Container().
		From("mysql:8.2.0").
		WithEnvVariable("MYSQL_ROOT_PASSWORD", "password").
		WithEnvVariable("MYSQL_DATABASE", "database").
		WithFile("/docker-entrypoint-initdb.d/db.sql", sqlInitDB).
		WithExposedPort(3306).
		AsService()
}
Lets break this code down:
- In the
Servicefunction we first call theBuildRuntimeto generate a container that has ourjarready to be executed. - We then create a new container that defines a mysql
ServiceBindingto whateverServicetheMysqlfunction returns. - The
Mysqlfunction returns MySQL 8 container with our seed file ready to populate the DB when it starts.
Now we can use the up command to start the service and its dependencies locally dagger -m ./ci up with-source --src "." service --sql-init-db "db/db.sql":

Dagger makes sure that the services are healthy before they connect to each other. All this runs in containers isolated in their own environments. This means that we can run this same command in other machines and expect it will work correctly.
To run the end to end tests using Dagger we can choose one of two approaches: i) containerize the execution of the tests and define it as a service connected to the others; ii) take advantage that tests are written in Go and simply call out to them as a library. Implementing the first one is quite straightfoward, we simply define a new function that uses the Go module from the Daggerverse and creates a container that is connected to the service:
func (m *GradleService) IntegrationTests(ctx context.Context, tests *Directory, sqlInitDB *File) (string, error) {
	return dag.Go().
		FromVersion("1.21-alpine").
		WithSource(tests).
		Container().
		WithServiceBinding("service", m.Service(ctx, sqlInitDB)).
		WithExec([]string{"go", "run", "main.go", "--endpoint", "service:80"}).
		Stdout(ctx)
}
In this function we expect to receive the directory that holds the tests, the database file used to seed the db and we return the output that the command generates. We can now use dagger’s CLI to call this function and run the tests, all containerized and defined within a single codebase:

The second approach is interesting to explore. Since our tests are written in Go, we could technically just import them as a library and execute that Go code from within the execution context of our module. Since that is also containerized, it is still re-usable. To be able to do this we would have to move the code of our tests inside the ci folder, since it is a go module, import it from our module and call the function that runs the tests:
import "main/test/orderlist"

...

func (m *GradleService) IntegrationTests(ctx context.Context, sqlInitDB *File) error {
	svc, err := dag.Host().Tunnel(m.Service(ctx, sqlInitDB)).Start(ctx)
	if err != nil {
		return err
	}
	defer svc.Stop(ctx)

	endpoint, err := svc.Endpoint(ctx)
	if err != nil {
		return err
	}

	return orderlist.Test(endpoint)
}
In this code we are importing the tests as a library, starting the service and the MySQL database, opening up a tunnel from the container of the service to the container our module is running on and then use the created endpoint to run the tests (the warning messages are from the Stop function, we can ignore them):
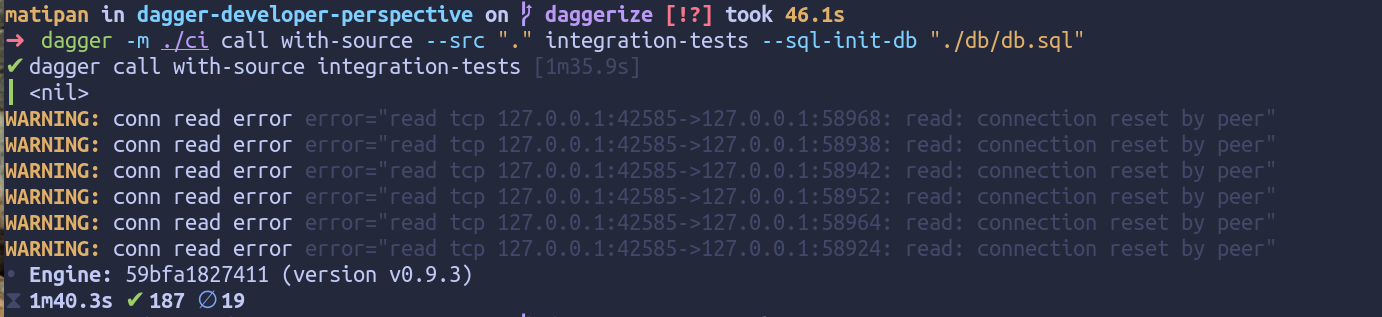
I wanted to show both approaches since you might prefer to write your end to end tests using a different language to the one used by your Dagger module. If this is the case, you can use the first approach of containerizing and executing a command there.
Building our CI workflow
Let’s put all of this together in our CI workflow. This is where Dagger shines in my opinion. We don’t have to do anything special to make sure this works in our CI environment. We just need to install the dagger CLI and run the exact same command developers run locally:
name: 'pull request'

on:
  pull_request:
    branches:
      - master
      - main
      - develop

jobs:
  build-and-test:
    runs-on: ubuntu-latest
    steps:
      - name: Checkout
        uses: actions/checkout@v3
      - name: Install Dagger CLI
        run: cd /usr/local && { curl -L https://dl.dagger.io/dagger/install.sh | sh; cd -; }
      - name: Test
        run: dagger -m ./ci call with-source --src "." test
      - name: End to end tests
        run: dagger -m ./ci call with-source --src "." integration-tests --tests "./tests" --sql-init-db "./db/db.sql"
And we are done! Less YAML and no surprises. Here is the pipeline working as we expected:

Thoughts
Through the use of code and Dagger’s capabilities for running containerized services and commands we were able to build our entire CI workflow in a programmatic way inside a single Go file. Here is an overview of what we needed to write in order to make this work:
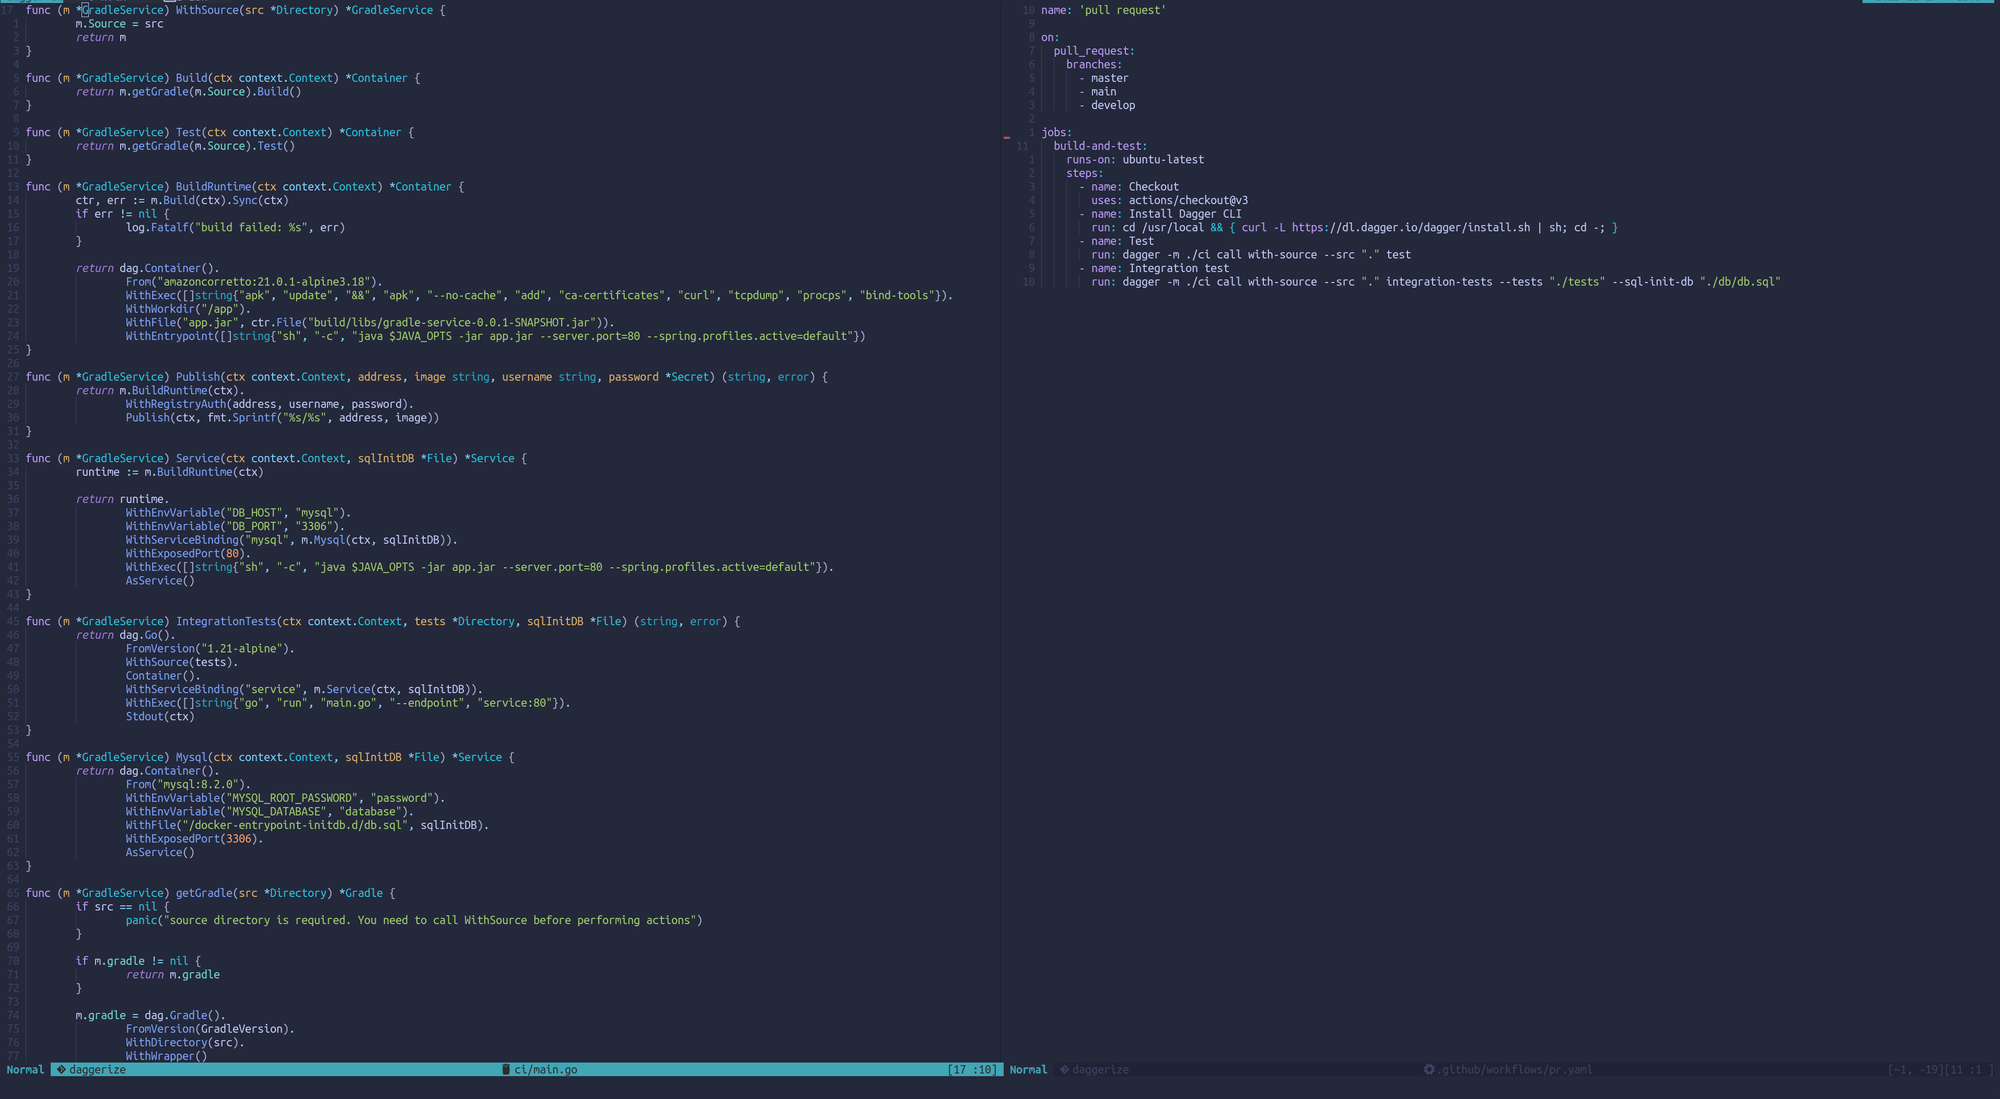
Notice how we wrote all the important bits directly in code, no need for YAML and config files like Dockerfiles. Even though there are a few rough edges in Dagger (mainly due to how new it is) I personally believe this is a much better experience than what we had before. We wrote the entire definition of our CI using code and we were able to validate every single part of it locally. If we compare to how we could run the tests before, we now have an DX that developers can definitely use: dagger -m ./ci call with-source --src "." test.
Conclusion
In this blog post we compared the experience of using traditional tools like docker-compose with Dagger for building a CI workflow that builds and tests a Java-Gradle service. We saw how with docker and docker-compose we had to write a lot of configuration files and YAML to glue things together in a way that was not easily reproducible. Meaning that developers would run things locally in a way that would be different to how the CI would work. However, with Dagger we saw that it was no longer necessary to write this config and YAMl files. Instead, we built everything using Go code, we leveraged Dagger’s native support for running services and we glued everything together in a programmatic but still declarative way. We were then able to run this code in the CI in the exact same way that we run it locally.
I personally believe there is still a bit of a learning curve to Dagger. It requires a mindset shift in order to stop thinking that this processes should be written and defined with configuration “languages” such as YAML and dockerfile. However, I think Dagger provides a lot of power with it’s code-first approach and its ecosystem that will only get bigger and better. It’s interesting how easily it integrates with existing CI systems and gives a developer experience that allows us to treat pipelines as software and write them using our editors and IDEs.

