The title says it, motion tracking turret using only Go, ready to have some func?
This blog post will be divided into three main parts: Motion detection with GoCV, Controlling servo motors with Gobot and Putting it all together. In the first part, we build a lightweight motion detection algorithm that can run on low-power devices such as the RPi. In the second part we will show how to control servo motors with Gobot from the Raspberry Pi and in the last part we’ll explain how to go from detecting an object on an image to telling exactly the angles in which the servos need to move in order to track it.
For this blog post I assume that you already know Go. If you don’t but want to learn, there are lots of resources out there. Anyway, a good and simple place to start is the Go tour.
This entire project is hosted on Github.
Before we start let me show you what you will get once you are done if you follow this series of blog posts:

Just kidding, this is what you will have(for real this time):
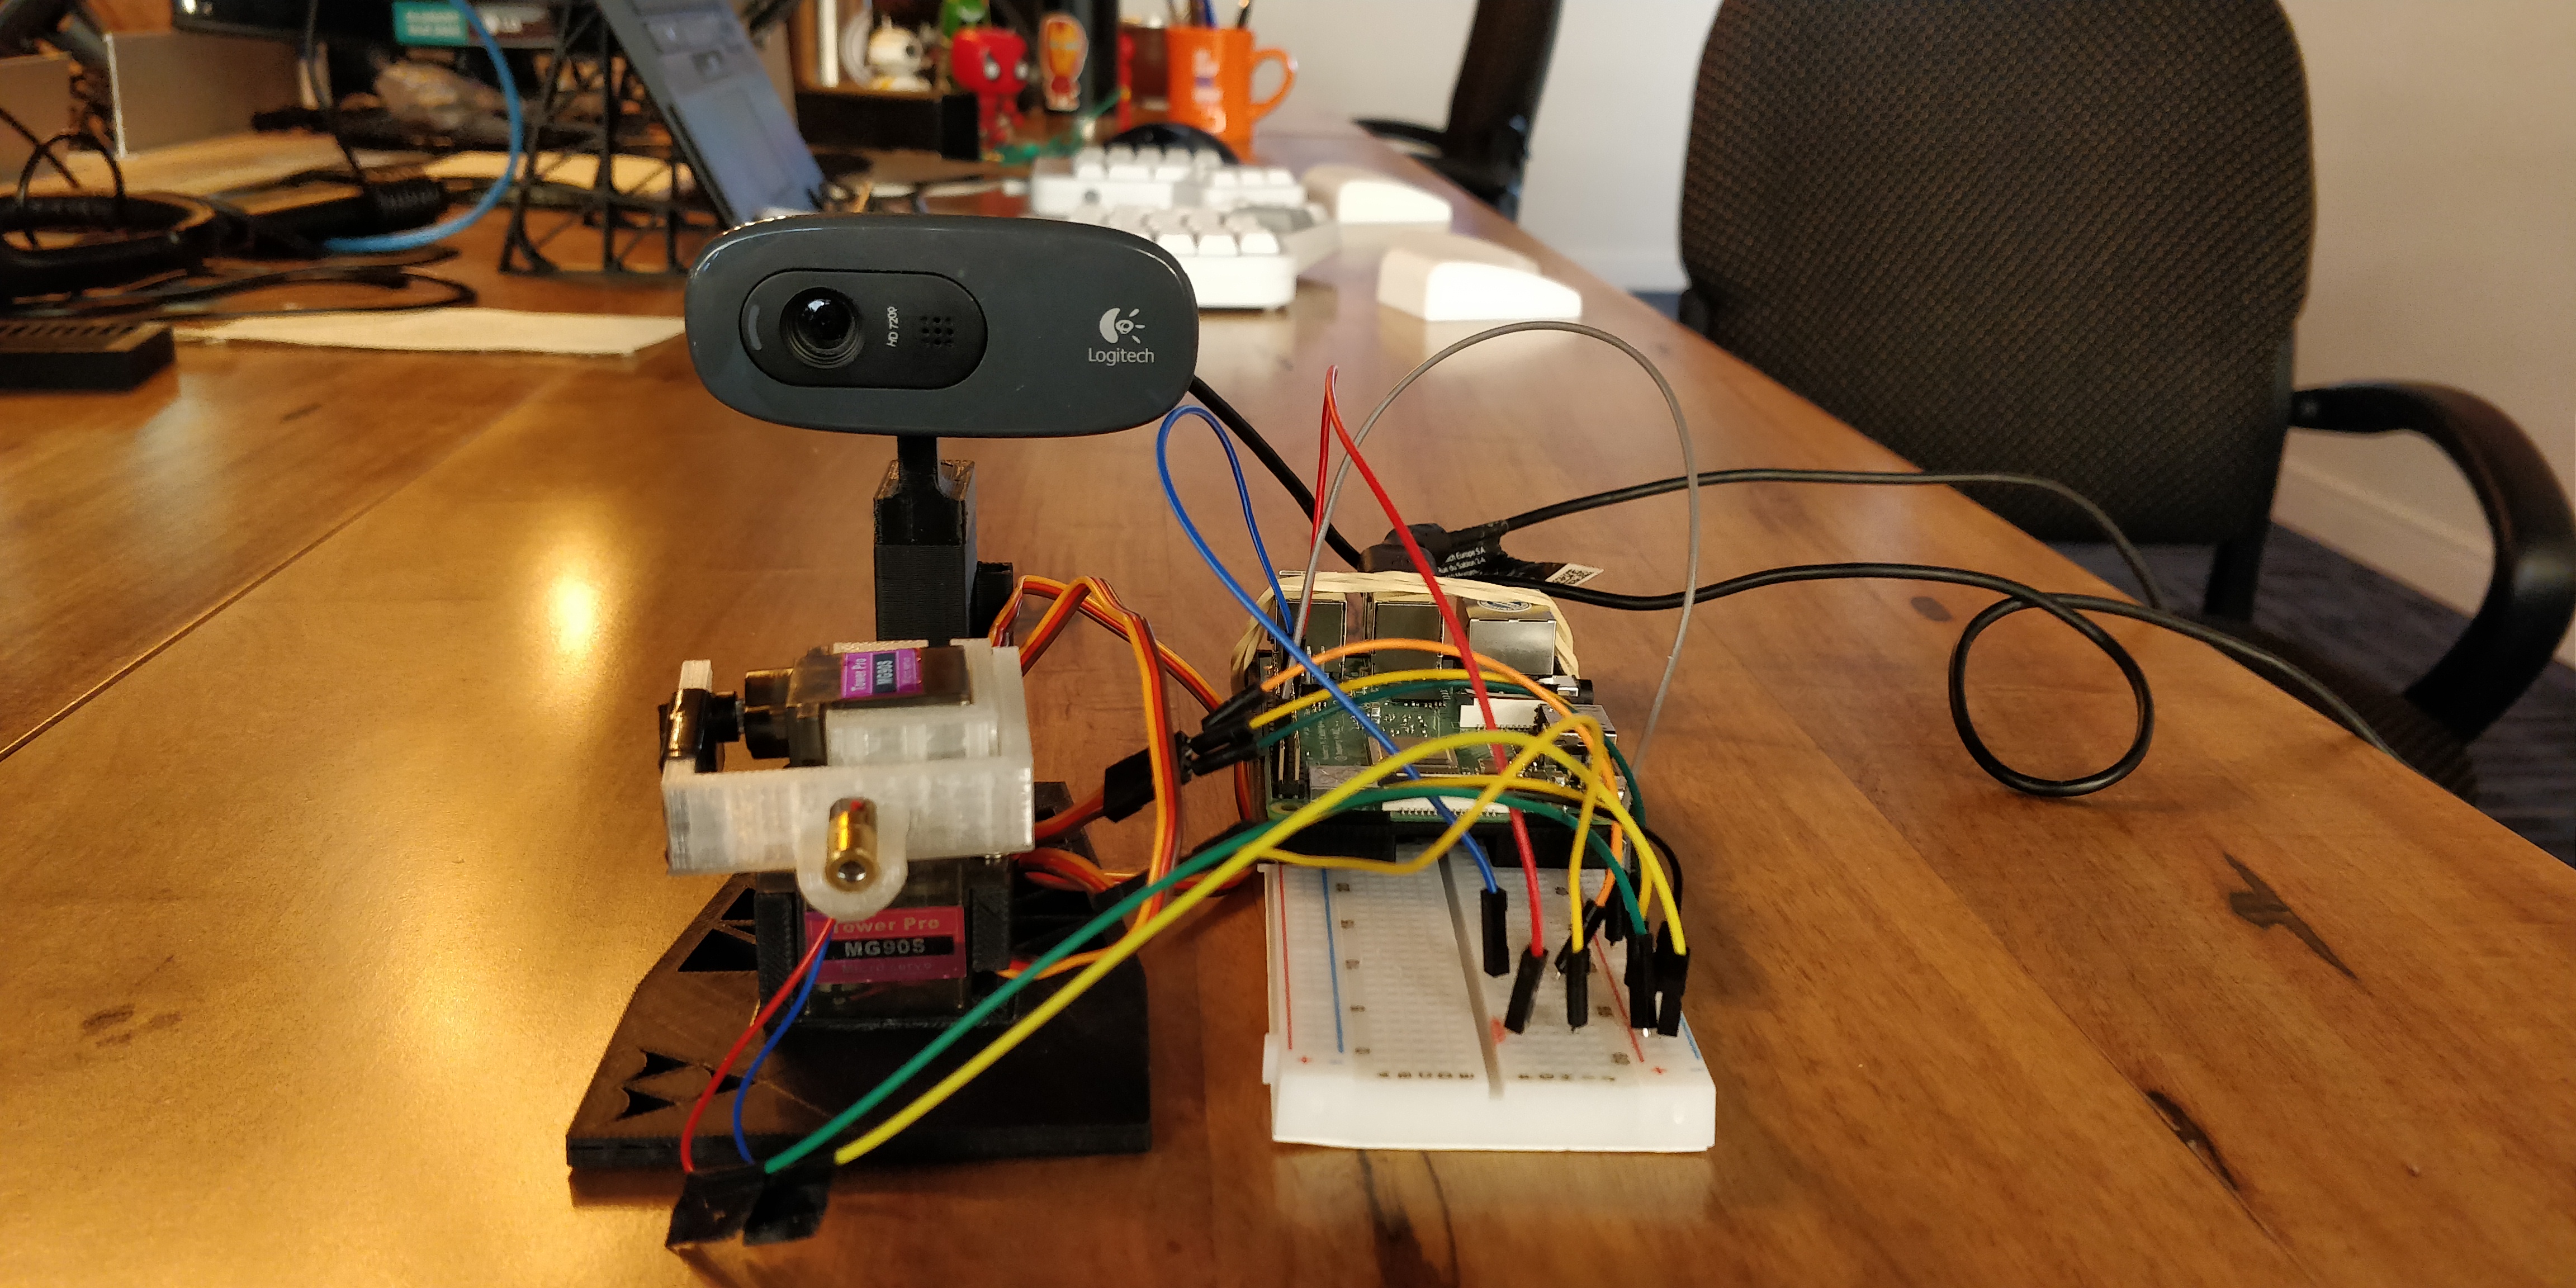
Looks lethal, right? Lets dive in and see how we can build this sophisticated piece of machinery. Starting of with the list of things you’ll need to follow this tutorial:
- Two MG90 tower pro micro servos: MercadoLibre - Amazon.
- One Raspberry Pi 3 B+ with Raspbian installed: MercadoLibre - Amazon.
- A bunch of cables and a breadboard: MercadoLibre - Amazon.
- One 5V and 2A power source: MercadoLibre - Amazon.
- Either a 3D printer or a shop that can print the case(although you could build your own)
- C270 Logitech web camera is what I used, but any other model should work: MercadoLibre - Amazon.
- 5V laser(it’s not the best fit but we’ll probably update it in the future): MercadoLibre - Amazon.
- Bonus: soldering iron if you want to build your own PCB or solder some cables
Note: if you want to use different things go ahead, but I don’t guarantee they will work with the same code.
Motion detection with GoCV
You might ask what is this GoCV thing he’s talking about? Well, first lets explain what OpenCV is. OpenCV is a library for computer vision, better yet, is the library for computer vision. It has a whole lot of functions, types and interfaces that allow us to manipulate images by applying already implemented filters and image-manipulation algorithms. It’s a really cool project, you should definitely check it out.
The thing is that OpenCV is implemented in C++ and it has interfaces for Java and Python. But don’t be afraid my gopher-friend, the Hybridgroup has got us. Along with other libraries they implemented a Go wrapper for OpenCV. They did this by using CGo to call C code from Go code and that C code calls the corresponding C++ code of OpenCV. It’s really efficient and works pretty well. Lucky for us, this wrapper is really fast and most of the OpenCV functionality is already there.
Installation
We are going to be running this program on a Raspberry Pi but since Go is nice and lets us do cross-compilation we will only install GoCV and OpenCV on our development machine. So head over to GoCV’s how to install section and follow the steps required for your platform. It’ll take a while so I’ll wait here till you are back.
Extra: if you want to debug and change the code while testing in the Pi you can install Go and after that install GoCV for Raspbian following this instructions.
Motion detection algorithm
You back? Awesome. Lets explain just a bit about how the motion detection algorithm works so that you understand what it’s going on and can tweak it to your needs.
Since we are going to run this on the Pi, we are not going to use a fancy already trained neural network with near zero error margin. Instead we will do something relatively simple:
- When the program starts we take a picture, convert it to gray and blur it using a Guassian filter. That first frame will be considered our background so try not be there when it starts.
- Constantly read new frames, perform the same conversion we did before, compute the absolute difference between the first frame and the current frame, apply a threshold to the image so that we create a binary image where the area of movement will look really bright. Finally, dilate the resulting binary image and find the biggest contour. We will consider that contour our area of movement.
Once all these filters were applied our image will look something like this:
Time to implement this using GoCV.
First, lets write a program that opens the feed of a camera to read images, stores the first frame and starts reading new frames non stop while showing them on a window(error handling for now is out of scope). I’m using device 0, to check which devices you have available you can do ls /dev/video*:
package main

import (
	"log"
	"gocv.io/x/gocv"
)

var (
	firstFrame = gocv.NewMat()
	frame = gocv.NewMat()
)

func main() {
	window := gocv.NewWindow("Motion")
	video, _ := gocv.OpenVideoCapture(0)

	video.Read(&firstFrame)
	for {
		video.Read(&frame)
		window.IMShow(frame)
		if window.WaitKey(1) == 27 {
			break
		}
	}

	video.Close()
	window.Close()
	firstFrame.Close()
	frame.Close()
}
If you run this program you’ll basically be streaming from your camera to the window that just opened. To quit this window you can hit escape, that is what that if window.WaitKey(1) == 27 is doing.
Since each frame we read(including the first one) needs to be converted to a gray-scale image first and blurred later, we are going to write a function that does this for us:
func convertFrame(src gocv.Mat, dst *gocv.Mat) {
	gocv.Resize(src, &src, image.Point{X: 500, Y: 500}, 0, 0, gocv.InterpolationLinear)
	gocv.CvtColor(src, dst, gocv.ColorBGRToGray)
	gocv.GaussianBlur(*dst, dst, image.Point{X: 21, Y: 21}, 0, 0, gocv.BorderReflect101)
}
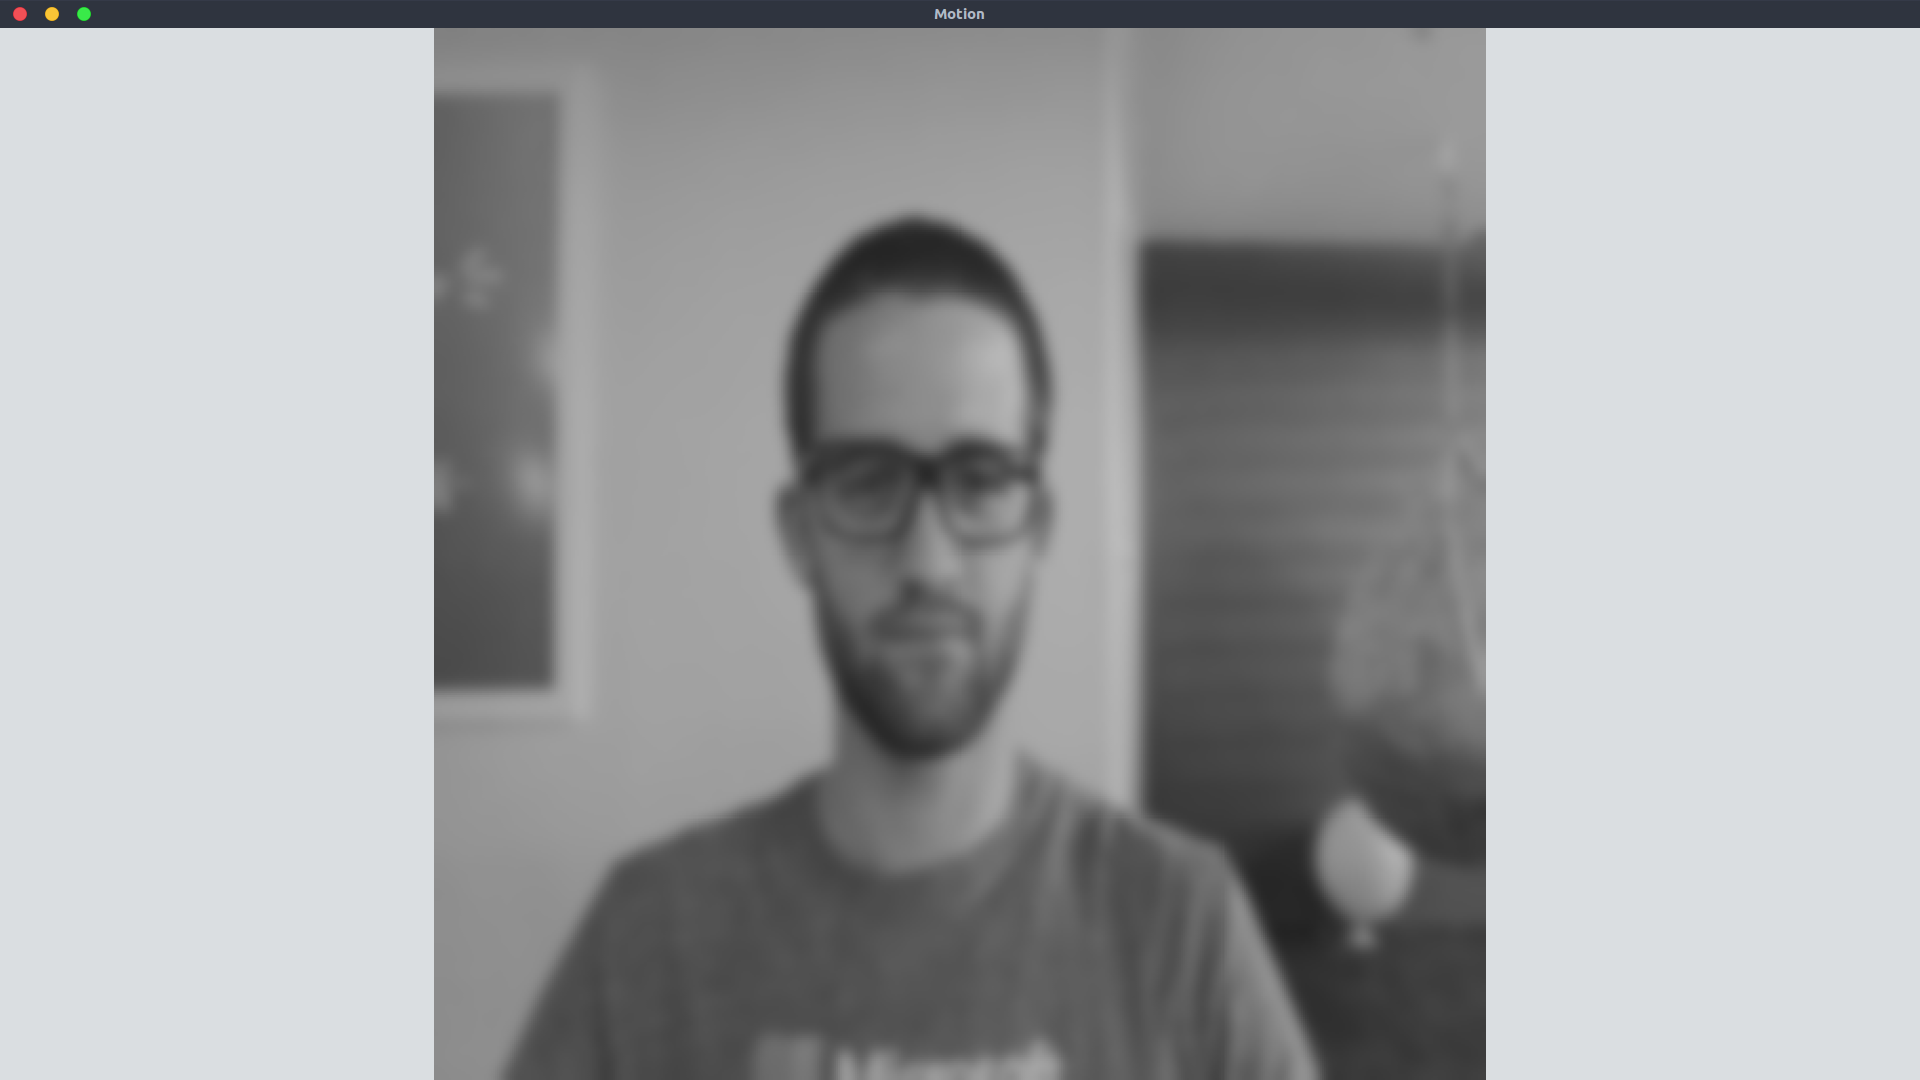
Lets walk through that function. First, we are resizing the image with the Resize function since working with squared images is a lot easier and faster. Then we use the CvtColor function to convert the image to gray-scale and finally, we apply the GaussianBlur to the gray image so that we get the blurred image we wanted.
Now rewrite your previous program to call this function each time we read a new frame(including the first one). Basically add the line convertFrame(img, &img) after each video.Read, where img is the gocv.Mat you used to read a new frame. If all went well, then the window should display images that look kinda like this:
We have the first frame and the current frame already converted to gray scale and blurred, now we need to compute the absolute difference between those two and apply the required threshold and dilation to the resulting difference:
gocv.AbsDiff(firstFrame, frame, &difference)
gocv.Threshold(difference, &difference, 50, 255, gocv.ThresholdBinary)
gocv.Dilate(difference, &difference, kernel)
The name of this functions are a bit self explanatory. AbsDiff computes the absolute difference between the first frame and the new frame and stores that difference on the difference mat. Threshold converts the gray image to a binary image by applying a fixed-level thresholding to each pixel and finally, Dilate dilates the image by using the specific kernel element, in this case our kernel is empty.
The best thing you can do to understand all this better is to read the docs for each function and play around with the values that they receive, for example, what happens when you change those two magic numbers that the Threshold function receives? What about the type of the threshold?
If you are curious here, here are most of the different types of thresholds that you can apply to an image:
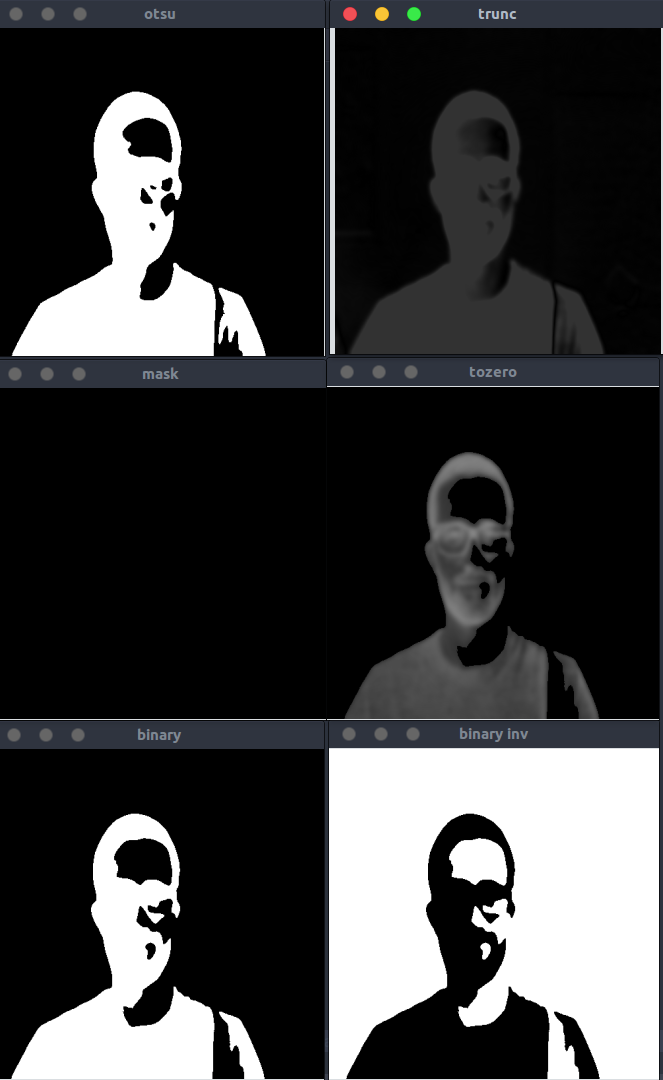
Lets add those filters to our code and we’ll display the difference mat instead of the normal frame mat we’ve been displaying so far:
package main

import (
	"image"

	"gocv.io/x/gocv"
)

var (
	firstFrame = gocv.NewMat()
	frame      = gocv.NewMat()
	difference = gocv.NewMat()
	kernel     = gocv.NewMat()
)

func main() {
	window := gocv.NewWindow("Motion")
	video, _ := gocv.OpenVideoCapture(0)

	video.Read(&firstFrame)
	convertFrame(firstFrame, &firstFrame)
	for {
		video.Read(&frame)
		convertFrame(frame, &frame)

		gocv.AbsDiff(firstFrame, frame, &difference)
		gocv.Threshold(difference, &difference, 50, 255, gocv.ThresholdBinary)
		gocv.Dilate(difference, &difference, kernel)
		window.IMShow(difference)
		if window.WaitKey(1) == 27 {
			break
		}
	}

	video.Close()
	window.Close()
	firstFrame.Close()
	frame.Close()
}

func convertFrame(src gocv.Mat, dst *gocv.Mat) {
	gocv.Resize(src, &src, image.Point{X: 500, Y: 500}, 0, 0, gocv.InterpolationLinear)
	gocv.CvtColor(src, dst, gocv.ColorBGRToGray)
	gocv.GaussianBlur(*dst, dst, image.Point{X: 21, Y: 21}, 0, 0, gocv.BorderReflect101)
}
Try running this program by first having the camera point directly at you when the program first starts. What happens when you move around? Or even better, what happens when you leave the chair? You are going to see yourself all bright, but you aren’t there, are you? What kind of sorcery is this!!??
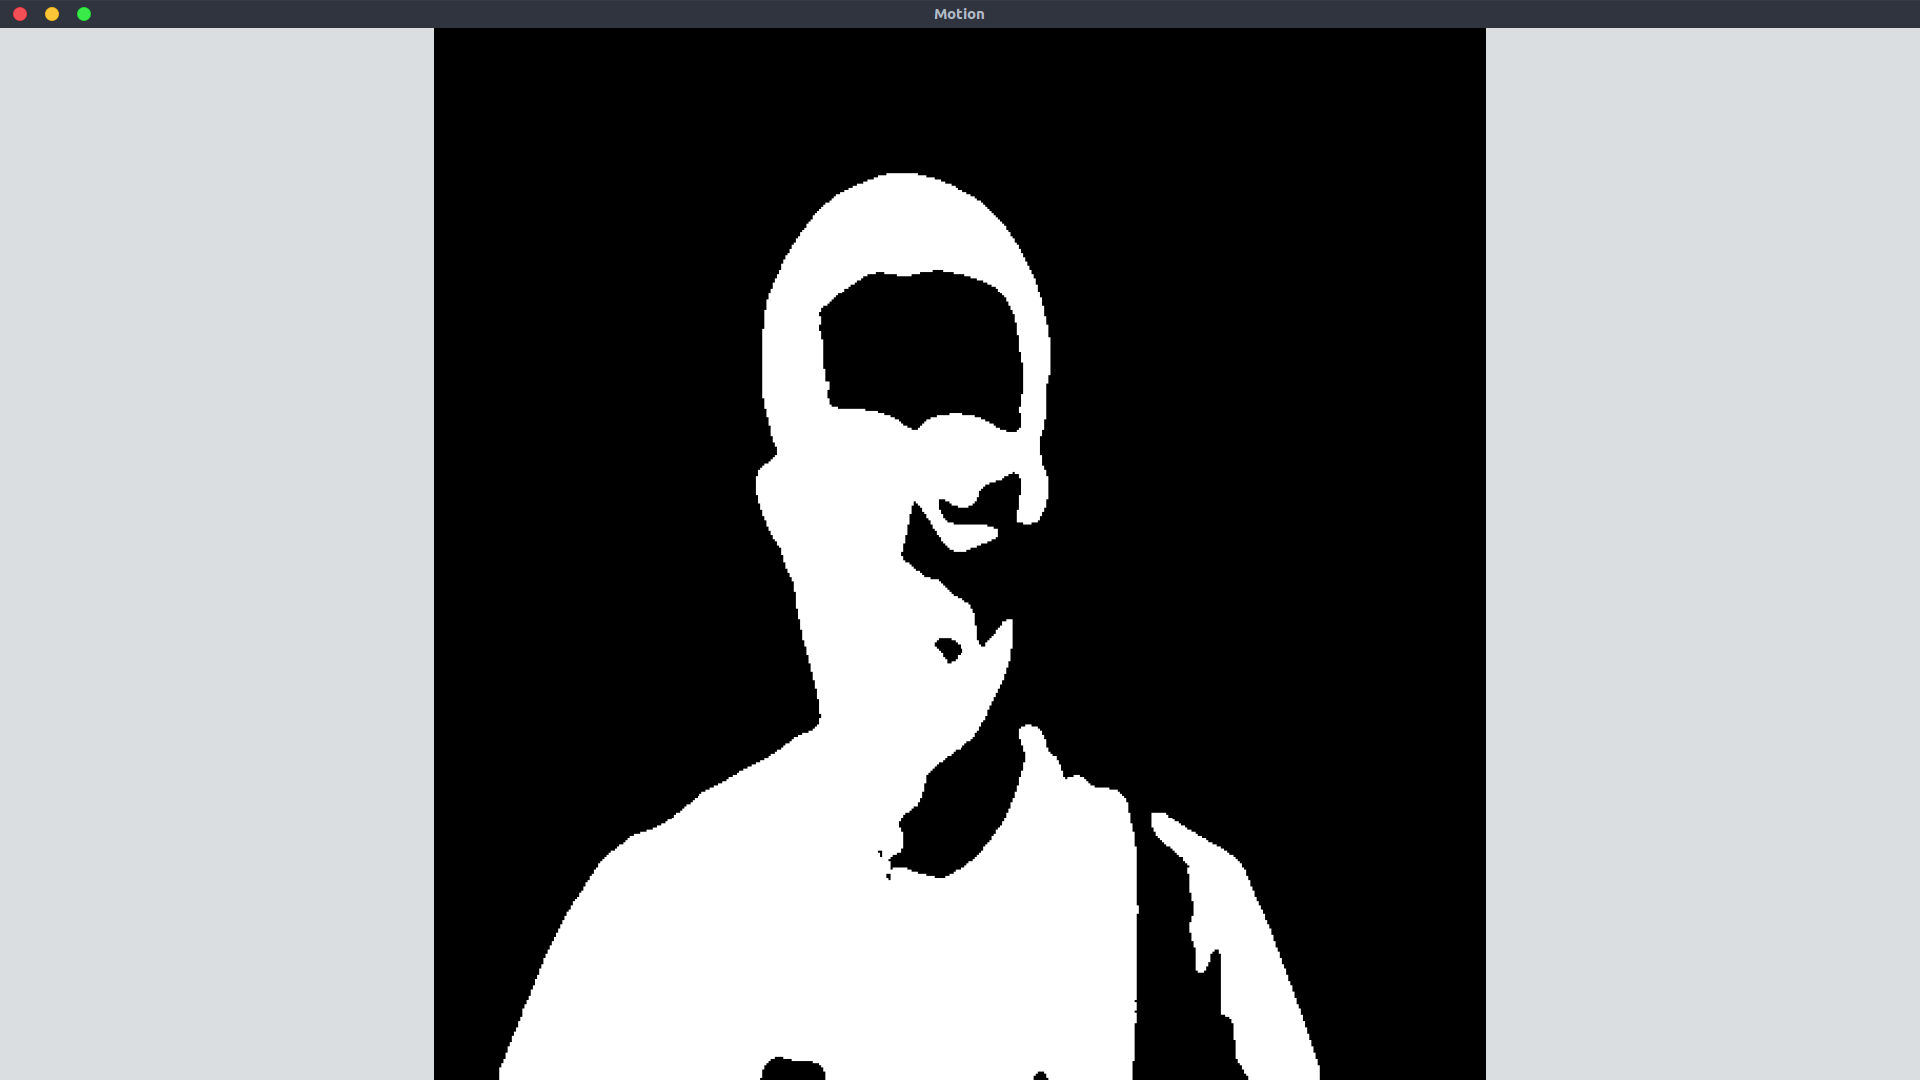
Well that’s what it’s supposed to happen. Remember that all the filters we are applying are over the absolute difference of the first frame and the current frame. This means that if you are on the first frame you will be part of the “background” and whenever you leave the image there will be a difference on that area since instead of you sitting there the image will pick up everything that was behind you. This is why you see yourself sitting there even though you are not. It’s either that or magic, who knows.
Try running this code without you being there for the first frame. Once the program is running pop in front of the camera, you should be looking into an image that resembles this:
OK, we have our big bright spot on our image, now is time that we find some contours. I have to admit I thought this was going to be really hard, but thanks to GoCV’s FindContours function all we have to do is call it, iterate over all the contours and pick the contour that has the biggest area. Lets write a function that does exactly that but it also makes sure that the areas are bigger than some minimum:
// bestContour obtains the biggest contour in the frame provided is bigger
// than the minArea.
func bestContour(frame gocv.Mat, minArea float64) []image.Point {
	cnts := gocv.FindContours(frame, gocv.RetrievalExternal, gocv.ChainApproxSimple)
	var (
		bestCnt  []image.Point
		bestArea = minArea
	)
	for _, cnt := range cnts {
		if area := gocv.ContourArea(cnt); area > bestArea {
			bestArea = area
			bestCnt = cnt
		}
	}
	return bestCnt
}
We will call this function with the difference mat, since that is the one where we applied all the filters. After this function ends, we will either have the biggest contour that was found on the image or nothing at all. We can see whether we have results or not by checking the len of the []image.Point array that was returned. If we have a contour then we will draw a rectangle on the base image to show were was the area of movement found:
package main

import (
	"image"
	"image/color"

	"gocv.io/x/gocv"
)

var (
	firstFrame = gocv.NewMat()
	frame      = gocv.NewMat()
	gray       = gocv.NewMat()
	difference = gocv.NewMat()
	kernel     = gocv.NewMat()

	motion    = gocv.NewWindow("Motion")
	threshold = gocv.NewWindow("Threshold")

	rectColor = color.RGBA{G: 255}
	textColor = color.RGBA{B: 255}

	statusPoint = image.Pt(10, 20)
)

func main() {
	video, _ := gocv.OpenVideoCapture(0)

	motion.ResizeWindow(500, 500)
	threshold.ResizeWindow(500, 500)
	motion.MoveWindow(0, 0)
	threshold.MoveWindow(500, 0)

	video.Read(&firstFrame)
	convertFrame(firstFrame, &firstFrame)

	for {
		video.Read(&frame)
		convertFrame(frame, &gray)

		gocv.AbsDiff(firstFrame, gray, &difference)
		gocv.Threshold(difference, &difference, 50, 255, gocv.ThresholdBinary)
		gocv.Dilate(difference, &difference, kernel)
		cnt := bestContour(difference.Clone(), 5000)
		if len(cnt) == 0 {
			if imShow() {
				break
			}
			continue
		}
		rect := gocv.BoundingRect(cnt)
		gocv.Rectangle(&frame, rect, rectColor, 2)
		gocv.PutText(&frame, "Motion detected", statusPoint, gocv.FontHersheyPlain, 1.2, textColor, 2)
		if imShow() {
			break
		}

	}

	video.Close()
	motion.Close()
	threshold.Close()
	firstFrame.Close()
	gray.Close()
	difference.Close()
	frame.Close()
}

func imShow() bool {
	motion.IMShow(frame)
	threshold.IMShow(difference)
	return motion.WaitKey(1) == 27 || threshold.WaitKey(1) == 27
}

func convertFrame(src gocv.Mat, dst *gocv.Mat) {
	gocv.Resize(src, &src, image.Point{X: 500, Y: 500}, 0, 0, gocv.InterpolationLinear)
	gocv.CvtColor(src, dst, gocv.ColorBGRToGray)
	gocv.GaussianBlur(*dst, dst, image.Point{X: 21, Y: 21}, 0, 0, gocv.BorderReflect101)
}

// bestContour obtains the biggest contour in the frame provided is bigger
// than the minArea.
func bestContour(frame gocv.Mat, minArea float64) []image.Point {
	cnts := gocv.FindContours(frame, gocv.RetrievalExternal, gocv.ChainApproxSimple)
	var (
		bestCnt  []image.Point
		bestArea = minArea
	)
	for _, cnt := range cnts {
		if area := gocv.ContourArea(cnt); area > bestArea {
			bestArea = area
			bestCnt = cnt
		}
	}
	return bestCnt
}
We made a lot of changes in that code, lets walk through each of them. First off, we now have two windows instead of one, why? Well, we are going to be displaying two different types of images. In the motion window we will display the normal image with the rectangle drawn on top of the area of motion(if there is any). In the threshold window we will show the difference mat we’ve been showing so far. We also did a few resizes and moved the windows over so that they are displayed side by side.
Since now we want to preserve the colors of the images we are reading, we can not use the same frame mat when we call convertFrame. This is why we have the new gray mat that we use for the conversion.
The most important change of the previous code is right here:
cnt := bestContour(difference.Clone(), 5000)
if len(cnt) == 0 {
	if imShow() {
		break
	}
	continue
}
rect := gocv.BoundingRect(cnt)
gocv.Rectangle(&frame, rect, rectColor, 2)
gocv.PutText(&frame, "Motion detected", statusPoint, gocv.FontHersheyPlain, 1.2, textColor, 2)
First, we call the bestContour function to obtain the biggest area of movement. If there are no results, we simply call the new imShow image that displays the images without drawing anything on them. But if we have results then we first have to find the rectangle of that area using the BoundingRect function, once we have that we simply draw the rectangle on our image with Rectangle and display the “Motion detected” text on our image.
If all went well, when you run this code and pop in front of the camera you should have something similar to this:
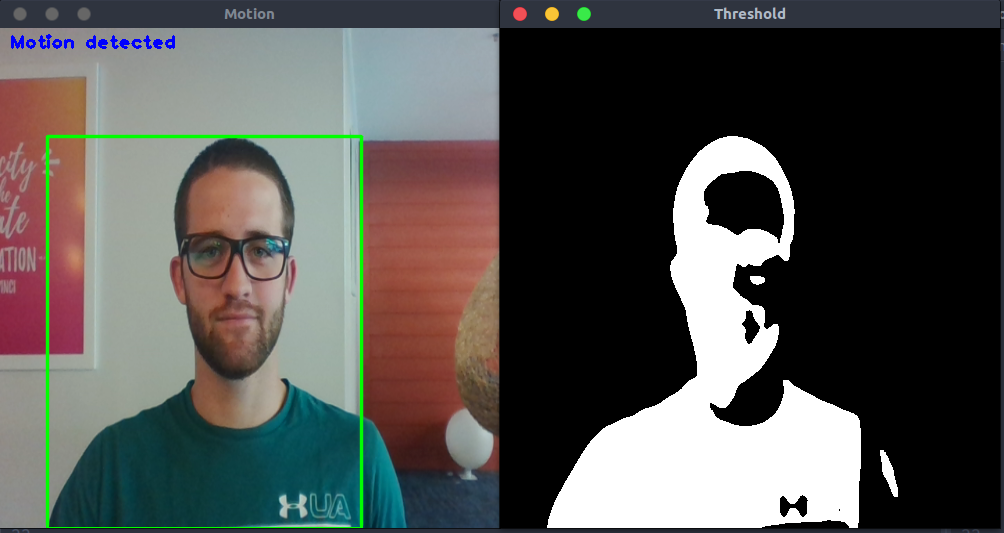
And voila! You have motion detection! Don’t go out and celebrate with a beer yet. We need to compile this to a binary that can run on the RPi, move that binary there and run it. In order to see this program running on the raspberry pi, you will need to have a display connected to it.
You can compile the binary for the RPi with the following command:
GOOS=linux GOARCH=arm GOARM=5 go build
Once you have your binary, you can send it over with scp:
scp <USER>@<RASPBERRY IP>:<DIRECTORY ON THE PI> <BINARY-NAME>
Change those parameters accordingly and run the command. SSH into the RPi and run the binary, if you have a video camera connected to the Pi that can be identified with the same ID you’ve been using, then you should see the same image you saw when you ran this program on your development machine.
Congrats! Now you can go and have some beers!

Conclusion
On this blog post you saw how to build a simple and lightweight motion detection program with GoCV and how to compile and run that on the raspberry pi. The idea is to connect two servos and make them follow the area of movement. All that will be explained in Part 2 and Part 3 of this blog post, so stick around for that!
Thank you!